Marketing > Underwriting
Applications are added and completed for submission to carriers on the Marketing screens.
Quickly navigate to procedures included in this topic by clicking one of the links below:
To Add a Marketing Policy
To Navigate Through the Forms
To Add a Marketing Policy
- On the Primary menu, click SEARCH. Search for the appropriate client.
- Click the Details
 icon next to the client for which the marketing policy will be created.
- On the Client menu, click MARKETING. If
no marketing policies exist, a dialog box will display:
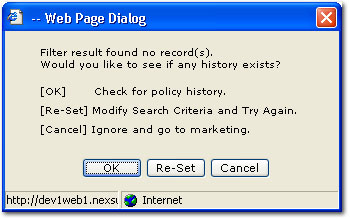
- Click OK to check for policy history.
Or
Click Re-Set to modify the search filter criteria and search again.
Or
Click Cancel to add a new marketing policy.
Note: If marketing policies are available, a new marketing policy can be added through SERVICING > Marketing. If the correct marketing policy is not found on the history tab, click MARKETING on the Client menu again. The dialog box is displayed again, click Cancel.
- Once the new marketing policy is open, the underwriting tab is displayed.

In the policy header, contains each of the following:
- Policy Type / Primary State: The Policy Type is displayed showing either Monoline or Package. The Primary State for the policy can be selected.
- Issuing Co: Select the issuing company name from the list box if known. Once a name is selected for the Issuing company, the Admitted check box will be displayed.
- Admitted: The Admitted check box is displayed to indicate wether or not the carrier selected is admitted in the state selected for the policy.
- Billing Co: Select the billing company name from the list box if known.
Note: Click the  button to expand the Issuing Co and Billing Co field to view full names.
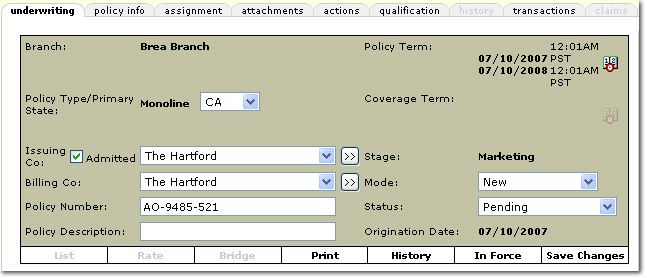
- Policy Number: Leave the policy number as unassigned as the policy does not yet exist.
- Policy Description: Enter a description to categorize the policy. This description can only be modified from the underwriting tab and will remain with the policy.
- Policy Term: The policy term defaults to one year from today's date. To change the policy term dates, click the Calendar
 icon to select new dates. Use the Selecting a Policy Term guidelines to complete the Assign Date and Time dialog box.
- Coverage Term: Coverage term dates are not active in marketing.
- Stage: Identifies the current stage of the policy. Nexsure defines the Stage automatically, such as: Marketing
or Policy stage.
- Mode:
The Mode identifies the policy as: New, New on Existing, Renew, or Re-New-Co.
Note: The New on Existing mode is available for selection after adding a new marketing application or renewing a policy. The New on Existing mode helps identify new business on an existing client vs. new business on a new client.
- Status: Once the policy has been submitted to the carrier, use the Status type to denote where in the quoting process the application stands.
- Origination Date: The policy term effective date is displayed as the Origination Date upon placing the policy in force or binding the policy. Once the policy is placed in force, the Origination Date will remain static throughout the life of the policy. This date can assist in the tracking of the retention of existing customers as they are migrated to new divisions within a customer's organization as well as tracking the retention of acquisition business.
- On the Navigation Toolbar, click Save Changes. New options are added to the Navigation Toolbar and below the policy header.
- The following options are available on the Navigation Toolbar:
- Print: Print the marketing application once it has been added.
- History: Move the marketing
policy to history when the marketing policy is no longer active or needed.
- In Force: This option moves the policy from marketing to active,
making the policy a current In Force or Bound policy status. Once a policy
is in force, changes may only be made through SERVICING.
- Save Changes: Saves any additions or changes made to the underwriting tab.
- The following links are available:
- [Import]: Import the client’s data into the file
from outside programs such as rating vendors.
- [ACORD XML]: Import or export XML data.
- [Supplements]: After all applications are added, any supplemental forms can then be added.
- [Add Application]: New Application Selection dialog box will be displayed.
Note: The [Template] link becomes available once an application has been added and the form has been accessed. Templates can be created or used to help populate applications.
- Under the policy header, click [Add Application]. The New Application Selection dialog box is displayed.

- In the Form Standard list, select the appropriate Form Standard. Available selections are:
- In the State list, make a selection if necessary. The default is the state from the primary location on the client profile. The state selection determines what forms will be displayed for the lines of business.
- In the Type list, make a selection if necessary. The default is the client type selected when the card file was created.
Important: The options available in the Type list are dependent on the staff member's security rights template. If Business Types are set up in the security rights template then only the selected Business Types will be displayed in the Type list for the opportunity. If Allow Override is selected in the security template Business Types tab, then all available business types will be displayed. For more information about Business Types in the security templates, see the User Rights Templates topic.
- In the Lines of Business list, select the appropriate line of business for the application. The selections available are based on the selections made in the Form Standard, State and Type lists.
- In the Available Applications box, select the appropriate application. The description of the form selected will display below the Available Applications box.
- In the Nexsure Application Helper section, select one of the following options:
- Basic Pre-fill: Selected by default and will pre-fill basic client information.
- Pre-fill from other application: Select an application (same line of business) that has previously been completed to pre-fill information to the new application.
- Blank Application: Pre-fill nothing to the application.
- Click Next. Any forms selected to pre-fill are displayed on the underwriting tab.

Tip: Click the Description of a form to view the form and any notes regarding form usage or completion.
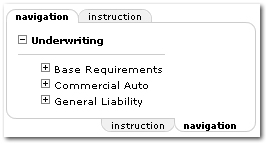
To Navigate Through the Forms
The navigation tab found on the right side of the screen will contain
all lines of business added for the policy. If it is a commercial policy, Base
Requirements is the first item when a line of business
is dependent on other forms. The
dependent form will automatically be added to the Base Requirements.
To complete
the application, click on the [+] beside the application to expand the view of the various applications. Click on the title of the application and the corresponding entry fields will display in the underwriting tab. The application is in sections and any section can be selected for completion. For
more information see Working With Forms.
When completing the forms, the following options are available on the navigation toolbar:
- List:
Allows a screen display of every field on the application
and the data entered.
- Rate: Marketing applications can be exported for rating purposes. Or, to open a supported rating vendor's application directly from Nexsure.
- Bridge: Once rating from a supported vendor has been completed, the rating information can be bridged back into Nexsure.
Important: ExpressWay does not enable application information to be bridged back into Nexsure. Currently supported rating vendors for bridging include WinFSC and ACS2000.
- Print: Allows a print preview of the application in Adobe® Reader®. The
form will display Adobe® Reader® functionality so the form may be printed if desired.
- History: Moves the policy to history.
- Compare Policy: Used after the policy is in force. Click the Compare Policy: [On] link to compare this edited version of the application to the original application. Anything highlighted in red is an item that is different from the original application. Click the Compare Policy: [Off] link after reviewing the changes.
- In Force: Moves a marketing policy to in force.
Note: If the policy already exists in the current policy list, use
SERVICING > Renew to select a marketing policy as the replacement for the renewal policy. Using the renewal process in this case will assure the policy mode is accurate.
Once a policy has been place in force it can only be edited by creating
an Edit or Endorsement
from SERVICING. In the resulting dialog box, the following options are available:
- In force: Moves a marketing policy to in force with a status of In Force.
- Bound: Moves a marketing policy to in force with a status of Bound. Policies with a bound status can be tracked from the HOME > Binder Log screen even if an agency binder has not been issued.
- Create Binder: This selection is made when issuance of a binder is necessary. A binder will be created and the binder details are displayed.
Creating
a binder will create an entry on the HOME > Binder Log screen.

- Save Changes: Saves any additions or changes made to the policy header.
Assignments
Tab
Importing and Exporting to Policies
Policy Info Tab
Populating Coverage and Premium
Fields
Rating Integration
Servicing > Marketing
Working with Forms
Working with Schedules