Working with Forms
Nexsure supports standard industry forms such as ACORD forms, allowing completion of the forms through the Nexsure interface. Completing form fields is accomplished by accessing the navigation tab located on the underwriting tab. When
the form has been completed, the option is available to view the form in Adobe® Acrobat®, save the Adobe PDF version of the form, and / or send the form to a printer.
|
There are three ways to approach completing a form:
- Using the navigation tab.
- Using Next and Prev on the navigation toolbar.
- Using the List view.
Each of the above approaches are detailed in the instructions below:
|

|
To Complete a Form Using the Navigation Tab
- Once a form is added to a policy, the form chosen will appear in the underwriting > navigation tab.
- On the navigation tab, expand the Underwriting item, the line of business, and then the ACORD form. Selecting the form (in this example ACORD 127) will display entry boxes and lists to be completed on the form.
- In the navigation tab, select the section of the form to complete. In the example below, Producer has been selected. Notice the screen on the left shows the form boxes to be completed.
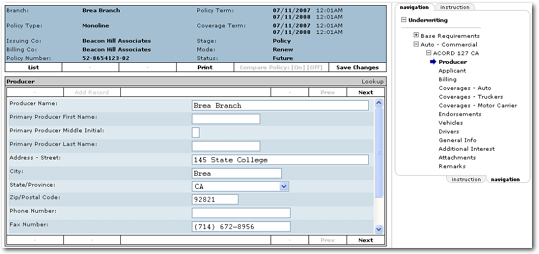
- Once the form section has been completed, select another section of the form in the navigation tab. Each time a new section is selected in the navigation tab, the completed entries in the previous section are saved.
- Continue working through the form using the navigation tab.
- When all sections are
completed, click Save Changes.
To Complete a Form Using Next and Previous
- Once a form is added to a policy, the form chosen will appear in the underwriting > navigation tab.
- On the navigation tab, expand the Underwriting item, the line of business, and then the ACORD form. Selecting the form, in
this example ACORD 125, will display entry boxes and lists to be completed on the form.
- In the navigation tab, select the section of the form to complete. In the example below, Underwriting > Auto - Commercial > ACORD 127 CA > Producer has been selected. Notice the screen on the left shows the form boxes to be completed.

- Once the form section has been completed, click Next to move to the next section of the form. Each time either Next or Prev is clicked, the current completed section of the form is saved.
Note: Save Changes on the navigation toolbar can also be clicked at any time to save changes to the form.
- Continue working through the form navigating from section to section using Next and Prev.
- When all sections are
completed, click Save Changes.
To Complete a Form Using the List View
- Once a form is added to a policy, the form
chosen will appear in the underwriting > navigation tab.
- On the navigation tab, expand the Underwriting item, the line of business, and then the ACORD form. Selecting the form, in
this example ACORD 127, will display entry boxes and lists to be completed on the form.
- On the navigation toolbar, click List. Notice the ACORD form is displayed as a single list of boxes to be completed.

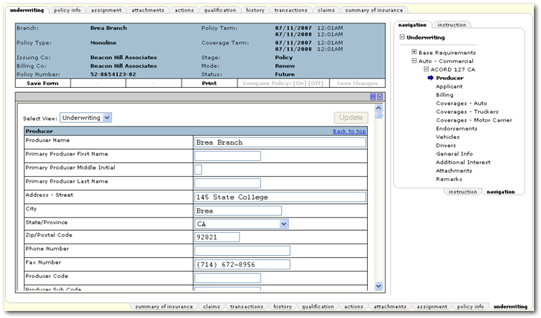
- Notice the Expand
 icon and the Close
  icon in the top, right corner of the List view screen. Use Expand
  to open a full screen view of the List. Use Close
  to close the full screen view.
- To save information entered into the form, click Update or on the navigation toolbar, Save Form.
Tip: When completing schedules of many items, the List view is not as efficient as using the navigation tab or the Next and Prev method. When using the List view the Copy option is not available to replicate schedule items.
Record Summaries
In instances where there are multiple records of the same type, such
as multiple drivers, those records can be managed on the summary screen.
To Sort Records
When a client has a large schedule, sorting is an easy way to temporarily change the view to quickly verify what is in the list. To change the view of any schedule on a form, click the link of the schedule on the navigation tab to display the items entered on the form.
Perform the following after accessing the appropriate client through SEARCH, clicking POLICIES on the Client menu and clicking the Details  icon:
icon:
- In the underwriting > navigation tab, click the appropriate line of business link.
- Click the ACORD link.
- Click the appropriate schedule link to open the summary view.
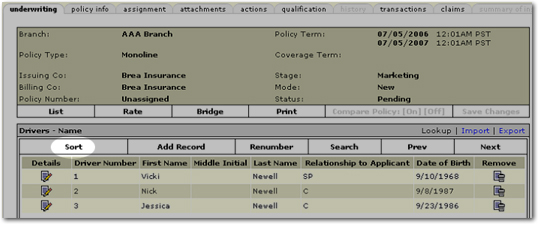
- On the summary
screen, click Sort. The Sort Record(s) dialog box is displayed.
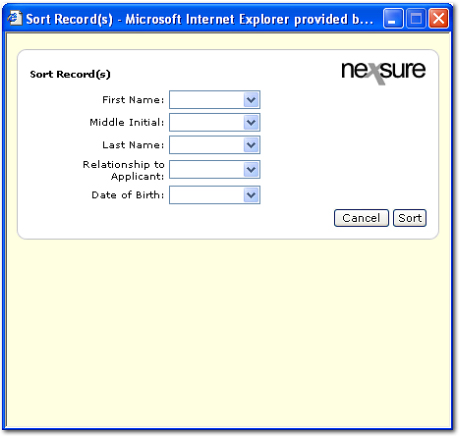
- Choose the item to sort
by from the available options and select Ascending or Descending from the list.
- Click Sort.
The items will be sorted accordingly in the summary.
To Search Records
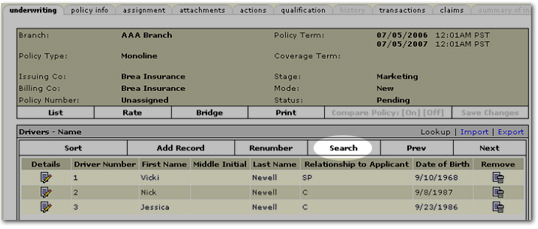
- On the summary
screen, click Search. The Search Record(s) dialog box is displayed.
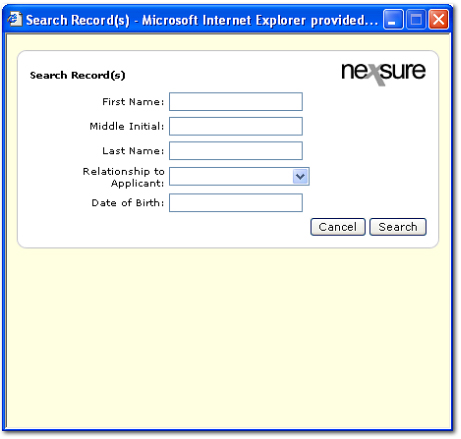
- Choose the item to search
by from the available options and enter or select the search criteria.
- Click Search.
Any items found will appear in the summary.
Working with Schedules


 icon:
icon:


