Importing and Exporting Schedules
You can import XML data into Nexsure to easily transfer lists of data
(such as schedules of autos or drivers) that would otherwise have to be
entered manually. This
is most useful in transferring information from one Nexsure system to
another.
Quickly navigate to procedures included in this topic by clicking one of the links below:
To Export XML Data
To Import XML Data
To Work with Endorsement Exports and Imports
To Export XML Data
- From the record summary
screen, click Export. The export dialog box appears.
- In the export dialog box, click Export. The File Download dialog box is displayed.
- In the File Download dialog box, click Open. The spreadsheet is displayed.
- Once the spreadsheet is complete, save the spreadsheet as an Microsoft® Excel® 97 - 2003 Workbook.
To Import XML Data
This procedure is done when filling out policy forms. If
the Import / Export option is
available for a form item, it will appear in the upper right corner of
the record summary dialog box. For
more information on filling out policy forms, see Working
with Forms.
- Add the spreadsheet to be imported as an attachment in Nexsure.
- From the record summary
screen, click Import.
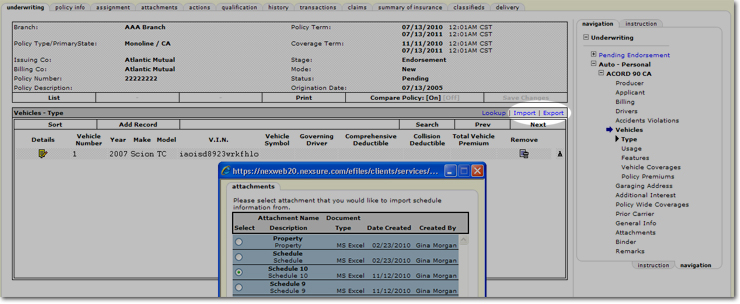
- Select the items to
import and click the Import button:

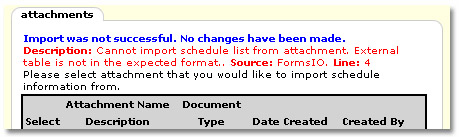
Note: If an
error occurs during the import process, a notification will appear on
the attachments window:
To Work with Endorsement Exports and Imports
Once a policy is pending an endorsement, there are a few options for working with the resulting exported / imported spreadsheet. When importing endorsements, the policy level process will not remove all pre-existing schedule information but apply the imported information to the schedule.
- From the underwriting tab in a pending endorsement, use the navigation tab to navigate to the appropriate schedule for export.
- Export the schedule using the guidelines in To Export XML Data. The resulting spreadsheet will be displayed.

- C: To indicate a change to a unit on the spreadsheet, in the Change column enter a C or c. The only entry recognized is a C or c to identify any existing units that have been modified. On the form's schedule summary, a C will automatically be displayed upon import to identify changes to the unit.
- Blank: To indicate an addition to the spreadsheet, leave the Change column blank. No entry in the Change column is needed when adding new units to the spreadsheet. On the form's schedule summary, an A will automatically be displayed upon import to identify any new units that have been added to the spreadsheet. These new units will not be associated to the client level units at risk upon import. To associate the new units to the client level, the Lookup option must be used to add the units.
- Remove existing item from the spreadsheet: To indicate a deleted item on the spreadsheet, simply delete the row in the spreadsheet. On the form's schedule summary, a D will automatically be displayed upon import to identify any units that have been deleted from the spreadsheet.
Important: If a spreadsheet is exported, say with five units, then two more units are added manually in the Nexsure schedule, upon import of a spreadsheet, those two units added manually after the spreadsheet was exported, will be deleted from the schedule.
- Once the spreadsheet is complete, save the spreadsheet as a Microsoft Excel 97 - 2003 Workbook.
- The spreadsheet must be added as an attachment first to be imported. Click the attachments tab.
- On the attachments tab, click [Add New], the Add New Attachment dialog box is displayed.
- Select Add Attachment. The dialog box expands to allow selection of the attachment and options for identifying the attachment.
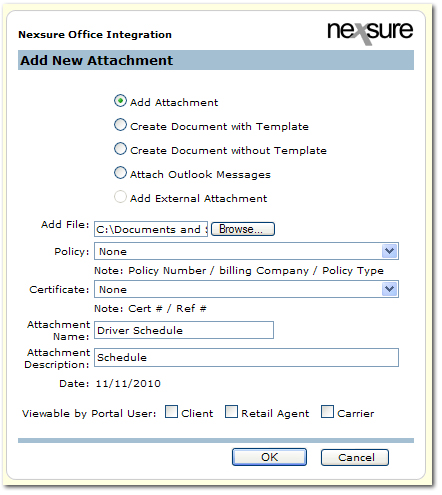
- Complete the Add New Attachment dialog box by entering the following:
- Add File: Click Browse and select the spreadsheet.
- Policy: Select the policy with which the attachment will be associated.
- Certificate: If the attachment needs to be associated with a certificate, make the selection here.
- Attachment Name: Give the attachment a name for identification.
- Attachment Description: Add a description for the attachment.
- Viewable by Portal User: Select the type of user that can view this attachment through the portal.
- Click OK. The attachment is displayed on the attachments tab.
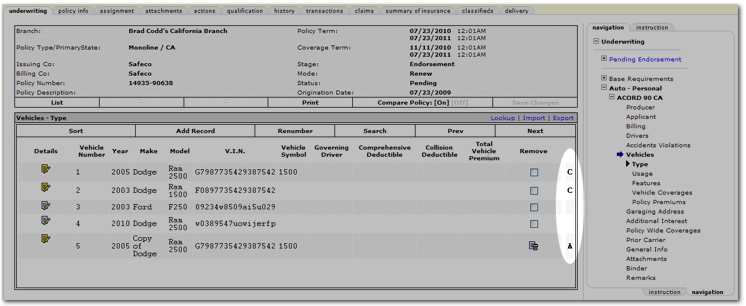
- Navigate to the policy with the pending endorsement and access the schedule to be updated.
- Click Import. The attachments tab dialog box is displayed.
- In the attachments tab dialog box, select the attachment to add to the schedule and click Import. The updated schedule is added to Nexsure. Notice in the right side column there may be the indicators as explained above. (A = Add, C = Change, D = Delete)
Policy Underwriting
Working With Forms