Carrier Names Detail
- On the Primary menu, click SEARCH.
- On the search tab, select Carrier in the Entity list. Search for the desired carrier.
- Click the Details
 icon next to the carrier. The CARRIER PROFILE > card file tab is displayed.
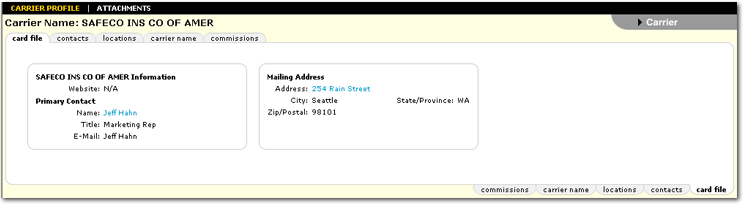
- Click the carrier name tab. The Carrier Summary screen is displayed.

- Click [Add New] to add a new carrier. To
edit a carrier name see Carrier Names Summary.
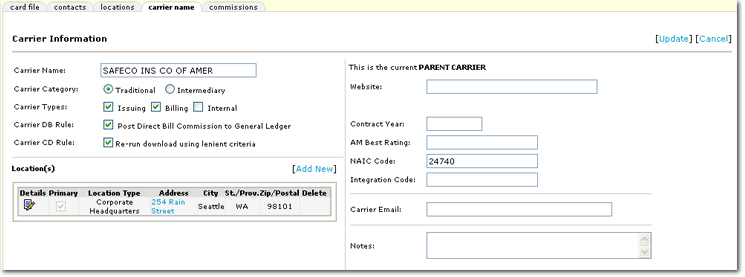
- Complete
the Carrier Information:
- Carrier Name
- Enter to identify the carrier.
- Carrier Type
- Identifies if the carrier is the issuing, billing or both. The issuing
check box identifies the carrier writing the policy. The billing check box
identifies the carrier who will either pay the branch or bill the branch. Territory carrier associations will limit the selections displayed in the Billing Carrier and Issuing Carrier lists on the associated policies.
See the Carrier Associations topic for more information about associations.
- Carrier DB
Rule - This option is available if Override
by Carrier is selected in the Posting
Rules. Post Direct Bill Commission to General Ledger will
be selected (by default) if Direct Bill Invoice General Ledger Posting
is set to Post to the General Ledger
in the posting rules. If the default is changed, all previous invoices
will retain their posting rule at the time they were posted. Reversals
will use the original invoice posting rule.
If this option is not
selected, direct bill invoice activity will not be available for reconciliation,
receive payment or disbursement. No aspect of the invoice will post to
the general ledger.
- Carrier CD Rule: The carrier commission download rule can be checked at the global SETUP > Downloads > Download Defaults level or here at the carrier level. This rule gives the option to bypass the exceptions when multiple policies are found. Only the latest version of the policy will be used.
Note: When selected at the SETUP (global) level, the Re-run download using lenient criteria option will be applied to all carriers regardless of the selections made at the carrier level. To give carriers differing rules, do not select the global option but make selections at each carrier at SEARCH > carrier details > carrier name tab > carrier details > Carrier CD Rule option.
- Website:
Enter the carriers Web site address.
- Contract Year:
Entering the contact year is optional.
- AM Best Rating:
Entered by the branch.
- NAIC
Code:Entered by the branch as indicated by the carrier.
- Integration Code: Enter an Integration Code to be used to differentiate an issuing carrier that is being used in downloads by two different parent carriers for download carrier identification purposes.
- Carrier Email: The email address
for the carrier is optional, however if the format is entered incorrectly
an error will be returned to warn of the improper format. The screen cannot
be saved until the format is correct. The field can contain up to 30 characters
with alphanumeric data.
- Notes: Enter
any appropriate notes.
- Cancel:
The [Cancel]
link will abort any modifications or adding a new location.
- Save: The
[Save]
link will save new location information.
- Location (s):
Click the [Add New] link to
select or add the address for this carrier. There is no limit to the number
of addresses that may be added.
- Existing addresses may be added by selecting
Use Existing. Select an existing
address from the drop-down box which is populated from locations added
to the carrier. A new location may also be added here, by selecting the
[Add New] option. Complete
information should be populated by accessing the carrier Location
tab and click on the Details icon to edit.
- Locations may be removed or edited by the
following:
- Click on the Details icon to edit.
- Click on the Remove
 icon to delete. This
icon does not display on the primary location.
icon to delete. This
icon does not display on the primary location.
- Once the Carrier Information is complete, click [Update]. The Carrier Summary screen will again be displayed.
- To add a carrier association to a territory and / or branch, click the Details icon next to the carrier name to associate. The Carrier Information screen is displayed.
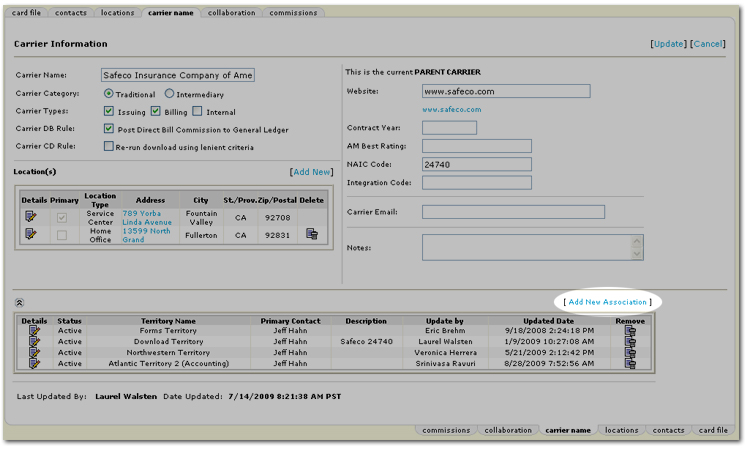
- Notice at the bottom of the carrier name tab, there is a link to add a new association, this link is only displayed after the carrier name record has been saved once. Click [Add New Association]. The Select Territories and Branches dialog box is displayed.
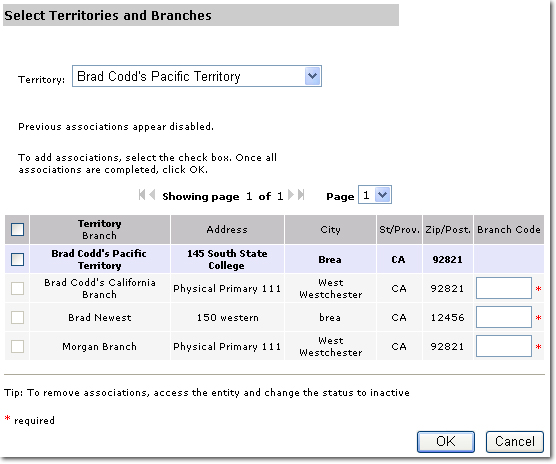
- In the Territory list, select All or the specific Territory to be associated. This list is comprised any territories associated with the logged on staff member. If a specific territory is selected here, the resulting list below will have that territory and its corresponding branches only.
Note: If the staff member is associated only at the branch level, the Territory list will be blank.
- Select the territories and branches to be associated, by selecting the check box to the left of the screen. A territory must be selected to enable the check boxes for its branches. The check boxes will not be available if as association has already been added.
- In the Branch Code box, a branch code is required to be displayed on the View / Edit Existing Commission screen for the carrier record.
- Click OK to save the selected territories and branches. The association is complete. The carrier is now associated with the selected territories and branches.
Note: On the carrier commissions tab, a line item for the branch with zero commission is also added.
Or
Click Cancel to return to the Carrier Information screen without saving selections.
To Edit an Association
- On the Primary menu, click SEARCH.
- On the search tab, select Carrier in the Entity list. Search for the desired carrier.
- Click the Details icon next to the carrier. The CARRIER PROFILE > card file tab is displayed.
- Click the carrier name tab.
- Click the Details icon next to the appropriate carrier. The Carrier Information screen is displayed.
- Click the Details icon next to the association to edit. The edit dialog box is displayed.
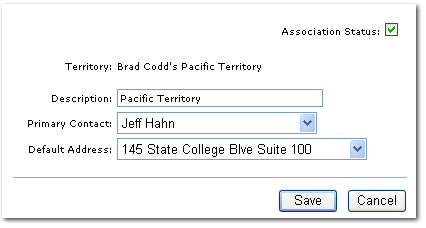
- The following options are editable:
- Association Status
- Description
- Primary Contact
- Default Address: Selections are based on carrier name locations.
- Click Save to save the updates.
Or
Click Cancel to return to the Carrier Information screen without saving.
To Remove an Association
- On the Primary menu, click ORGANIZATION.
- Click the territories tab.
- Search for and select the appropriate territory by clicking the Details icon next to that territory.
- Click the entity associations > carrier associations tab.
- Click the Remove
 icon next to the carrier to be removed.
Related Topics
Adding / Editing Carrier Contacts
Carrier Associations
Locations Detail
Commissions Summary