Search Overview
Use the search tab to search for and add entities. Prior to adding a new entity
a search is required to avoid entering duplicate records.
Quickly navigate to procedures included in this topic by clicking one of the links below:
To Search for an Entity
To Use the Search Results
To Use the Client Search Context Tool

To Search for an Entity
- On the Primary
menu,
click SEARCH. When the SEARCH menu is
selected, the HISTORY RESULTS are displayed with up to five pages of the last entities accessed by the person logged on with the most recent entities accessed displayed first. Select a different entity type to view the HISTORY RESULTS for that entity type. Click the Details
 icon next to an entity or continue to search.
Important: When using more than one search criteria option, Nexsure treats the criteria as an OR search string. That is, Nexsure will search for one piece of criteria OR another piece of criteria and return the results. Adding more than one piece of criteria will not narrow the search results.
- In the All Branches list, select a branch to narrow the search to branches the person logged on is authorized to access.
- In the Entity
list, select the entity type.
Note: Of the following search options, only those applicable to the entity selected are displayed.
- In the Search Type list, select Begins
with to search for entities that begin with specific characters, or Contains to search for entities that contain specific characters anywhere in the selected field.
- In the Client Stage list, select the Client Stage to limit the search by: Client, Prospect, or Suspect. Client stages are automatically assigned by Nexsure based on the following:
- Client: Has at least one in force policy.
- Prospect: Has at least one marketing policy, but no in force policies.
- Suspect: Has card file information and / or opportunity files.
- In the Client Type list, select a Client Type to return results specific to a Commercial or Personal entity.
- In the Code Class list, first click the Ellipsis
 button to load all possible selections to the list. Then, select a Code Class to return clients with that classification. The Code Class refers to the designation on the entity profile classified tab.
- In the Code Designation list, select a Code Designation in conjunction with the Code Class to return more specific results. The selections available in the Code Designation list will populate based on the Code Class selected.
- In the Status list, select whether the search results will be All, Active, or Inactive records.
- In the Client box, enter at least two characters of an entity name. The title of this box changes dynamically depending on the selection made in the Entity list.
Note: When a client is inactive in Nexsure, the name of the client will have a strikethrough in the search results.
- In the Policy Number box, enter at least two digits of the policy number. All clients are returned that are associated with the policy number.
- In the Policy Description box, enter at least two characters of the policy description to return search results that include a matching policy description. Up to 50 characters of the description can be entered.
- In the Phone Number box, enter at least two characters to narrow the search results. Entering some of the phone number returns a broader result. Enter most or all of the number for more specific results. Each account has an optional Phone Number field. If multiple phone numbers are on the account, any of those numbers may be entered to return the entity associated with the number.
- In the Location Name box, enter at least two characters to narrow the search results. Entering some of the name returns a broad result. Enter most or all of the name for specific results. Each account has an optional Location Name field that appears on the search result screen to help identify entities. Only the primary location name is displayed on the search results screen but if a secondary location name is entered for the search, the entity will be found and displayed.
- In the Location Address box, enter at least two characters to narrow the search results. Entering some of the address returns broad results. Enter most or all for more specific results. Each account has an optional Location Address field. If multiple location addresses are on the account, any of those addressees may be entered here to return the entity associated with the address.
- In the Location State/Prov list, select the state or province in which the client location resides.
- In the Location City box, enter at least two characters to narrow the search results. Each account has an optional Location City field. If the account has multiple location addresses, any of those cities may be entered here to return the entities associated with the city.
- In the Location Zip/Postal box, enter at least two characters to narrow the search results. Each account has an optional Location Zip / Postal field. If multiple location addresses are on the account, any of the zip or postal codes may be entered here to return the entities associated with the zip or postal code.
- In the First Name and Last Name boxes, enter at least two characters to narrow the search results. Entering some of the contact name returns a broader result, enter most or full first and last names for more specific results. The First Name and Last Name boxes are used to search contacts associated with the entity. If multiple contacts are on an account, any of those contacts may be entered to return the entities associated with the contacts.
- In the Enterprise Code box, enter at least two characters to narrow the search results. Entering some of the Enterprise Code returns a broader result, enter most or the full Enterprise Code for more specific results. The Enterprise Code can be used to cross reference and track clients managed in Nexsure with other proprietary systems.
- Click Search
to begin the search. If the entity is not found the [Add New Record] link is displayed. Use [Add New Record] to open a new card file tab to begin adding the new entity.
Or
Click Clear
to clear the search criteria.
Note: Upon navigating away from and returning to the search tab, the last searched for
entity type will be retained. Once logged out of the current Nexsure session
the search tab will revert back to the default entity type.
To Use the Search Results
Once a search has been run to find a client, the search results are displayed. The following columns and functions are available from the search results screen:
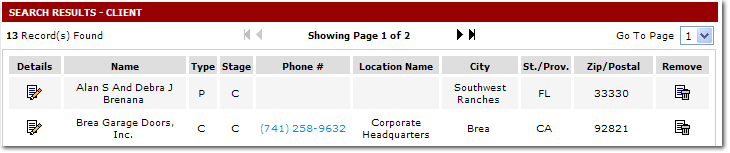
- Notice the options at the top of the search results screen to help navigate through the results:
- Showing Page: The Arrow

 icons can be used to navigate through pages of search results.
- First Page
 icon.
icon.
- Previous Page
 icon.
icon.
- Next Page
 icon.
icon.
- Last Page
 icon.
icon.
- Go To Page: Click the Go To Page list
 to open a list of all search results pages. Select the desired page number to open that page of search results.
- Click the Details icon to view the card file tab for the associated client. The Client menu will also be opened for navigation throughout the client screens.
- In the Name column, the name of the client is shown as it was entered when the client was added to Nexsure.
- In the Type column, either of the following are shown to indicate the type of account:
- C = Commercial
- P = Personal
- In the Stage column, the stages that are automatically assigned by Nexsure are displayed:
- C = Client: Has at least one in force policy.
- P = Prospect: Has at least one marketing policy, but no in force policies.
- S = Suspect: Has card file information and / or opportunity files.
- In the Phone # column, the primary contact's phone number is available. The phone number is also a link to the contact details screen for additional information.
- In the Location Name column, the primary location name is displayed. If a secondary location name is entered for the search, the entity will be found and displayed.
- In the City column, the city for the primary location is displayed.
- In the St./Prov. column, the state or province for the primary location is displayed.
- In the Zip/Postal column, the zip or postal code for the primary location is displayed.
- Click the Remove
 icon to delete the client record.
Important: The client record will be completely deleted once the Remove  icon is clicked and OK is selected on the confirmation pop-up unless there is activity associated with the client. If the client cannot be deleted by clicking the Remove icon, the client can be made Inactive instead on the Client menu > named insureds tab.
To Use the Client Search Context Tool
Once a client has been located using the search method described above, the context tool becomes available on the search results screen. To use the context tool, do the following:
- Locate the client to which updates need to be made and right-click on the client's Details icon. The context menu is displayed.
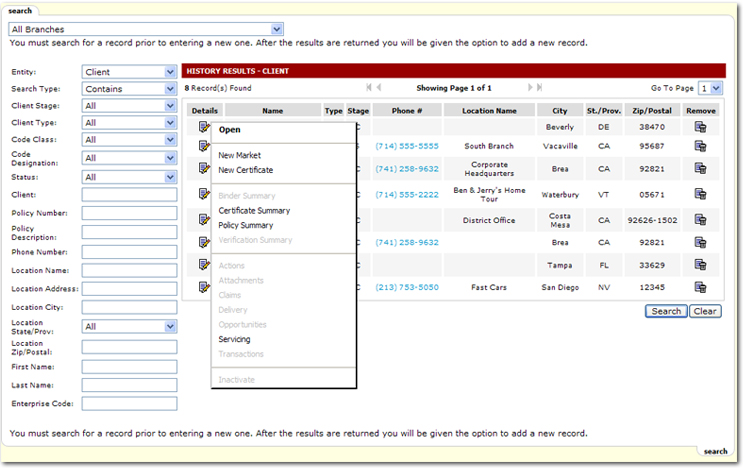
- On the context menu, the following options are available:
- Open: Opens the client card file tab.
- New Market: The New Application Selection dialog box is displayed on the marketing underwriting tab for application selection.
- New Certificate: The new certificate tab is displayed to begin creating a new certificate for the client.
- Certificate Summary: The certificates tab is displayed showing all certificates for the client.
- Policy Summary: The policies tab is displayed showing a summary of all policies for the selected client.
- Servicing: The servicing tab for the selected client is displayed.