Delivering a Binder
Once a binder has been created, the binder can be delivered via fax or email as an attachment.
To Deliver a Binder
- On the Primary menu, click SEARCH. Search for the appropriate client.
- Click the Details
 icon next to the appropriate client.
- On the ,
click POLICIES.
- Click the binders tab. A summary screen will display all bound policies.
- Click the Details
 icon next to the binder to be delivered.
- Click the delivery tab. If there is no pending delivery a prompt is displayed to add a new email or fax. If other pending deliveries are found, click [Add New] to create a new delivery.
- Select either the email or fax tab, depending on the format of the delivery.
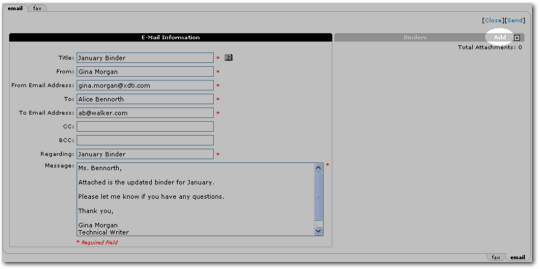
- Enter the following delivery information:
- Title:
This entry is not displayed to the recipient, but is intended to
be used as an internal note or to aid in a search.
- From:
Enter the name of the person whom the delivery is from.
- From
Email Address / Fax number: The
email address or fax number (for reply purposes only).
- To:
Enter the recipient's name.
- To
Email Address / Fax Number: Enter
the recipient's email or fax number.
- CC:
Enter the email address of any additional persons to whom the information should be sent. Separate multiple email addresses with a semicolon.
- BCC: Enter the email address of any additional persons to whom the information should be sent without informing the To or CC recipients. Separate multiple email addresses with a semicolon.
- Regarding: Enter the delivery
subject. This entry will be displayed in the Subject line of the email.
- Message: Enter a
message, if needed, to accompany the attachments.
 Add a salutation file to deliveries on the employee > identity
tab.
Signature files can display name, company
name, phone number etc.

- On the Primary menu, click ORGANIZATION.
- Click the employees tab.
- Click the Details
 icon next to the employee to be updated with a salutation.
- Click the identity tab.
- On the identity tab, click [add salutation]. The Add A Salutation dialog box is displayed.
- In the Name box, enter a name for the signature file. For example, Delivery.
- In the Text box, enter the salutation information.
- In the Add A Salutation dialog box, click Save. The new salutation is added to Nexsure.
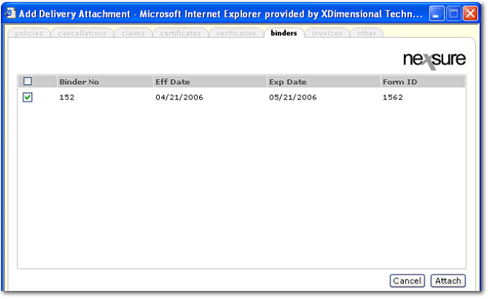
- On the right side of the email tab, in the Binders area, click Add. All open and posted binders are displayed with the Binder No, Effective Date, Expiration Date, and Form ID.

- In the Add Delivery Attachment dialog box, select the binder to attach.

Note: Only binders that are both open and posted are available for selection.
- Click Attach. The attachment is displayed in the Binders area of the email tab.

- Click [Send]. The delivery tab is again displayed with a summary of the deliveries. In the first column of the summary a Status
 icon is displayed until the email has been successfully sent. Once the email is sent, the Details
  icon is displayed.
The screen will need to be refreshed to view the status change. Click the details tab then the delivery tab again to refresh the screen.
Note: Do not use the Refresh button in the browser to refresh the screen; the current session will be ended.
Creating a Binder
Extending a Binder
Putting a Bound Policy In Force
 icon next to the appropriate client.
 icon next to the appropriate client.
 Add a salutation file to deliveries on the employee > identity
tab.


 icon is displayed.