Using Allocations
Organizations with multiple branches, departments and possible units
may have a policy of dividing expenses during the course of an accounting
transaction based on the organizational structure. Creating a general
ledger allocation plan provides a template for easily dividing expenses
within the organization. Allocation plans can be created for accounts
payable and journal entries. Before using an allocation template it must
be created first, see Allocation
Plan Setup.
Accounts Payable Allocations
To Use Allocations with Accounts Payable
- On the Primary
menu, click ORGANIZATION.
- Select the Org level
where your bank accounts are located, for example - Territories.
- Select the accounting
tab.
- Select the transactions
tab
- Click the accounts
payable tab.
- Click [Add
New]. The Entity Search dialog appears.
- Search
for the Entity to pay.
Note: If the
entity has an alternate payment address, it can be selected from the Select Address drop-down list.
- Click
OK.
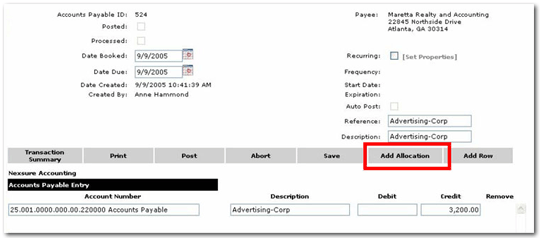
- Enter the accounts payable
information as covered in the accounts
payable topic.
- Click Add Allocation.
An allocation
plan must have been previously created to activate this link.
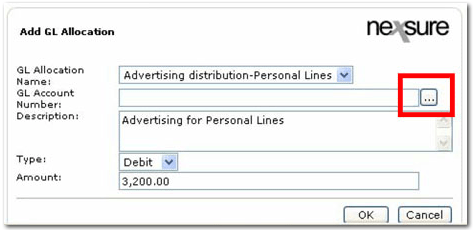
- GL
Allocation Name - Select the allocation plan from the drop-down
list. The Entity where the transaction is created must be part of the
allocation plan to be available.
- Description
- defaults from allocation plan.
- Type
- Select debit or credit for fill in to accounts payable item.
- Amount
- defaults from the first AP entry but can be changed. If the amount is
changed, additional rows or allocation must be entered to balance.
- Click the GL Account
Number ellipsis.
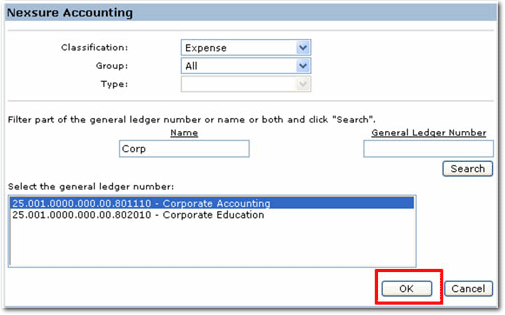
- Classification
- classification availability depends on the allocation plan's Type.
- A Balance Sheet Type
will display: Classification Asset, Liability and Equity
- An Income & Expense
Type will display: Classification Income, Expense, Under Ops Income and
Under Ops Expense
- Group
- selection is dependent upon the classification selected.
- Type
- selection is dependent upon the classification selected.
- Enter a partial name or
GL account number and click Search.
- Select the general ledger
number and click OK.
- Click OK
to close the Add GL Allocation pop-up window.
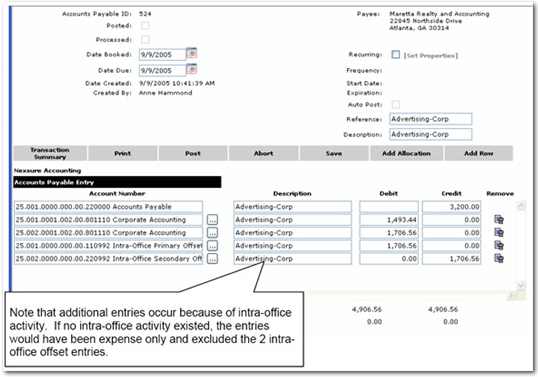
The allocation in this example divided items
evenly across 2 organizational levels. Intra-territory angle creates additional
entries to keep the books in balance.
Processing the disbursement for the accounts
payable item in this example will:
- Credit bank $3,200.00 (Territory
001)
- Debit accounts payable
$3,200.00 (Territory 001)
- No additional entries via
disbursement (accounts payable processing) need to occur to Territory
002
- Territory 002 may eventually
repay territory 10, crediting the bank and debiting Intra-Office Secondary
Offset.
- Territory 001 receipts
repayment, debiting undeposited funds and crediting Intra-Office Primary
Offset.
Journal Entry Allocations
To Use Allocations with Journal Entries
- On the Primary
menu, click ORGANIZATION.
Select the Org level where your bank accounts are located, for example
- Territories.
- Select the accounting
tab.
- Select the transactions
tab.
- Click the journal
entry tab.
- Click [Add
New].
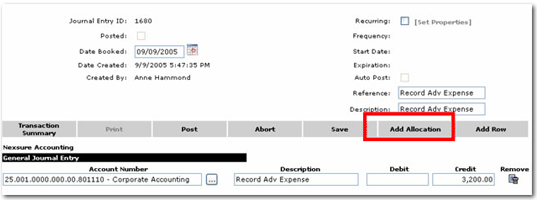
Note: The first
General Journal Entry line must be completed with a general ledger number
and debit or credit value before Add Allocation can be used.
- Enter the journal entry
information as covered in Journal
Entry, and click Add Allocation.
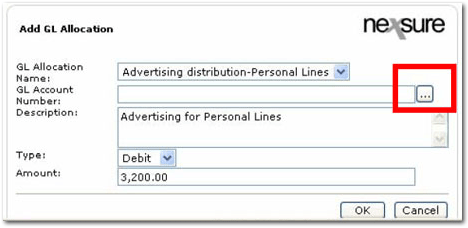
- GL
Allocation Name - Select the allocation plan from the drop-down
list. The Entity where the transaction is created must be part of the
allocation plan to be available.
- Description
- defaults from allocation plan.
- Type
- Select debit or credit for fill in to accounts payable item.
- Amount
- defaults from the first AP entry but can be changed. If the amount is
changed, additional rows or allocation must be entered to balance.
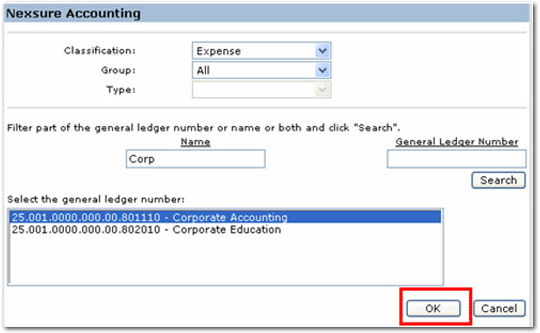
- Classification - classification availability depends on the allocation plan's Type.


