Allocation Plan Setup
Organizations with multiple branches, departments and possible units
may have a policy of dividing expenses during the course of an accounting
transaction based on the organizational structure. Creating a general
ledger allocation plan provides a template for easily dividing expenses
within the organization. Allocation plans can be created for accounts
payable and journal entries.
To Create an Allocation Plan
- On the Primary
menu, click ORGANIZATION.
- Click the territories
tab.
- Select the territory
to add the plan to by clicking its Details
 icon.
icon.
- Click the accounting
tab.
- Select the general
ledger tab.
- Select the gl
allocation tab. Any previously created allocation plans will be
displayed on this screen.
Note: The territory
level is used in this example, but allocations can also be setup at the
organization level. When created at the territory level, general ledger
defaults will be based on that territory. Depending on user security to
other territories, defaults may be overwritten.
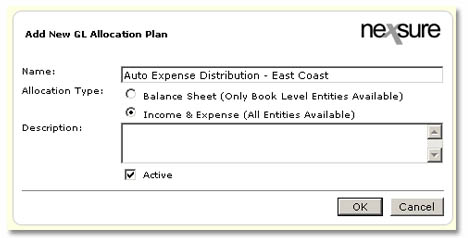
- Click the [Add New]
link.

- Name:
Enter a name for the allocation plan. Enter a name that can be easily
recognized from a list of other possible allocation plans.
- Allocation
Type: Select Balance Sheet
or Income & Expense. Balance
Sheet will restrict selection of organizational entities to Region and
force a Territory. Income & Expense will permit all organizational
entities as well as both income and expense accounts when allocation is
used.
- Description:
Add a description of the plan (optional).
- Active:
This is selected by default. To create a plan to be used at a later time
or to deactivate a current plan, clear this checkbox.
- Click OK.
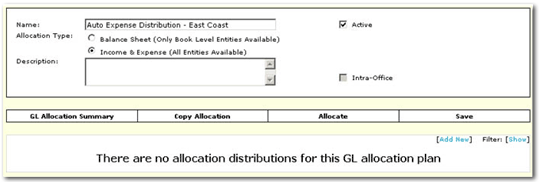
The GL Plan screen appears:

- Intra-Office:
Selected by default if the allocation uses multiple territories requiring
intra-office transactions.
- GL Allocation Summary:Click to return to the GL Allocation
list screen. Any line items added will be saved, but allocation factors
will not be saved unless Save or Allocate has been clicked.
- Copy Allocation: Creates a new allocation screen displaying
"copy of" in front of the original plan description.
- Allocate: Takes
any allocation factor entered and creates appropriate percent values.
- Save: Saves
the allocation information without closing the screen.
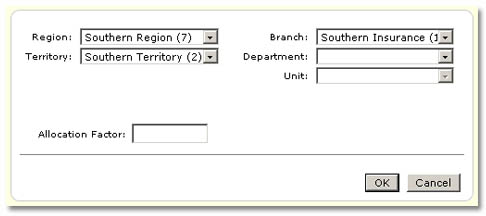
- Click the [Add
New] link.

- Region:
Defaults based on territory but can be changed depending upon security
to other entities.
- Territory:
Available based on Region – defaulted based on entry level but can be
changed
- Branch:
Available based on previous territory selection.
- Department:
Available if branch selected.
- Unit:
Available if applicable for department.
- Allocation
Factor: enter a percentage amount (numerical).
- Click OK.
Note:
After a
line item has been added, Allocation Type cannot
be edited. At this point, the Income and Expense has been designated as
the selection which permits pulling all entities but will not be available
for balance sheet accounts. To
switch the allocation type, you must delete all org line items.

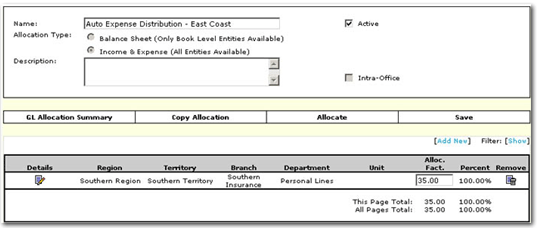
The plan name and description as entered
and can be edited by clicking the Details
icon.
Note:
In this example, the Intra-office
checkbox is unchecked. Adding a different territory to the allocation
will automatically place a check in the box. You cannot check or uncheck
the checkbox. Deleting the different territory in an allocation group
will uncheck
the checkbox.
Click Add
New to continue adding desired groups
- Note there can be a
single line item = to 100%.
- Click Save,
Allocate or OK.
Line items will be split per Allocation Factor percent to equal 100%.
- Clicking Cancel
or GL Allocation Summary will
return to the GL Allocation Summary list, saving changes as of the last
“Save” or “Allocate”.
- Clicking the Remove
 icon deletes
the item selected.
- Note that if an allocation
plan has been used, its use is held in the existing posted transaction.
Intra-Office transaction
capability
With GL allocation permitting selection of
multiple book levels (territories), subsequent use in accounts payable
and journal entries permits intra-office transactions.
Allocation is complete.
Copying an Allocation Plan
- On the Primary menu,
click ORGANIZATION.
- Click the territories tab, select territory by clicking the Details
 icon.
icon.
- Click the accounting
tab, then select the general ledger
tab.
- Click the gl
allocation tab and click the Details
 icon on the desired plan to copy.
- Click Copy
Allocation
- Click OK
and system returns to the original GL Allocation Plan details.
- Click GL
Allocation Summary.
- The
Plan is an exact copy of original with
the following exceptions:
- Active Status is unchecked
- Date Created is the date
copy was created
- Click the Details
 icon to edit as needed. Select the Active
checkbox to activate the plan when complete.


 icon.
icon.