Accounts Payable
Accounts payable entries can be made at the organization level if necessary but are more typically made at the territory level. Most agencies enter accounting transactions at the territory level where client receivables and carrier payables reside. The following instructions are for adding accounts payable at the territory level.
To Make an Accounts Payable Entry
- On the Primary menu,
click ORGANIZATION.
- Select the organization level
where the bank accounts are located, for example the territories tab.
- At the accounting level (ex. territories) tab, click the Details
 icon next to the territory or other accounting level.
- Select the accounting > transactions > accounts payable tab.
- Click [Add
New]. The
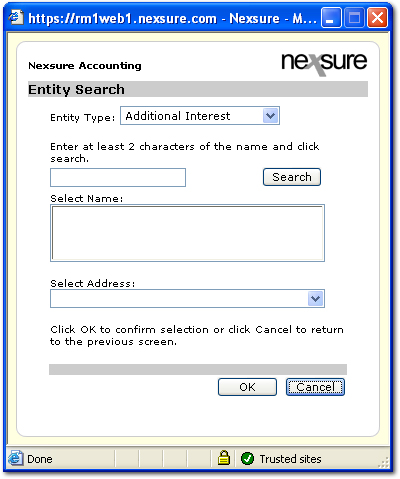
Entity Search dialog box is displayed.

- In the Entity Search dialog box, search
for the entity to pay.
Note:
If the
entity has an alternate payment address, it can be selected from the Select Address list.
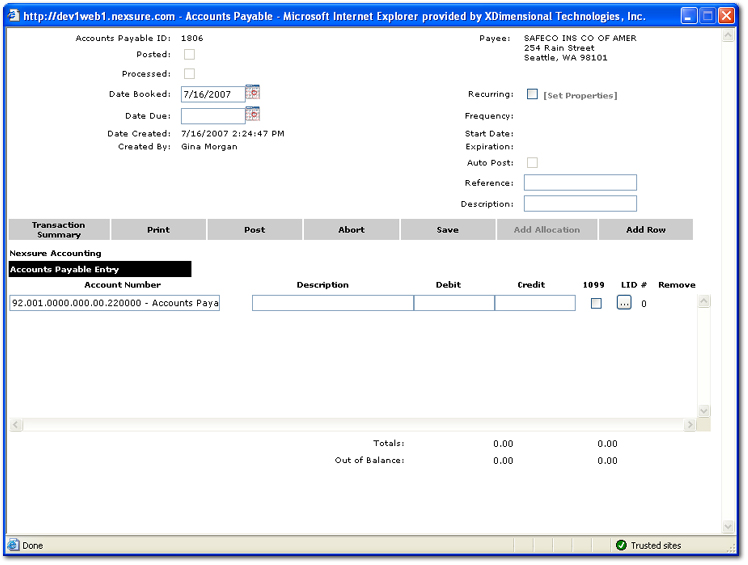
- After selecting the appropriate entity, click OK. The Accounts Payable entry window is displayed.

- Enter
the Date Booked (current date
is default). The accounts payable entry will post to the general ledger on this date. This date can be changed, however, the date booked cannot be posted to a locked month unless the staff member has the security rights to override a locked month. The date booked can never be posted to a closed month.
- Enter the payable Date Due. Enter the date the payable item is due to be paid.
- Select
Recurring to setup a recurring account payable entry. The current entry will become a template for recurrences and the Post link will be disabled. Since this entry will not post it can be edited or removed at any time. The template will be available for manual selection whenever desired and will also be used by Nexsure to automatically create entries.
- Click [Set Properties] in conjunction with the Recurring check box to set up an automatic Daily, Weekly, Monthly, or Yearly recurrence schedule for the accounts payable entry. For more information about setting up recurrences see Recurring Accounts Payable.
- Enter
an internal Reference and Description for the payable transaction.
- On the Navigation Toolbar, click Save. All of the above accounts payable header information will be saved.
- The Account Number box defaults to the Accounts Payable account automatically as it is the temporary holding account for money due. When an accounts payable entry is processed a disbursement is created and posted that automatically reverses the entry to the accounts payable account and offsets the selected bank account.
- In
the Debit box, enter the amount
owed.
- In the Credit box, enter
the amount being refunded.
- Select the 1099 check box if line items subsequent to the accounts payable line item are 1099 reportable.
- Click the Ellipsis
 button in the LID # column to add a general ledger line item distribution for an employee. Line item distribution (LID) is used to track employee’s expenses that do not need to display on the general ledger.
- On the Navigation Toolbar, click Add Row if more than one payment to the same vendor must be made.
- On the Navigation Toolbar, click
Save to save the payable information.
- On the Navigation Toolbar, click
Post to post the payable information
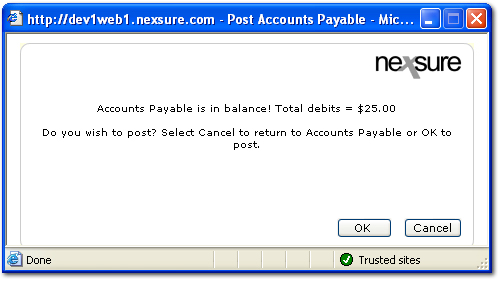
to the general ledger. A confirmation dialog is displayed showing whether or not the account is in balance. The
Posted check box is then automatically selected.
Once a
disbursement has been
made, the Processed checkbox will
be selected as well.
Note: When posting to locked periods, keep the following in mind. If the staff member has rights to post to a locked period a dialog box is displayed letting the staff member know they are posting to a locked period. If the staff member does not have rights to post to a locked period, the only option is to change the date booked to an unlocked period. More information on rights for staff members to post to locked periods can be found at Transactions > Reconciliation Security.

- In the Post Accounts Payable dialog box, verify that the account is in balance and click OK. The transaction is then displayed on the accounts payable summary screen.

- Once the transaction has been posted, only the 1099 check boxes are editable. If it is necessary to update a 1099 selection, make the new selection and click [Update 1099]. The system records are then updated to match the selection.
Note: Only a staff member with Accounts Payable > Modify rights can change 1099 selections. Changes to locked or closed months can only be made by a staff member with Accounts Payable > Post Locked rights can change 1099 selections in a locked or closed month. For more information on security settings see 1099 Security.
Accounts
Payable Auto Processing
Recurring
Accounts Payable
Using
Allocations
 icon next to the territory or other accounting level.
 icon next to the territory or other accounting level.

 button in the LID # column to add a general ledger line item distribution for an employee. Line item distribution (LID) is used to track employee’s expenses that do not need to display on the general ledger.
