You are here: Client menu > SERVICING > Claim > Servicing > Claim
Servicing > Claim
The Claim option is used to generate a claim form.
To Initiate a Claim
- On the Primary
menu,
click SEARCH.
- Click the Details
 icon for the appropriate
client.
- On the ,
click SERVICING.
- Select the Claim option.
- Select an effective date for the claim by clicking the Calendar
 icon and selecting a date. The date can also be typed into the date box using the format: mm/dd/yyyy.
- Enter a description for the claim that will be displayed in the action Description area.
- Enter any notes to be included in the action Memo area.
- Select the Line of Business that the claim is being reported against.
- Click [Next]. Policies,
including copies sent to history that fall within the date of loss, are
displayed.
- Select the appropriate
copy of the policy and click [Next].
- The policy header
will be displayed with a red border around it.
Note: The
pending claim will be displayed on the HOME > CLAIMS screen and the
Client menu > CLAIMS screen. It
will also display on the Client menu > POLICIES link with a red border
around the policy until it is either posted or aborted.
- The
 appropriate
claim form
for the line of business selected will be available for completion on the navigation tab under Pending Claims.
Important: When a claim is accessed through an iteration of the policy under which the claim was not made, the loss notice boxes will not accept entries. The loss notice entries must be made in the policy iteration where the claim was established and the claim must be unposted.
Tip: If a change is made to a loss notice, Nexsure will update the pending claim form in all iterations of the policy that follow the claim, once Save Changes is clicked on the original loss notice.
- ACORD
1 – Property Loss Notice
This form is used for reporting commercial
and personal lines property losses.
This form is used for reporting commercial
and personal lines auto losses.
- ACORD 3 – General Liability
Notice of Occurrence
This form is used for reporting commercial
and personal liability losses.
- ACORD 4 – Workers Comp
First Report of Injury or Illness
This form is designed as a first notice of
a claim for injury or illness by an employee.
- Once the claim form is completed click Save Changes on the Navigation Toolbar.
Note: Steps 10 through 17, below, describe using the populate button to populate an auto claim form. The populate workflow is similar on all claim forms.
- Click Populate
 .
.
- Select the Agree
option.
- Click Accept.
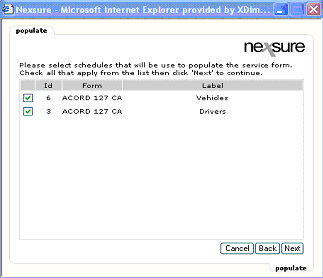
- Select both Vehicles
and Drivers check boxes (if loss pertains to both).

- Click Next.
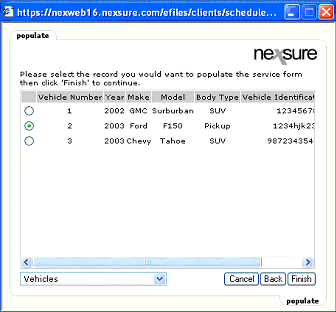
- Select vehicle involved
in loss.

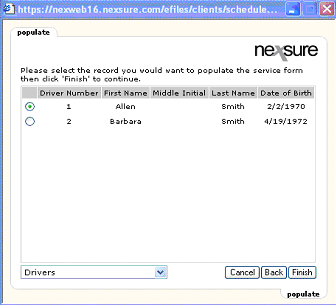
- Select Drivers
from the list.
- Select the driver involved
in the loss.

- Click Finish.
Note: This
pulls the vehicle and driver information from the application over to
the claim form.
- Click " +
" next to Pending Claims in the navigation tab. The DOL (Date of Loss) is displayed next to the form name on the navigation tab.
- Review the claim form
for accuracy and populate the incomplete sections of the form as described
in the Working
with Forms topic.
- Click the claims
tab. All
claims for this policy will be displayed in the summary view.
- Click the Details
 icon of the claim. This
is where claims information can be stored on an ongoing basis.
Note: If making
changes to the claims screen always remember to click the Save
Changes link in the Navigation Toolbar under the claim header.
- Clicking the Details
 icon of the claim form will open the claim form to the underwriting tab for review and/or edits to the information.
- The claim action created
will default to Closed. The action status can be changed to Open and the Memo box can be used to
track monies paid out. Complete
the action as described in the Actions
topic.
- See the Claims Details topic for information about completing the claim and adding claimants.
- Click the Save
Changes link in the Navigation Toolbar under the claim header.
Delivering a Claim
Once a claim has been created, it can be delivered via fax or email.
To Deliver a Claim
- Click the Delivery
link on the Client menu.
- Click [Add
New]. The email tab is displayed.
- Select the method of
the delivery, the email or fax tab.
- Enter the email or fax
information on the left.
- On the right, in the
Claims section, click Add.
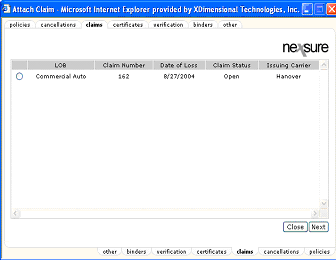
- Select the claim to deliver
and click Attach.

- The claim will be attached,
click Send.
Aborting a Claim
A claim cannot be aborted once a claimant is attached. The claimant must first be removed.
- On the ,
click SEARCH.
- Click the Details
 icon of the appropriate client.
- On the ,
click CLAIMS.
- Click the Details
 icon of the appropriate claim.
- Click the Abort
Claim link in Navigation Toolbar under the claim header.
Posting a Claim
- On the ,
click SEARCH.
- Click the Details
 icon of the appropriate client.
- On the ,
click CLAIMS.
- Click the Details
 icon of the appropriate claim.
- Click the Post
Claim link in Navigation Toolbar under the claim header.
Note:
Once the claim is posted a Reopen Claim
link is available on the Navigation Toolbar under the claim header.
Multiple Claim Payments
Claims Details
 appropriate
claim form
for the line of business selected will be available for completion on the navigation tab under Pending Claims.


