Actions Overview
The actions tab is the default view when Nexsure is opened. Actions are used as follow-up reminders for activities that need to occur.
Note: Although a maximum of 2000 records can be returned in a search, up to 5000 records can be exported.
There
are three levels of actions that can be created:
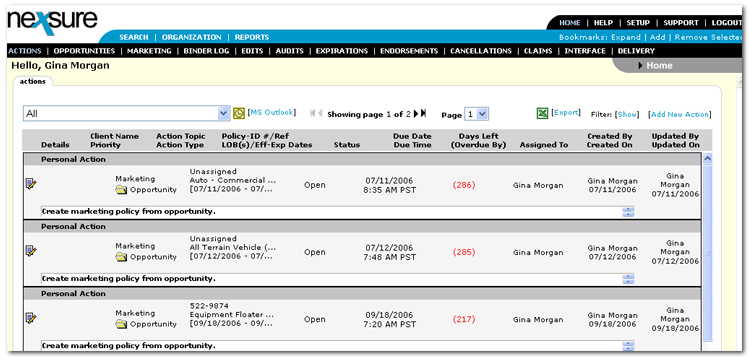
- Personal actions: Created from the HOME > actions tab by clicking [Add New Action]. An
action created here would be a personal action or a reminder to follow
up on a non-client related item.
Note: Actions that are associated with restricted policies will only display for those staff members that are assigned to the policy.
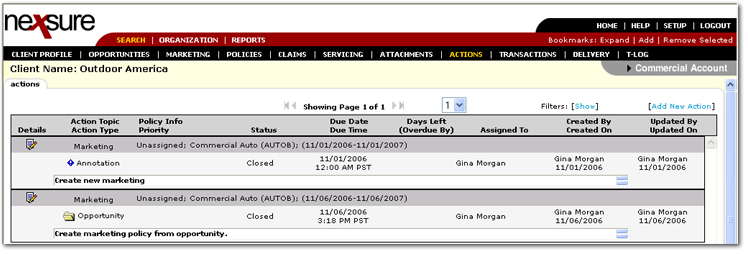
- Client actions: Created from Client menu > ACTIONS. An
action created here would contain general information pertaining to a
client.
Note: Policies that are restricted are displayed only if the person logged on is assigned to them. All other non-restricted policies are displayed and can be searched for by all staff members.
- Policy actions: Created from the Client menu > POLICIES > policy Details
 icon > actions tab. An
action created here would pertain to a client's policy.

To
print out custom actions reports, see Action Reports. For more information on creating actions,
see Creating Actions.
There are several options when working with actions. Notice the list boxes and links across the top of the actions tab.
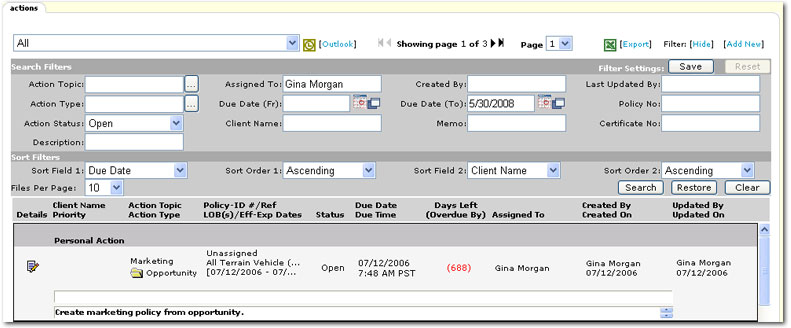
The following options are available when working with actions:
- Branch: The Branch
 list box in the upper left can be used to select a branch to narrow the search results. Once a branch is selected personal actions and actions tied to the selected branch are displayed.
-
 Microsoft Outlook: The
Microsoft Outlook
  icon is used to open Microsoft® Outlook®
to synchronize actions with an Outlook calendar or tasks. See
Creating Actions.
- Showing Page: The Arrow

 icons can be used to navigate through pages of search results.
- First Page
 icon.
icon.
- Previous Page
 icon.
icon.
- Next Page
 icon.
icon.
- Last Page
 icon.
icon.
- Page: Click the Page
 arrow to open a list of all search results pages. Select the desired page number to open that page of search results.
-
 [Export]: Click [Export] to generate a Microsoft Excel® spreadsheet from the actions displayed on the screen.
Exporting to Excel can help to manage large amounts
of records by using Excel's search,
sort and print capabilities. A maximum of 5000 records can be exported.
- Search Filters: Click [Show] or [Hide] to toggle the Search Filters screen.

The options available on the Search Filters screen are:
- Filter Settings: In the Filter Settings area, two options are available:
- Save: If Save is clicked after setting up search filters, each time the actions tab is opened, the actions returned will be filtered by the saved filter setting. The settings will be saved regardless of any later criteria being entered, until Save is again clicked and a search is run. Exercise caution when saving filter settings with a date range as returned actions will be restricted to that date range. As a general rule, check the filter settings each time this tab is accessed.
Tip: Date variables can be used to set up a date range in a saved filter setting. Using date variables can help to avoid unwanted search results.
- Reset: Click Reset to return all filter settings to the Nexsure filter defaults. After filter settings are saved, the Reset button becomes active. Once the Reset button is clicked, it again becomes inactive until the Save button is again used.
- Action Topic: Enter the action topic to narrow the search results to a specific action topic. Or, click the Ellipsis
 button to open the Action Topics dialog box. In the Action Topics dialog box select one or more action topics to use as search criteria in the Search Filters screen. To make multiple selections, press and hold the CTRL key while selecting. Topics that are shaded in gray are inactive topics. Click [Select] to add the selection to the Search Filters screen.

- Action Type: Types are a default description clarifying the action and are associated with action topics. Enter the type to search for. Or, click the Ellipsis
 button to open the Action Types dialog box. In the Action Types dialog box select one or more action types to use as search criteria in the Search Filters screen. To make multiple selections, press and hold the CTRL key while selecting. Types that are shaded in gray are inactive types. Click [Select] to add the selection to the Search Filters screen.

- Action Status: By default the Open status is selected in the Action Status box. Or, select the status of the action to search for:
- All
- Open
- Closed
- Description: Enter the description to return results that include all actions with that description. Enter at least one character to narrow the search results. Entering some of the Description returns a broader result; enter most of the description for more specific results.
- Assigned To: By default the person logged on is entered in the Assigned To box. Or, enter the name of the person to whom the action is assigned. Enter at least one character to narrow the search results. Entering some of the Assigned To name returns a broader result, enter most or full first and last names for more specific results.
- Due Date (Fr): Click the Calendar
 icon to select the beginning date in a date range. A date range can be selected to return all actions with Due Dates in the date range. Click the Variable
  icon and enter a variable number of days to set a continuous date range to be used with Save Filter Settings. Enter + or - and the number of days up to three digits. The date will then be + (after) or - (before) the current date.
- Client Name: Enter the name of a client to return results that include all actions for a particular client. Enter at least one character to narrow the search results. Entering some of the Client Name returns a broader result; enter most of the name for more specific results.
- Created By: Enter the name of a person that created the action. Search results will return all actions created by that person. Enter at least one character to narrow the search results. Entering some of the Created By name returns a broader result, enter most or full first and last names for more specific results.
- Due Date (To): By default the Due Date (To) will be the current date. Or, click the Calendar
 icon to select the ending date in a date range. A date range can be selected to return all actions with Due Dates in the date range. Click the Variable
  icon and enter a variable number of days to set a continuous date range to be used with Save Filter Settings. Enter + or - and the number of days up to three digits. The date will then be + (after) or - (before) the current date.
- Memo: Enter words from the Memo section of the action to search for. Search results will return all actions that contain those words in the Memo section of the action.
- Last Updated By: Enter the name of the person that last updated the action. Search results will return all actions where the person's name appears in the Updated By column of the results. Enter at least one character to narrow the search results. Entering some of the Last Updated By name returns a broader result, enter most or full first and last names for more specific results.
- Policy No: Enter at least one digit of the policy number associated with the action. The more digits of the policy number entered the narrower the search results.
- Certificate No: Enter at least one digit of the certificate number associated with the action. The more digits of the certificate number entered the narrower the search results.
- Sort Filters: Use the Sort Filters to sort the results of the actions search.
The options available on the Sort Filters screen are:

- Sort Field 1: By default Sort Field 1 is set to Due Date. However, another column heading from the Sort Field 1 list may be selected. The search results will be sorted by the column selected in the Sort Field 1 list.
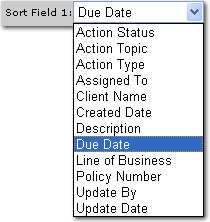
- Sort Order 1: By default Sort Order 1 is set to Ascending. However, either Ascending or Descending may be selected to set the order of the actions returned. Ascending will set the order from A-Z. Descending will set the order from Z-A. The Sort Field 1 will be the first sort and Sort Field 2 will be the sub sort.
- Sort Field 2: By default Sort Field 2 is set to Client Name. However, another column heading from the Sort Field 2 list may be selected. The search results will be sorted by the column selected in the Sort Field 2 list.
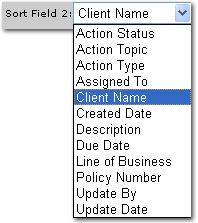
- Sort Order 2: By default Sort Order 2 is set to Ascending. However, either Ascending or Descending may be selected to set the order of the actions returned. Ascending will set the order from A-Z. Descending will set the order from Z-A. The Sort Field 1 will be the first sort and Sort Field 2 will be the sub sort.
- Files Per Page: By default the Files Per Page is set to 5. However, 5, 25, 50, or 100 action records may be selected to display per screen.
- Search: Click Search. The results of the Search Filter criteria and Sort Filter settings are displayed. A maximum of 2000 records can be returned in the search results.

- Restore: Click Restore to return to the current saved Filter Settings without having to navigate away.
- Clear: Click Clear to remove all entries in the Search Filter and Sort Filters fields.
Important: Clicking Clear does not remove the saved Filter Settings selections.
The following columns are displayed in the actions search results:
- Details: There are two types of Details icons that will each give access to different information:
- The
blue Client Details
 icon will display the client card file tab. Right-clicking on the Client Details
  icon displays the following navigation
options:
- Open: Opens the client card file tab.
- Add New Opportunity: Opens the Add New Opportunity dialog box to choose one or more lines of business.
- Market New Line of Business: Adds a marketing record and brings up the Add Line of Business screen.
- The white Action Details
 icon will display the selected action allowing the action to be modified. Right-clicking on the Action Details
  icon displays the following navigation
options:
- Open: Opens the current action to edit.
- Add New Action: Opens the Add New Personal Action screen.
- Mark As Closed: Closes the action without adding a new memo to the action.
- Print Application: If the action is associated with a policy, click this link to print the forms associated with the policy.
- Client
Name: If the action is created for a particular client, the client's name will be
displayed as the primary named insured.
- Priority: The red Flag
 icon under the client name on the actions tab indicates a high
level of priority.
- Action Topic: Topics
are unique and allow grouping of like items together. For
instance, the Renewal topic would be used on every action during the renewal
process.
- Action Type: Type
is the actual description of the action such as Call the Underwriter.
Type is found directly under the Action Topic beside the action icon. (See
action setup for more details). To the left of the Action Type there may be icons displayed such as; [
 ] Question Mark and [
 ] Information, these icons are chosen by the agency in the actions setup for each Action Type.
- Policy
Info: If an action is added at the policy level the policy number, line of business,
and effective date will be displayed. Or, if the action was added at the client level and associated with a policy, the policy information will be displayed. Hover the mouse pointer over the information in this column to see a pop-up with complete information.
- Policy ID # / Ref # / LOB(s) / Eff Exp Dates: This column displays four pieces of information:
- Policy ID #: The ID number associated with the policy.
- Ref #: The certificate reference number and the certificate number.
- LOB(s): Lists the LOBs associated with the policy.
- Eff Exp Dates: Lists the effective and expiration dates.
- Status:
The
action status will either be Open or Closed which is selected while creating or modifying the action.
- Due
Date / Due Time: This is the date that this action is due to be
completed. If
more than one action is due on the same day, a due time can be assigned
to address each action in chronological order.
- Days Left: Next
to the Due Date is a color-coded countdown number of the days remaining
or past the due date of that specific action. The
legend is as follows:
- Green: More than five days before the due date.
- Orange: Five days or less before the due date.
- Red: Number of days past the due date.
- Assigned
To: The
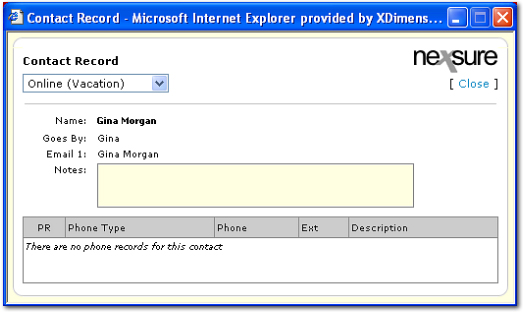
person assigned the responsibility to address the action. Click on the name to view the Contact Record dialog box.
- Created
By: Person that created the action. Click on the name to view the Contact Record dialog box.
- Created On: Date
and time the action was created.
- Updated By: Name of the person that last updated the action. Click on the name to view the Contact Record dialog box.
- Updated On: Date
and time the action was last updated.
- Memo: View the message that was added to the action Memo box. To view the full memo, click in the Memo box.

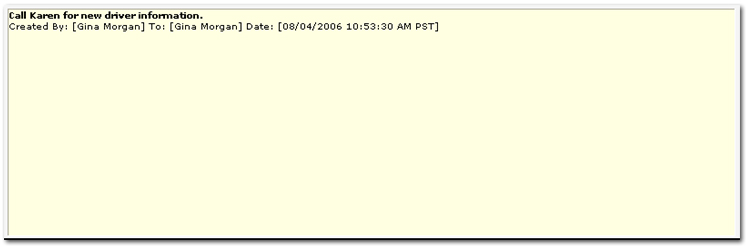
To collapse the Memo box, click outside of the Memo box.
Creating Actions
Setup > Actions


 icon > actions tab. An
action created here would pertain to a client's policy.

 arrow to open a list of all search results pages. Select the desired page number to open that page of search results.
 button to open the Action Topics dialog box. In the Action Topics dialog box select one or more action topics to use as search criteria in the Search Filters screen. To make multiple selections, press and hold the CTRL key while selecting. Topics that are shaded in gray are inactive topics. Click [Select] to add the selection to the Search Filters screen.
 button to open the Action Types dialog box. In the Action Types dialog box select one or more action types to use as search criteria in the Search Filters screen. To make multiple selections, press and hold the CTRL key while selecting. Types that are shaded in gray are inactive types. Click [Select] to add the selection to the Search Filters screen.


