Agency Fee Income Reconciliation Report
The Agency Fee Income Reconciliation report is a summary of Agency Fee income booked to the mandatory general ledger account for Agency Fee Income based on the posting rules for the agency. The report is used to prove the balance of the mandatory general ledger account for Agency Fee Income.
To Generate an Agency Fee Income Reconciliation Report
- On the Primary menu, click REPORTS.
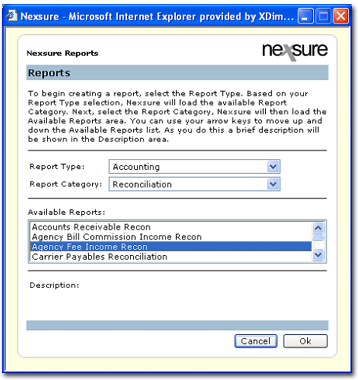
- On the REPORTS menu, click Reports. The Nexsure Reports dialog box is displayed.

- In the Report Type list, select Accounting.
- In the Report Category list, select Reconciliation.
- In the Available Reports list, select Agency Fee Income Recon.
- Click OK. The summary tab is displayed showing the report selected in the header area.

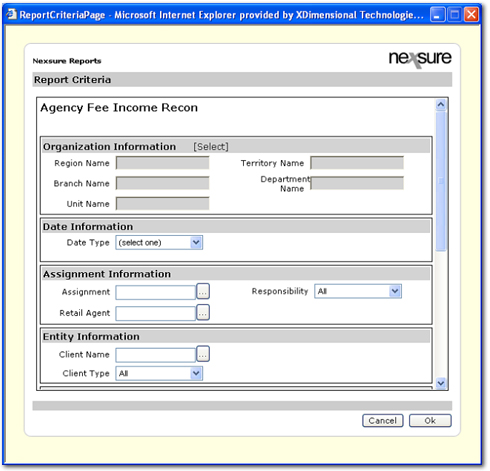
- On the navigation toolbar, click New Report Criteria to go to the Nexsure Reports > Report Criteria dialog box.

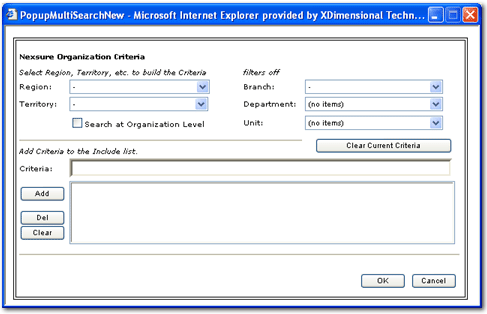
- Under Organization Information, click [Select]. The Nexsure Organization Criteria dialog box is displayed.

- In the Nexsure Organization Criteria dialog box, select the desired organization information (in the Region,
Territory, Branch, Department, and Unit lists) to query for the report
and click Add.
Note: If the report is being run for the entire organization it is not necessary to make a selection in the Nexsure Organization Criteria dialog box. Only one Region, Territory, or Branch may be selected for each report. When filtering by Department or Unit, add the Branch first then add the Department or Unit.
Once
information has been added to the Include list, it can be removed by selecting
the item and clicking Del to remove individual items or Clear to remove all
items.
- If
the organization information is correct, click OK. The organization information selected is added to the Nexsure Reports > Report Criteria screen.
- In the Date Information area, select date filters. Date filters are used to set the beginning and ending date of the
report.


The available options are:
- Date Type: Select either As Of Date or Date Range.
- As Of: Set the end date of the report by using either the
calendar dialog box or entering a date in the box.
- Period: Periods can be selected from the Period list, which are based on agency
accounting periods or can be entered manually if the desired date range does not fall within the
standard accounting periods. Period range filters will return all transactions
with a balance due within the date range of the report regardless of the transaction date booked.
- Year: Fiscal years based on the general ledger periods and default to current year.
- Date From: Start date for a selected period.
- Date To: End date for the selected period.
Note: As Of Date and Date Range
options will return the same results since the report will pull invoices based on their payment status
within the date range of the report, not date booked of the invoice.
- In the Assignment Information area, make selections to filter the report output by one or more people assignments and / or retail agents.

The available options are:
- Assignment: Limit report output by clicking the
 button to select one or more people assignments at the invoice level.
- Retail Agent: Limit report output by clicking the
 button to select one or more retail agent names.
- Responsibility: Limit report output based on only the responsibility type selected or can be used to further limit output in conjunction with the Assignment sections.
- In the Entity Information area, make selections to limit report output based on one or more client names and / or the client type.

The available options are:
- Client Name: Limit report output by clicking the
 button to select one or more client names.
- Client Type: Limit report output based on client type as designated in the client card file. From the Client Type list, select one of the following:
- All
- Personal
- Commercial
- In the Policy Information area, make selections to limit report output based on Policy Type, Policy Status, Line of Business and Policy Mode.

The available options are:
- Policy Type: Limit report output by selecting a Policy Type from the list. The available selections are:
- Empty
- Monoline
- Package
- All
- Line of Business: Limit report output by clicking the
 button to select one or more lines of business.
- Policy Status: Limit report output by selecting a Policy Status from the list. The Policy Status selections are unique to each organization.
- Policy Mode: Limit report output by selecting a Policy Mode from the list. The available selections are:
- All
- New
- New on Existing
- Renew
- Re-New-Co
- In the Carrier Information area, make selections to limit report output by one or more billing or issuing carriers.

The available options are:
- Billing Carrier: Limit report output by clicking the
 button to select one or more billing carriers.
- Issuing Carrier: Limit report output by clicking the
 button to select one or more issuing carriers.
- In the Grouping / Sorting Options area, select the grouping and sorting options that affect the layout of the report.

The available options are:
- Group Field [1]: Apply a primary grouping by:
- Bill To Name
- Bill Type
- Billing Carrier
- Branch
- Client Name
- Department
- Issuing Carrier
- People Last Name
- Policy Status
- Region
- Responsibility
- Retail Agent
- Territory
- Unit
- Group Field [2]: Apply secondary grouping by:
- Bill To Name
- Bill Type
- Billing Carrier
- Branch Name
- Client Name
- Date Booked
- Department
- Issuing Carrier
- None
- People Last Name
- Policy Number
- Policy Status
- Responsibility
- Retail Agent
- Territory
- Unit
- Sort Field [1]: Sort transactions in ascending order within groups.
Available selections are:
- Agency Commission
- Agency Fees
- Bill To Name
- Bill Type
- Billing Carrier
- Cleared By
- Client Name
- Date Booked
- Invoice Amount
- Invoice ID
- Other Commissions
- Other Fees
- Policy Mode
- Policy Number
- Premium
- Taxes
- Transaction Eff Date
- Sort Order: Select either Ascending or Descending to sort transactions within the group field selected. Ascending will set the order from A-Z. Descending will set the order from Z-A.
- In the Output Options area, make selections to insert a page break or change report output to calculate by production credit.

The available options are:
- Use Production Credit: Change report output by recalculating premiums to show production credit as assigned at the invoice level.
- Page Break: Inserts a page break between each of the items selected in the Group By [1] option.
- In the Report Format Options area, select one of the options in the Format Type list.

The available formats are:
- PDF: This is the default setting that creates the report in a PDF format. The report data is
static and cannot be manipulated.
- XLS: Microsoft® Excel® document that can be
manipulated as an .xls file. The report is generated with the same
formatting used in the PDF format so cells are merged and data may
not be stored in individual cells.
- DOC: Microsoft® Word® document that can be
manipulated as a .doc file.
- XLS (unformatted): Microsoft Excel document
that can be manipulated as an .xls file. The report is generated with no
formatting so cells are not merged and data is stored in individual
cells, however column headers do not appear and page breaks are
not inserted.
- In the Nexsure Reports > Report Criteria dialog box, click OK. The Agency Fee Income Reconciliation report will start compiling.

- To update the compiling status, click Refresh on the navigation toolbar.

- Once the report Status is Complete, click the View
 icon to view the report.
Working with Reports


 button to select one or more people assignments at the invoice level.
 button to select one or more retail agent names.
 button to select one or more client names.
 button to select one or more lines of business.
 button to select one or more billing carriers.
 button to select one or more issuing carriers.


