Retail Agent Assignments Tab
The retail agent assignments tab stores the agent's assignment information. The retail agent branch assignment will determine the availability of retail agents at the client and policy levels. The assignments added on this tab also dictate the availability of the retail agent for accounting transactions in the associated branch's territory.
Important: A retail agent cannot be deleted from Nexsure once an invoice is associated with that retail agent.
Quickly navigate to procedures included in this topic by clicking one of the links below:
To Add an Assignment
To Edit an Assignment
Understanding Accounting Results
To Add an Assignment
- On the Primary menu, click SEARCH.
- In the Entity
list, select Retail Agent. Search for the appropriate retail agent.
- Click the Details
 icon next to the retail agent.
- Click the assignments tab. The Assignment screen is displayed.
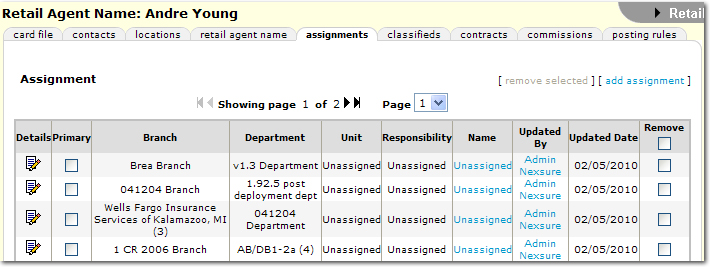
- On the Assignment screen, click [Add Assignment]. The Assign Account Management screen is displayed.
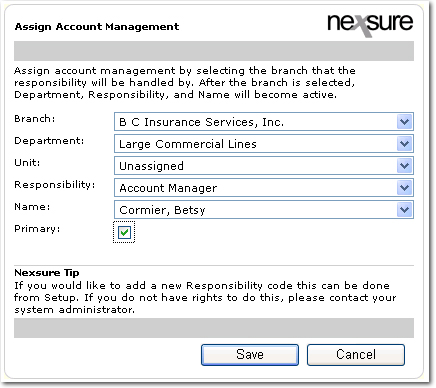
- In the Branch list, select from the branches associated with the organization. Select a branch to associate with the assignment.
Important: The assignments associating this branch with the retail agent dictate the availability of the retail agent for entity selections on accounting transactions in the associated branch's territory.
- In the Department list, select from the departments associated with the selected Branch. Select a department to associate with the assignment.
- In the Unit list, select from the units associated with the selected branch. Select a unit to associate with the assignment.
- In the Responsibility list, select the responsibility title to add to the assignment. This selection narrows the results in the Name list below.
- In the Name list, select the name for the assignment.
- Select the Primary check box if this assignment is to be the primary one for the retail agent.
Note: Primary assignments cannot be removed on the Assignment screen; another primary must first be selected.
- Click [Save] to save all entries on the Assign Account Management screen and return to the Assignment screen.
Or
- Click [Cancel] to return to the Assignment screen without saving entries.
To Edit an Assignment
- On the Primary menu, click SEARCH.
- In the Entity
list, select Retail Agent. Search for the appropriate retail agent.
- Click the Details
icon next to the retail agent.
- Click the assignments tab. The Assignment screen is displayed.
- Click the Details icon next to the assignment to edit. The Assign Account Management dialog box is displayed for editing. Make any changes necessary.
- Select the Remove check box and click [remove selected] to delete the assignment. Primary assignments cannot be removed on the Assignment screen; another primary must first be selected.
- Click [Save] to save all entries on the Assign Account Management screen and return to the Assignment screen.
Or
- Click [Cancel] to return to the Assignment screen without saving entries.
Understanding Accounting Results
The following basic rules apply when working on accounting transactions with retail agent assignments:
- A retail agent with a branch assignment will be available for selection at the territory level where the branch is associated.
- A retail agent assigned to a policy or client will be available for selection at the territory level.
- Branch assignment removal at retail agent after there has been a retail agent policy assignment will not remove the retail agent from territory level accounting transactions.
- A retail agent included in an invoice (posted or unposted) will be available for selection at the territory level.
- Removing a retail agent assignment from a policy and a client will not remove the retail agent from territory level accounting transactions.
- If a retail agent must be removed from territory accounting transactions, the following must be true:
- Branch assignment at retail agent does not exist.
- Retail agent is not on any policy or client.
- Retail agent is not included on any invoice.
Retail Agent Profile
Adding Retail Agents