Direct Bill Carrier Statement Entry
This process allows creating and posting invoices quickly from a carrier's direct bill commission statement, through reconciliation, without having
to access individual clients. No
invoicing is done at the client’s policy level but the policy
info tab does need to be completed with all applicable information.
To Reconcile a Statement
- On the Primary
menu,
click ORGANIZATION.
- Click the territories
tab.
- Click the Details
 icon of the appropriate
territory.
- Click the accounting > transactions > reconciliation tab.
- Click [Add
New Reconciliation]. The Reconciliation dialog box is displayed.
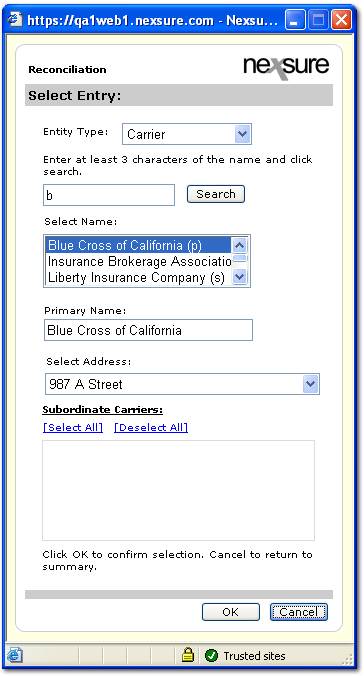
- In the Entity Type list, select Carrier.
- Search for the appropriate carrier and select a subordinate carrier if applicable.
- In the Select Name list, select the name of the carrier.
- In the Primary Name box, select the carrier. If there are more than one primary or subordinate names associated with the carrier selected, they are displayed.
- In the Select Address list, select the appropriate address for the carrier. Multiple addresses may be displayed if the carrier has more than one location.
- Click OK. The reconciliation tab is displayed.
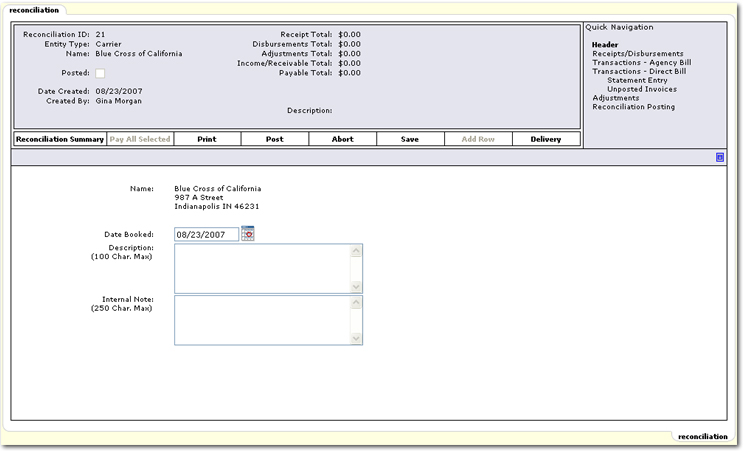
Note: Use the Maximize / Minimize  icon to display the full screen view of the reconciliation.
- The Date Booked entry will default to the current date.
- In the Description box, enter a description for the reconciliation if necessary.
- In the Internal Note box, enter an internal note if necessary.
- On the Navigation Toolbar, click Save.
- On the Quick Navigation panel, click Statement Entry. The policies that are available for statement entry transactions are displayed according to the search criteria selected.
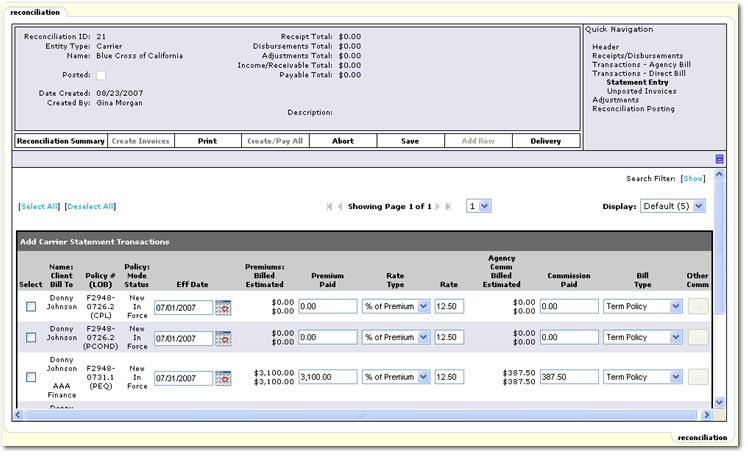
- If policies to be used for statement entry transactions are not immediately displayed, click [Show] to open the search filters. The following options are available:
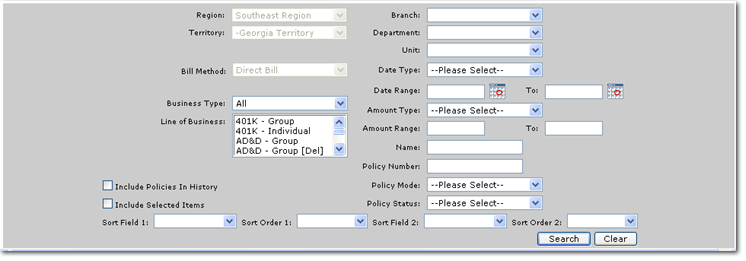
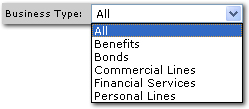
- Business Type: Select the business type for the transactions. The following selections are available:
- Line of Business: Select the line of business for the policies available for statement entry.
- Include Policies in History: Select this check box to include any policies in the policy tab and the history tab. If this check box is clear, any policies residing in the history policy tab will be excluded.
- Include Selected Items: Select this check box to include all previously selected items. If this check box is clear, items previously selected will remain selected but will not be displayed in the search results.
- Reset Premium and Commission fields to zero on all selected items (unchecks after search): Defaults to unchecked. Selection and search changes all premium and commission fields to zero except selected and paid items..
- Branch: Select the branch where the policies available for statement entry reside.
- Department: Select the department where the policies available for statement entry reside.
- Unit: Select the unit where the policies available for statement entry reside.
- Date Type: Select the date type to be searched for after setting the date range. The following options are based on the dates found in the policy header:
- Coverage Term Effective Date
- Policy Term Effective Date
- Date Range: Enter the beginning and ending dates in the date range to search.
- Amount Type: Select one of the following amount types:
- Premium: The premium amount per line item in the policy info.
- Commission: The commission amount per line item in the policy info.
- Amount Range: Enter, in dollars, the amount range to search.
- Name: Enter the client bill to name.
- Policy Number: Enter the policy number to search.
- Policy Mode: Select the policy mode. The following selections are available:
See the Policy Code Definitions topic for more information about the Policy Mode selections.

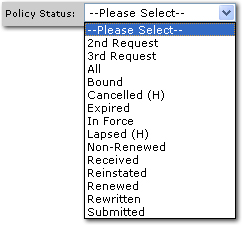
- Policy Status: Select the policy status. The following options are available:
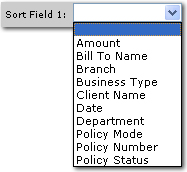
- Sort Field 1 and 2: The search results will be sorted by the column heading selected in the Sort Field 1 and / or the Sort Field 2 lists. The following selections are available in both sort field lists:
- Sort Order 1 and 2: Either Ascending or Descending may be selected to set the order of the policies available for statement entry returned. Ascending will set the order from A-Z. Descending will set the order from Z-A. The Sort Field 1 will be the first sort and Sort Field 2 will be the sub sort.
- Search: Click Search. The results of the Search Filter criteria and Sort Filter settings are displayed.
- Clear: Click Clear to remove all entries in the Search Filter and Sort Filters fields.
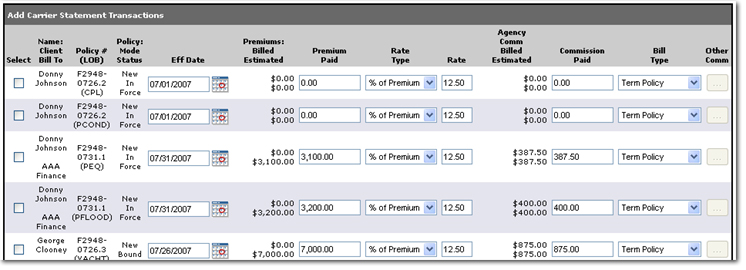
- Once the search results are displayed, the following options are available:
- Client Search: Search for clients by entering any text contained in the client name and selecting the search button.
- Policy Number Search: Search by policy number by enter any portion of a policy number and selecting the arrow icon.
- Clear: clears entries in both the client name and policy number fields
- Select: Select the transactions for which to create invoices.Selected items are automatically saved. Once and item is selected, a date/time stamp is applied. Subsequent searches will place unchecked items at the top of the list.
- Add Row(s) Selecting a number will add that number of duplicate rows . Selecting save refreshes the page and populates the added rows. Once saved, value is reset to zero on original row. Added rows are unchecked by default. Select row in order to save that row to the database. Additional other commission line items are duplicated per row selected..
- Name: Client / Bill To: Displays the name of the client and the Bill To name. If the Bill To name is the same as the client's name, then only the client name is displayed. Selecting the underlined header value of Client will sort the corresponding data alphabetically by client name. Selecting the header value once already selected will reverse the sort order.
- Policy # / (LOB): Displays the policy number assigned to the policy. Also displays the line of business assigned to the policy. Selecting the underlined header value of Policy # will sort the corresponding data by policy number. Selecting the header value once already selected will reverse the sort order..
- Policy: Mode / Status: Displays the mode from the policy header. Also displays the status from the policy header.
- Eff Date: The default date is the coverage term effective date from the policy info. This date can be changed which will change the invoice effective date.
- Exp Date: The default date is the coverage term expiration date from the policy info. This date can be changed.
- Premium Paid: Enter the estimated premium from the policy info. This amount can be edited to reflect the amount of the invoice. This amount can affect the commission paid to the agency if % of Premium is the rate type. If this invoice is for an installment, the amount of the installment can be entered.
Note: The invoice must be re-entered each time an installment commission is received using Installment as the Bill Type.
- Rate Type: The default selection is the commission type from the policy info. This type can be changed if necessary. Change this selection to Flat if the amount to be entered in Commission Paid is a flat dollar amount and not based on a percent of the premium entered in the Premium Paid field.
- Rate: The default entry is the commission rate from the policy info. This rate can be changed if necessary but will automatically change the Commission Paid entry.
- Agency Comm: Billed / Estimated: Displays the total of commissions billed as updated by posted invoice entries. Also displays the estimated commission amount to be used in the statement entry as the assumed invoice amount.
- Commission Paid: The default entry is from the agency commission estimated in the policy info. This amount can be changed to reflect the amount of the invoice.
- If Rate is % of Premium and Commission Paid is entered, the Premium Paid will be automatically altered.
- If Rate is Flat, the amount will be the amount entered in Commission Rate. This amount will not alter the Premium Paid.
- Other Commission Name: Display other commission name.
- Production Credit: Displays production credit.
- Other Commission Amount: Displays other commission amount.
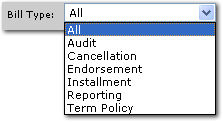
- Bill Type: The default selection is from the background servicing activity (such as endorsement, cancellation, audit or term policy). The following options are:
- Audit: The policy has been audited. Premium Paid amount for the transaction will be added to the Annualized and Billed totals on the policy's policy info tab.
- Cancellation: The policy has been cancelled. Premium Paid amount for the transaction will be added to the Billed premium on the policy's policy info tab. Cancellation Premium Paid does not change the Annualized premium field.
- Endorsement: The policy has been endorsed. Premium Paid amount for the transaction will be added to the Annualized and Billed totals on the policy's policy info tab.
- Installment: Exclusive to direct bill statement entry. The policy info result will be to add to annualized and billed during the policy term as determined by the transaction effective date. The master invoice together with the general invoice determines the annualized premium.
- Term Policy: Premium Paid amount for term transactions is entered in the Annualized and Billed fields of the policy's policy info tab. Any previous totals for the policy term are replaced by the Term Policy transaction.
- Other Commission: The Ellipsis
 button will become active if Other Commission has been added to the policy. Click the Ellipsis
  button, the [Add New Other Commission] link in displayed at the bottom of the screen.
- Click [Add New Other Commission]. The Add People Commission entry boxes are displayed.
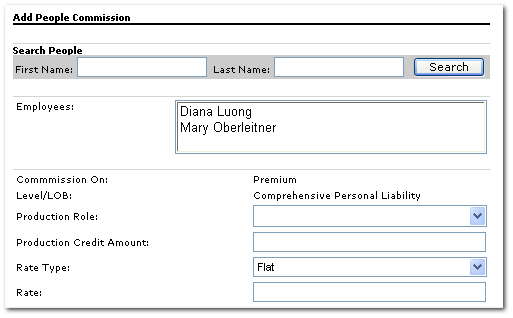
- In the Search People area, enter some or all of the first and / or last names and click Search.
- In the Employees list, select the employee. If commission defaults are already set for the carrier, those defaults are automatically entered in the boxes below. Selections can be altered.
- The Commission On and Level / LOB selections are pulled from the policy. These selections cannot be altered.
- In the Production Role list, select the select the production role of the employee.
- In the Production Credit Amount box, enter the credit amount for the employee.
- In the Rate Type list, select the type of rate for the credit. The available selections are:

- In the Rate box, enter the rate for the commission.
- Click OK. The other commission is added to the Add Carrier Statement Transactions screen below the transactions.
Or
Click Cancel to return to the Add Carrier Statement Transactions screen with out saving commissions additions.
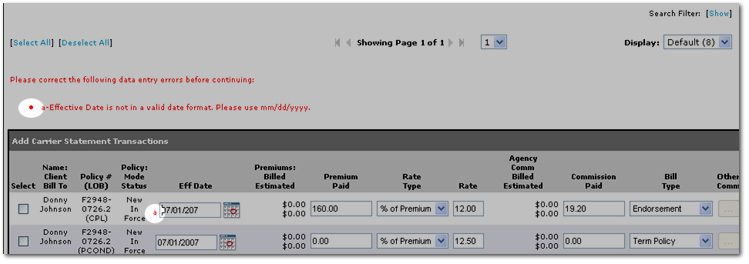
- Once all entries have been made, on the Navigation Toolbar, click Save. If any entry errors have been made, the errors are noted on screen.
- On the Navigation Toolbar there are several options:
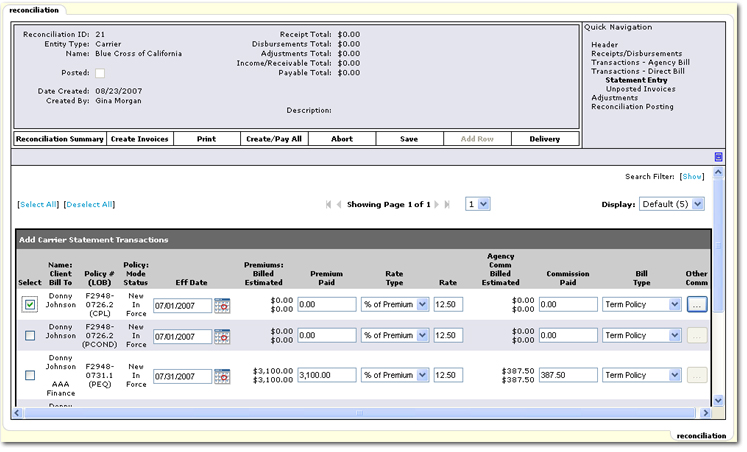
- Reconciliation Summary: Return to the reconciliation tab and save changes to the statement entry.
- Create Invoices: Gives confirmation that invoices will be created. Clicking OK in the confirmation dialog box will present the opportunity to click Close to exit the reconciliation process to continue other work in Nexsure while the invoices are being created.
- Print: Prints results of report selected. Selection of available report options will be listed. Available options are:Reconciliation Summary Exceptions Report.and ,Carrier Remittance Advice.
- Create / Pay All: For selected items, if no exceptions exist, invoices are created, posted, and flagged as received. If exceptions exist, popup will display on top of reconciliation that lists items that cannot be created due to production credit discrepancy.
- Exceptions Popup Command options:
- Create/Pay Invoices: Creates, posts and pays invoices that are not exceptions. Once selected, user is taken to Transactions-Direct Bill to continue.
- Create/Pay Invoices - Post: Creates, posts and pays invoices that are not exceptions. Summary popup to create/pay/post displays. Selecting OK returns Popup to close option. If close is selected, Post process is aborted and user is returned to summary line items. If close is not selected, selection displays Post popup.
- Cancel: Selecting cancel returns user to reconciliation.
- Abort: Reconciliation is aborted and invoices are not created.
- Save: Saves entries.
- Delivery: Once the Print option has been selected to return the Reconciliation Summary, the summary can be delivered.
- On the Navigation Toolbar, click Create Invoices. A confirmation dialog box is displayed and the invoices are then displayed, ready for posting.
Or
On the Navigation Toolbar, click Create / Pay All. The invoices are then created, posted and paid.
- After clicking Create Invoices, the Transactions - Unposted Invoices screen is displayed.

- In the Search Filter area, click [Show] to view the search criteria and sort filter options. The following options are available:
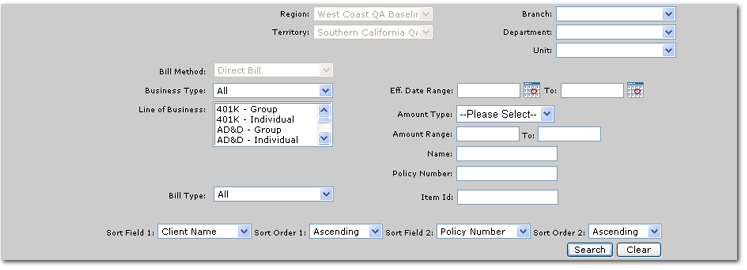
- Business Type: Select the business type for the transactions. The following selections are available:

- Line of Business: Select the line of business for the transactions.
- Bill Type: Select the bill type used on the policy. The available selections are:
- Branch: Select the branch where the transactions reside.
- Department: Select the department where the transactions reside.
- Unit: Select the unit where the transactions reside.
- Effective Date Range: Enter the beginning and ending dates in the date range to search.
- Amount Type: Select one of the following amount types:
- Premium: The premium amount per line item in the policy info.
- Commission: The commission amount per line item in the policy info.
- Amount Range: Enter, in dollars, the amount range to search.
- Name: Enter the client bill to name.
- Policy Number: Enter the policy number to search.
- Item ID: Enter the invoice Item ID number to search.
- Policy Mode: Select the policy mode. The following selections are available:
- Sort Field 1 and 2: The search results will be sorted by the column heading selected in the Sort Field 1 and / or the Sort Field 2 lists. The following selections are available in both sort field lists:
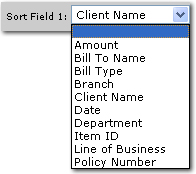
- Sort Order 1 and 2: Either Ascending or Descending may be selected to set the order of the transactions returned. Ascending will set the order from A-Z. Descending will set the order from Z-A. The Sort Field 1 will be the first sort and Sort Field 2 will be the sub sort.
- Search: Click Search. The results of the Search Filter criteria and Sort Filter settings are displayed.
- Clear: Click Clear to remove all entries in the Search Filter and Sort Filters fields.
- Once the search results are displayed, the following options are available:

- Select: Select the invoices to be posted.
- Date: Displays the transaction effective date.
- Item ID: Displays the invoice ID number. The ID will be followed by an (S) denoting it is a statement entry item.
- Bill Type: Displays the bill type according to the policy servicing activity.
- Client / Bill To: Displays the client name and the bill to name. If the client name and bill to name are the same, only the client name will be displayed.
- Policy Number: Displays the policy number of the policy selected for invoicing.
- LOB: Displays the abbreviated LOB of the line item invoiced.
- Premium / Rate / Commission: Displays amounts previously entered for the invoice.
- Other Comm. (Total / % of Agency): Displays the net total of the other commissions paid and the calculated % of agency.
- Remove: Permits the removal of unposted invoices.
- On the Navigation Toolbar there are several options:
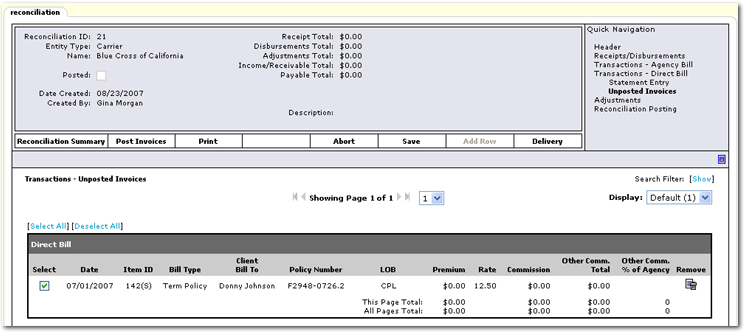
- Reconciliation Summary: Return to the reconciliation tab and save changes.
- Post Invoices: Gives confirmation that invoices will be posted. Clicking OK in the confirmation dialog box will post selected invoices and move them to the Transactions - Direct Bill link on the Quick Navigation panel.
- Print: Prints selected invoices.
- Abort: Reconciliation is aborted and invoices are removed.
- Save: Saves entries.
- Delivery: Once invoices are printed, they can be delivered.
- On the Navigation Toolbar, click Post Invoices. A confirmation dialog box is displayed and the invoices are then moved to the Transactions - Direct Bill link on the Quick Navigation panel.
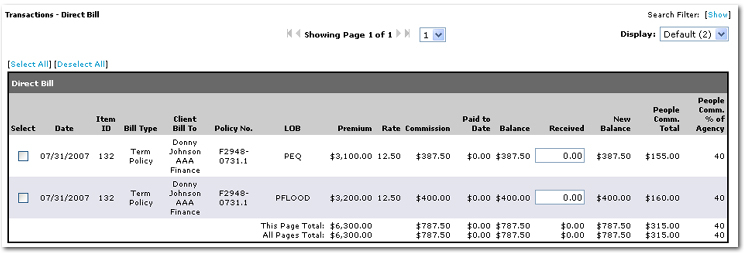
- The following options are available:
- Select: Select this check box to fill the Received column with the total from the Balance column. Items selected will be included when Pay All Selected on the Navigation Toolbar is selected.
- Date: The transaction effective date is displayed.
- Item ID: The item ID number is followed by an (S) denoting the item is for statement entry. The Item ID number is also a link to the unposted invoice for adjustment purposes.
- Bill Type: Displays the bill type according to the policy servicing activity.
- Client / Bill To: Displays the client name and the bill to name. If the client name and bill to name are the same, only the client name will be displayed.
- Policy Number: Displays the policy number on the policy selected for invoicing.
- LOB: Displays the abbreviated LOB is the policy is monoline. PCKG is displayed if the policy is a package policy.
- Premium / Rate / Commission: Displays amounts previously entered for the invoice.
- Paid to Date: The commission entered or calculated from previous reconciliations as paid by carrier to agency.
- Balance: The balance of commission due on the invoice.
- Received: The amount received from the carrier. Can be altered.
- New Balance: The balance due for the commission based on payments received to date.
- People Comm. (Total / % of Agency): Displays the net total of the people commissions paid and the calculated % of agency.
- On the Navigation Toolbar there are several options:
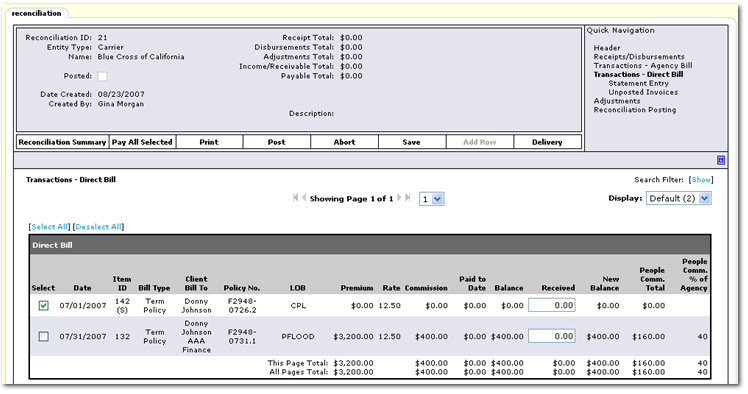
- Reconciliation Summary: Return to the reconciliation tab and save changes.
- Pay All Selected: Pays all selected invoices. A confirmation dialog will be displayed and the reconciliation header is updated.
- Print: Prints selected reconciliations.
- Post: Posts selected reconciliations.
- Abort: Reconciliation is aborted and invoices are not reconciled although they do remain posted.
- Save: Saves entries.
- Delivery: Once reconciliations are printed, they can be delivered.
Important: Statement entry that requires invoicing of multiple iterations of the same policy see Alternate Statement Entry.
Related Topics
Revising Commission During Reconciliation


![]() icon to display the full screen view of the reconciliation.
icon to display the full screen view of the reconciliation.


 button will become active if Other Commission has been added to the policy. Click the Ellipsis
  button, the [Add New Other Commission] link in displayed at the bottom of the screen.


