Agency Billing
Agency billing generates a record for the agency showing the amount due from the client and the amount due to the carrier.
To Invoice Using Agency Billing
- On the Primary menu, click SEARCH. Search for the client to invoice.
- Click the Details
 icon next to the appropriate client.
Note: An invoice can also be added from the policy transactions tab.
- On the Client
menu,
click TRANSACTIONS. The transaction summary tab is displayed.

- On the transaction summary tab, click [Add
New Invoice]. The New Policy Selection dialog box is displayed.
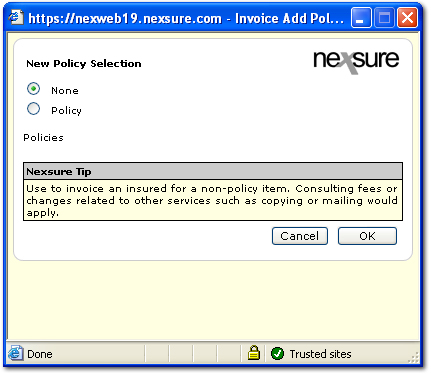
- In the New Policy Selection dialog box, select one of the following options:
- None: Indicates the invoice will be used for a non-policy item such as consulting fees.
- Policy: Indicates the invoice will be used for a policy.
Note: The New Policy Selection dialog box will not be displayed if the invoices were added through the policy transactions tab.
- If Policy was selected, the New Policy Select dialog box is expanded to include the following options:
- Select either Current or History to display the associated policies.
- In the Policies list, select the policy number that requires an invoice.
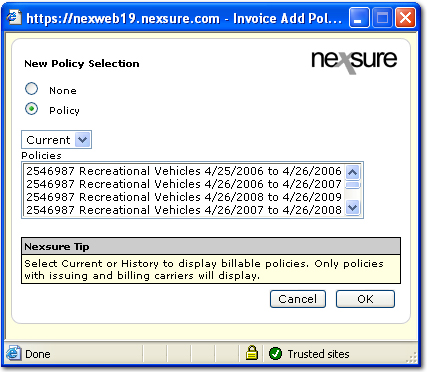
- Click OK. The invoice tab is displayed containing the new invoice. The new invoice will contain information carried over from the policy info tab including the bill type.
Note: Use the Maximize / Minimize  icon to display the full screen view of the invoice.
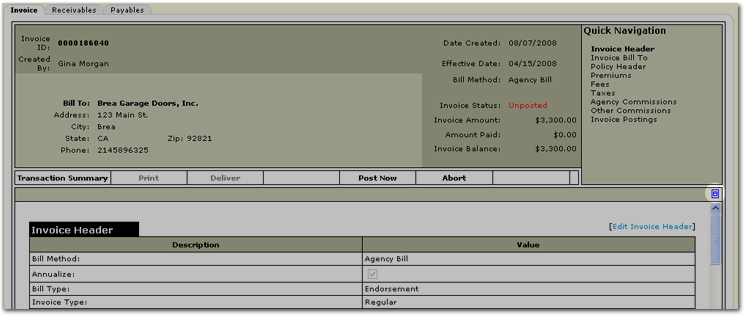
- Using the Quick Navigation
panel, review and complete each of the following sections:
 Invoice
Header
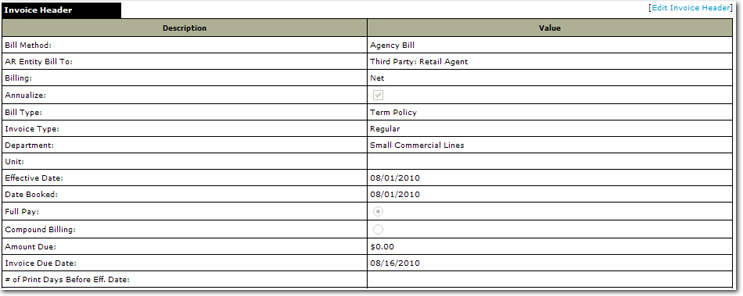
If changes to the Invoice Header are required, click [Edit Invoice Header]. The Edit Invoice Header dialog box is displayed.
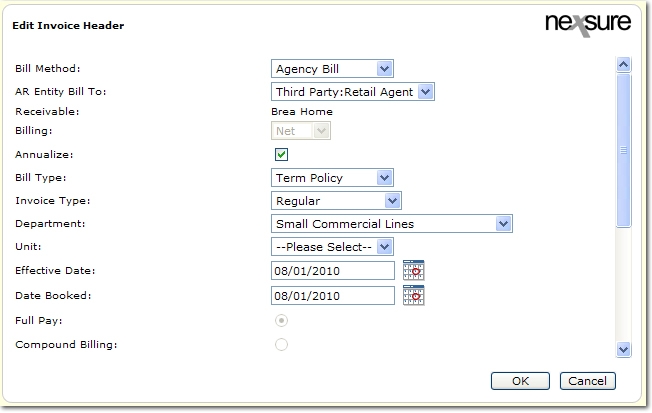
In the Edit Invoice Header dialog box, update or complete the following options:
- Bill Method: Select
Agency Bill.
Note: Direct Bill may be selected at this point if a change in the Bill Method is necessary. See Direct Billing for more information.
- AR Entity Bill To: Select the appropriate entity to bill. The options are Client or Third Party: Retail Agent. The retail agent must be assigned to the policy to invoice a retail agent.
- Receivable: The name of the receiving entity is displayed.
- Billing: Either Net or Gross is displayed depending on the posting rules set for the retail agent record. This option will be available if both Net and Gross are selected in the posting rules. See the Retail Agent Posting Rules topic for more information about setting the posting rules.
- Annualize: This check box is selected by default. Clearing this check box enables exclusion of annualized line items when invoicing. This option is helpful for short-term policies or special
event policies.
- Bill Type: In the Bill Type list, select one of the following options:
- Account Service: Used for creating an invoice that does not apply to a policy.
- Audit: Used for invoicing all audits that result in a premium change.
- Cancellation: Used if invoicing a cancellation to record return premium.
- Endorsement: Used for invoicing an endorsement that results in a premium change.
- Reporting: Used if invoicing a reporting policy.
- Term Policy: Used if invoicing a new business or renewal policy.
- Invoice Type: In the Invoice Type list, select one of the following options:
- Regular: Is applied to all appropriate general ledger accounts.
- Binder Bill: Is applied to accounts receivable and binder bill payables. Appropriate income
and expense accounts as well as the carrier payable will be applied when the binder bill is reversed.
- Manual Bill: Is recorded in the system but does not affect any general ledger accounts.
- Beginning Balance: Is used exclusively when an agency goes live. The Beginning Balance Invoice Type must be used in conjunction with the added Fee of Beginning Balance that is offset to a general ledger AR Beginning Balance mandatory general ledger number.
Tip: An agency, during their go-live process, will use the Beginning Balance Invoice Type combined with the Beginning Balance Fee to record their client beginning balances. Invoice transactions automatically post to accounts receivable so this offset will go against the accounts receivable Beginning Balance general ledger number.
- Department: The department information is displayed by default. If the department information needs to be modified, select the appropriate department from the list.
- Unit: A Unit can be selected from the list however, units are not required. Units
are a subset of departments, they provide additional income and expense
breakdown if needed.
- Effective Date: Select
the effective date of the transaction. The
default effective date is the Effective Date of the policy. This
date determines the period that the invoice will be posted.
- Date Booked: This defaults to the effective date of the policy or the invoice creation date based on which is later.
- Full Pay: Select if the billing will be in full.
Note: Installment billing is the recommended means for creating multiple billing under the same invoice.
- Down Payment Amount: Enter the down payment amount.
- Down Payment Date Due: Enter the down payment due date.
- Payment Plan: Select one of the following payment plans:
- Annual: Due date of the first installment is based on the date entered in the 1st Compound Billing Effective Date box. Subsequent installments billed in one year increments up to the specified number of installments.
- Semi-annual: Due date of the first installment is based on the date entered in the 1st Compound Billing Effective Date box. Subsequent installments are billed in six month increments up to the specified number of installments.
- Quarterly: Due date of the first installment is based on the date entered in the 1st Compound Billing Effective Date box. Subsequent installments are billed in three month increments up to the specified number of installments.
- Monthly: Due date of the first installment is based on the date entered in the 1st Compound Billing Effective Date box. Subsequent installments are billed in one month increments up to the specified number of installments.
- Weekly: Due date of the first installment is based on the date entered in the 1st Compound Billing Effective Date box. Subsequent installments are billed in one week increments up to the specified number of installments.
- Same Date: Due date of the first installment is based on the date entered in the 1st Compound Billing Effective Date box. Subsequent installments are billed on the same date as the first installment up to the specified number of installments.
- Number of Compound
Billings: Enter the total number of installments, excluding the down payment.
- 1st Compound Billing
Eff. Date: This defaults to the current date. All subsequent installments are based on this date.
- Amount Due: This field is display only. The amount shown here is the total premium amount.
- Invoice Due Date: Enter the number of days before this bill will become past due.
- # of Print Days Before
Eff. Date: Nexsure can automatically post an invoice and make the invoice available for printing. Enter the number of days prior to the effective date of the invoice that the automatic process should be run by Nexsure.
Note: To suspend the automatic posting of an invoice, leave this field blank.
- Fee Option: Select when the fee is to be collected. A Fee Option must be selected even if no fees are included.
- Tax Option: Select when the tax is to be collected. A Tax Option must be selected even if no taxes are included.
- Rounding Option: Select the rounding option to indicate when the rounding will be applied to an invoice.
- Unique Invoice Message: A message entered here will print on the invoice.
- Internal Note: Enter any internal notes, these notes will not print on the invoice. On the transaction summary tab, if an invoice contains an internal note, the Type column will contain an asterisk *. The internal note can be viewed by hovering over the asterisk, a pop-up will be displayed containing the note.
 Bill
To

- If changes to the Invoice Bill To are required, click [Change Bill To]. The Bill To: Select Entity dialog box is displayed.
Important: The Invoice Bill To information is not editable if the entity is a retail agent.
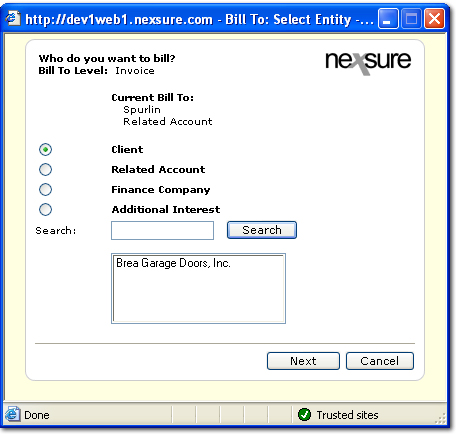
- Select one of the following entity types:
- Client
- Related Account
- Finance Company
- Additional Interest
- Third Party: Retail Agent
Note: Any named
insured may be selected as the Bill To on invoices.
- Use the Search option if the entity name is not already displayed in the search results.
- In the search results, select the name of the entity.
- Click Next.The client dialog box is displayed.
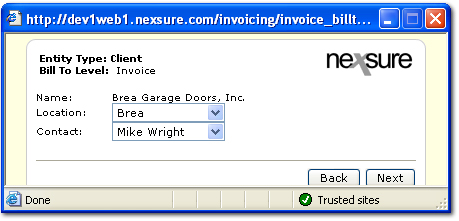
- In the client dialog box, select the Location and Contact for the invoice.
- Click Next. The Confirm Change dialog box is displayed.
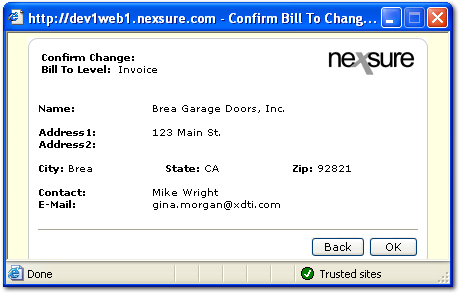
- Click OK. The invoice tab is again displayed.
Or
Click Back to return to the previous window and make changes.
 Policy
Header
Policy header information is displayed. Edits cannot be made to the policy header at this point.
 Invoice
premium

- If changes to the premium due are required, click the Details
 icon next to the premium to update.
- Click [Add New Premium] to add a new premium due. The Add Premium dialog box is displayed.
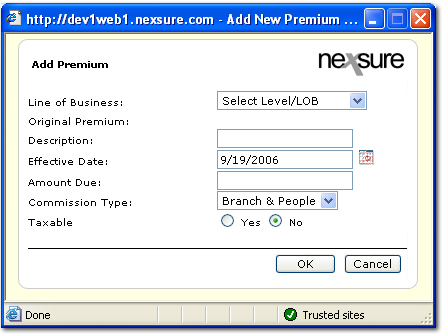
- In the Line of Business list, select the line of business for the premium.
- In the Description box, enter a brief description of the premium.
- The Effective Date box defaults to the Effective Date on the policy.
- In the Amount Due box, enter the amount that is currently due on the premium.
- If the new premium is taxable, select Yes.
- Click OK. The invoice tab is again displayed.
 Fees
Fees

- If changes to the fees are required, click the Details
 icon next to the fee to update.
- Click [Add New Fee] to add a new fee. The Add Non Premium dialog box is displayed.
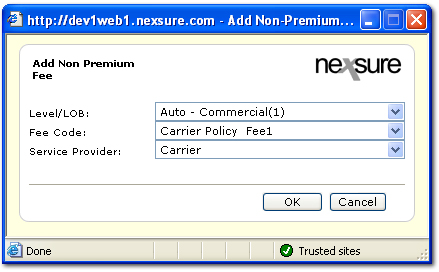
- In the Level / LOB list, select the line of business for the fee.
- In the Fee Code list, select the code with which the fee is associated. The Fee Code is the name of the fee that was added during the invoice setup process.
- In the Service Provider list, select the name of the entity that is providing the service in exchange for the fee.
- Click OK. The Add Non Premium Fee Details dialog box is displayed.
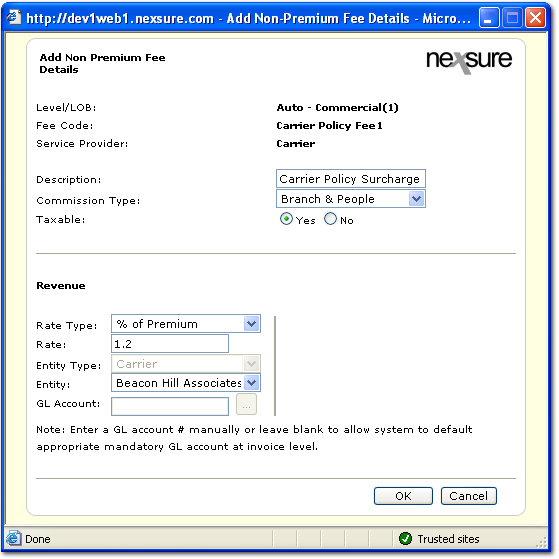
- The Description box is automatically completed with the description that was added to the fee during the invoice setup process.
- In the Commission Type list, select the commission type for the fee. This selection is used to identify whether a commission should be applied to a fee and if so, which type of commission.
- Select Yes if the fee is taxable.
- In the Revenue area, make selections in the following:
- Rate Type: Determines how the rate will be calculated.
- Rate: Establishes the flat dollar amount or the percentage of premium for the fee.
- Entity Type: Determines if the fee amount is offset to the Branch (income or expense) or Carrier (payable).
- Entity: Determines the entity for which the fee amount will be offset.
- GL Account: Determines the GL account for which the fee amount will be offset.
- Click OK. The fee is added to the invoice tab.
 Taxes
Taxes

- If changes to the taxes are required, click the Details
 icon next to the tax to update.
- Click [Add New Tax] to add a new tax. The Add Non Premium Tax dialog box is displayed.
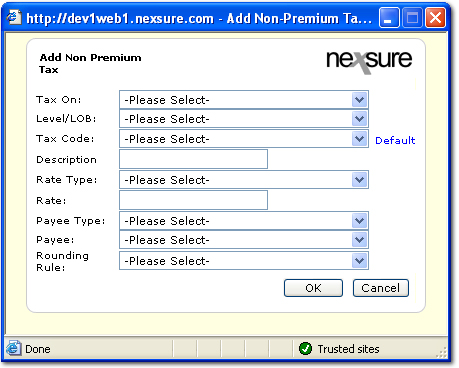
- In the Tax On list, the selection determines where the tax will be applied.
Note: If Fee is selected, the Fee Code list will also be displayed.
- In the Level / LOB list, the selection determines to what LOB the tax will be applied.
- In the Tax Code list, select the name of the tax.
- Optionally, once the Tax Code has been selected, click Default. The remainder of the selections will be automatically entered with the defaults created in the invoice setup process.
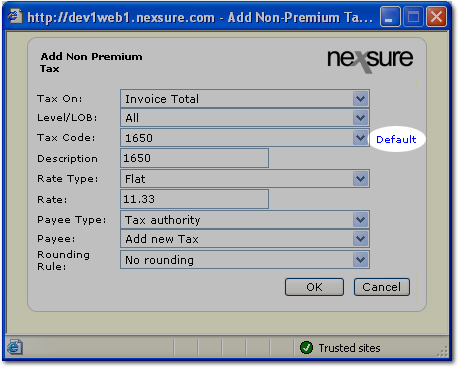
- In the Description box, enter a description for the tax. This entry defaults to the description entered during the invoice setup process.
- In the Rate Type list, make a selection to identify if the rate will be a flat dollar amount or a percentage of items taxable.
- In the Rate box, enter the flat dollar amount or the percentage of items taxable for the tax.
- In the Payee Type list, make a selection to identify which entity is paid for the tax.
- In the Payee list, make a selection if the Payee Type selected is Tax Authority.
- In the Rounding Rule list, make a selection to control the rounding on the tax when a percentage has been applied.
- Once all selections have been made in the Add Non Premium Tax dialog box, click OK. The tax is added to the invoice tab.
 Agency Commissions

- If changes to the Agency Commissions are required, click the Details
 icon next to the commission to update.
- Click [Add New Agency Commission] to add a new commission. The Add Agency Commission dialog box is displayed.
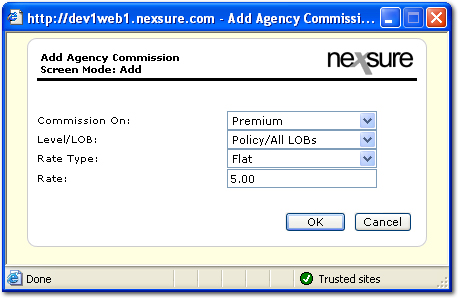
- In the Commission On list, select the item on which the commissions will be based.
- In the Level / LOB list, the selection determines to what LOB the commission will be applied.
- In the Rate Type list, make a selection to identify if the rate will be a flat dollar amount or a percentage.
- In the Rate box, enter the flat dollar amount or the percentage on which the commission will be based.
- Click OK. The agency commission is then added to the invoice tab.
 Third Party Commissions
Important: The Third Party Commissions area is only available when the bill to entity is a retail agent.

- If changes to the Third Party Commissions are required, click the Details
 icon next to the commission to update.
- Click [Add New Third Party Commission] to add a new commission. The Add Third Party Commission dialog box is displayed.
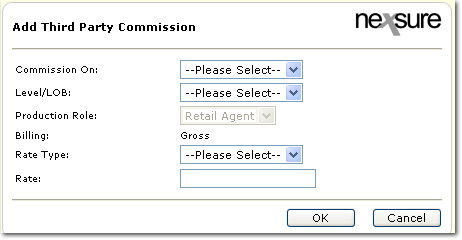
- In the Commission On list, select the item on which the commissions will be based.
- In the Level / LOB list, the selection determines to what LOB the commission will be applied.
- In the Rate Type list, make a selection to identify if the rate will be a flat dollar amount or a percentage.
- In the Rate box, enter the flat dollar amount or the percentage on which the commission will be based.
- Click OK. The invoice tab is again displayed.
 Other
Commissions

- If changes to the Other Commissions are required, click the Details
 icon next to the commission to update.
- Click [Add New Other Commission] to add a new commission. The Add People Commission dialog box is displayed.
Note: If
default
commissions exist for Carrier, People or Fees, they will be created
automatically. Defaulted
commissions can be edited.
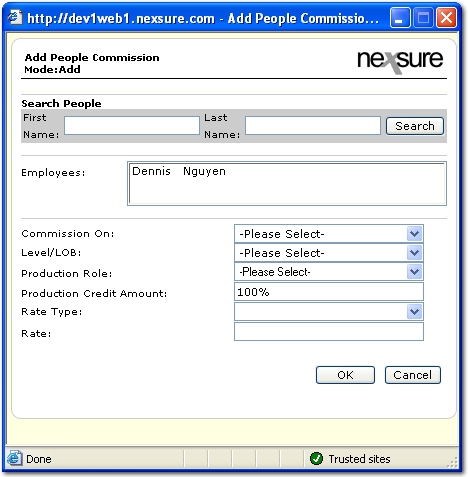
- In the Search People area, enter the first and / or last name of the employee.
- Click Search.
- In the Employees list, select the name of the employee with which to associate the commission.
- In the Commission On list, select the item on which the commissions will be based.
- In the Level / LOB list, the selection determines to what LOB the commission will be applied.
- In the Production Role list, select the role of the employee.
- In the Production Credit Amount box, enter the percentage of credit the employee will receive for bringing this piece of business to the agency.
- In the Rate Type list, make a selection to identify if the rate will be a flat dollar amount or a percentage.
- In the Rate box, enter the flat dollar amount or the percentage on which the commission will be based.
- Click OK. The new other commission is displayed on the invoice tab.
- Use the [Auto-Allocate] feature to redistribute the production credit equally among all Other Commission line items. Click [Save] when complete. The distribution can also be changed manually by making entries in the Production boxes and clicking [Save].

- Review the invoice to verify all information entered. On the Navigation Toolbar, click Post Now.
- After clicking Post Now, a confirmation message is displayed. Click OK.
- In the Quick Navigation panel, click Invoice Posting to view the details of the posting.
The receivables tab is available for reviewing receivables data including payments assigned
for agency bill or carrier receivable data for direct bill. The payables tab is available for reviewing data for carrier, people and tax authority payables including
payments assigned.
Note: Once
a policy is invoiced, changes to the issuing / billing carrier cannot be
made unless all invoices associated with the policy have been reversed.
Direct Billing
 icon next to the appropriate client.
  icon next to the appropriate client.


![]() icon to display the full screen view of the invoice.
icon to display the full screen view of the invoice.


 icon next to the premium to update.

 icon next to the fee to update.


 icon next to the tax to update.


 icon next to the commission to update.

 icon next to the commission to update.

 icon next to the commission to update.

 Invoice
Header