You are here: Client menu > POLICIES > Installment Billing
Installment Billing
Installment billing is used when spreading a premium over a number of
payments.
To Invoice Using Installment Billing
- Select the Client to
be invoiced.
- On the Client
menu,
click the POLICIES link.
- Click the Details
 icon for the
appropriate policy.
- Click the transactions
tab at the policy level.
- Click [Add Master Invoice].
- Click check boxes for Premium, Fees and / or Taxes to default in from the policy info tab, click
OK.
- Using the links in the
Quick Navigation panel, or the scroll bar, complete the following screens:
 Edit Invoice Header
- Bill Method: Select either Direct or Agency.
- AR Entity Bill To: Select to whom the accounts receivable will go.
- Lockbox Match: Select the items upon which a match is based for the lockbox files.
- Annualize: Select this check box to set the invoice amount to annualize calculations.
- Bill Type: Select the bill type.
- Department: Select the department to which this master invoice is associated.
- Unit: Select the unit to which this master invoice is associated.
- Down Payment Amount: Enter the amount required for a down payment.
Note: The down payment is not included in the number of installments.
- Down Payment Eff. Date: Enter the effective date of the down payment. If the invoice is being set up exclusively for installments, the date should be left blank.
- Down payment Date Booked: Enter the date booked for the down payment. If the invoice is being set up exclusively for installments, the date should be left blank.
- Down Payment Due Date: Enter the due date of the down payment. If the invoice is being set up exclusively for installments, the date should be left blank.
- Installment Frequency: Select the frequency which the installments are due.
- Annual:
Due date
of 1st installment is based off date entered in 1st Installment Effective
Date field. Subsequent
installments billed in 1 year increments up to the specified number of
installments.
Note: If client is paying in full, (no down payment), click [Add New Invoice] link and bill as full pay.
- Semi Annual:
Due date
of 1st installment is based off date entered in 1st Installment Effective
Date field. Subsequent
installments are billed in 6 month increments up to the specified number
of installments..
- Quarterly:
Due date
of 1st installment is based off date entered in 1st Installment Effective
Date field. Subsequent
installments are billed in 3-month increments up to the specified number
of installments.
- Monthly:
Due date
of 1st installment is based off date entered in 1st Installment Effective
Date field. Subsequent
installments are billed in 1-month increments up to the specified number
of installments.
- Weekly:
Due date
of 1st installment is based off date entered in 1st Installment Effective
Date field. Subsequent
installments are billed in 1-week increments up to the specified number
of installments.
- Same Date:
Due date
of 1st installment is based off date entered in 1st Installment Effective
Date field. Subsequent
installments are billed on the same date as the 1st Installment up to
the specified number of installments.
- Number of Installments: Enter the number of installments.
- 1st Installment Eff. Date: Select the effective date for the invoice.
- 1st Installment Date Booked: Enter the date the first installment was booked. This box defaults to the policy effective date or the transaction date, whichever is later.
- 1st Installment Due Date: Enter the date the first installment is due. This box defaults to the Date Booked + Invoice Days Until Past Due (from Department settings).
- # of Print Days Before Eff. Date: This field is used to calculate
the date when the installment will automatically post and makes the invoice
available to print in batch.
- EX: 1st installment effective
date is 7/20/2004.
- Print date field entered
is the number 15.
- Installment will post on
7/5/2004 and be available for batch printing on that date.
- If zero used in this field
each installments will post from the date in the effective date field
in their scheduled month.
- To suspend the posting
of an invoice the User should leave this field blank to avoid Nexsure
automatically posting the installment.
Note: If
the month is locked or closed, the invoice will post in the current month.
- Fee Option: Select the installment to which the fee will be applied.
- Tax Option: Select the installment to which the tax will be applied.
- Rounding Option: Select the type of rounding that will be made to the amount.
- Unique Invoice Message: Enter a message that will be displayed on the invoice.
- Internal Note: In the Internal Note box, enter an internal note. This note will not be displayed on the invoice.
- Click OK
 Change Bill To
This information is pulled from the policy
but can be changed. Any named insured may be selected as the "Bill
To" on invoices.
To Change Bill To Information
- In the Quick Navigation
panel, select Invoice Bill To.
- Click [Change
Bill To]. The Bill To pop up appears with the Client option selected
with all named insureds displayed.
Tip:
If a long list of named insureds is displayed, enter a name in the search
field and click Search.
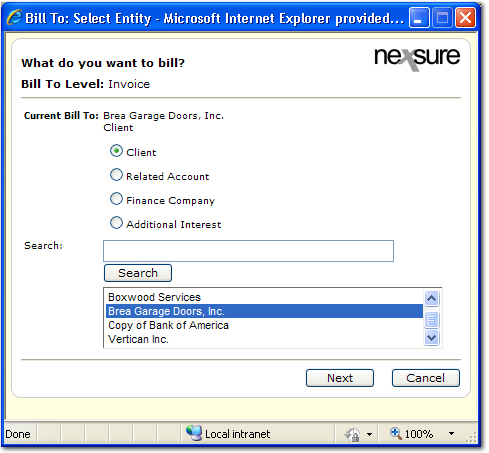
- Search for and select the entity and
named insured to bill.
- Click Next.
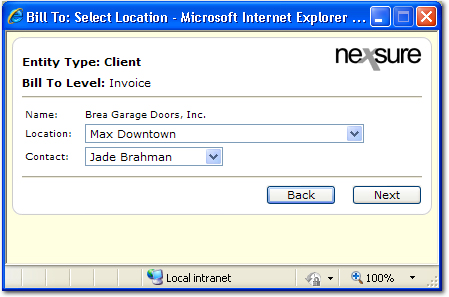
- Select the Location and
Contact name from the lists and click Next.
- The new Bill To information
is displayed, click OK to confirm
the change.
 Policy Header
Displays the Policy Header Information
 Base Forms
Displays base forms for the policy.
 LOB Forms
Displays all Lines of Business forms on the
policy.
 Premiums
Changes can be made to the existing premium
by clicking on the Details  icon. A new premium can be added by clicking the [Add
New Premium] link.
 Fees
Fees
Changes can be made to existing fees by clicking
on the Details
 icon. A new fee can be added by clicking the [Add
New Fee] link.
 Taxes
Taxes
Changes can be made to existing taxes by
clicking on the Details
 icon. A new tax can be added by clicking the [Add
New Tax]
 Agency Commission
If a default commissions exist for the Carrier
it will automatically be displayed.
Changes can be made to Agency Commissions
by clicking on the Details  icon.
icon.
A new agency commission can be added by clicking
the [Add New Agency Commission]
link:
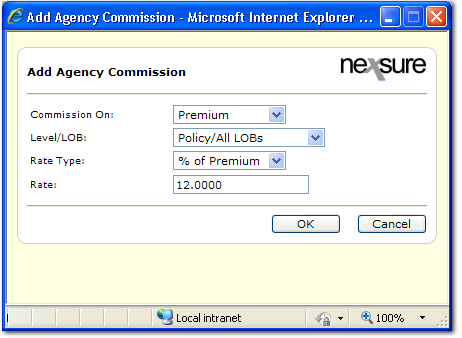
- Commission
On:
- Fee option will be
available only if fee was flagged as branch commissionable.
- Level/LOB:
Select appropriate line of business.
- Rate
Type / Rate: Enter
rate information
- Click OK
 Other Commissions
If a default commissions exist for the Employee
they will automatically be filled in.
Changes can be made to employee commissions
by clicking on the Details  icon.
icon.
A new employee commission can be added by
clicking the [Add New Other Commission]
link:
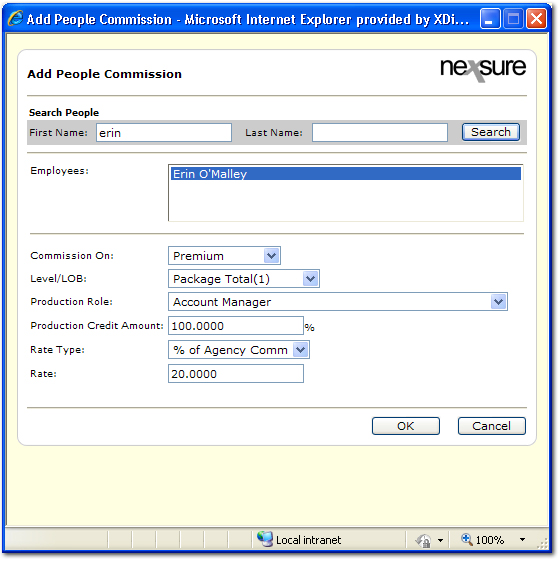
- Select the employee from
the Employees box or use the Search People option.
- Select the Commission On
from the list.
- Select
Fee: Fee
selection permits the application of fee-specific commission rates. Fees
subject to commission do not need to have the same rate applied and can
have a differentiating commission rate/rate type applied.
Note:
Only fees which are subject to commission will be available.
- Select the Production Role
and Production Credit Amount from the lists. The Production Role and
Production credit amount fields are used to designate the role and percent
of business this employee brought into the Agency on this policy.
- Select the Rate Type from
the list.
- Select the appropriate
Rate, Nexsure will calculate the commission based on the rate type chosen.
- Click OK.
- Click the Installment
Plan link in the Quick Navigation Panel. A
new installment schedule will be generated, click OK.
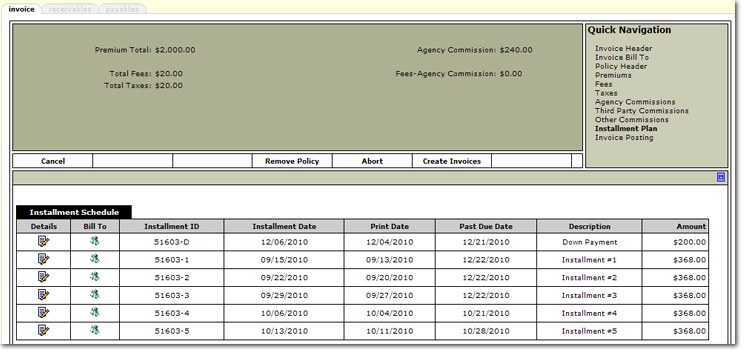
- The
 installment
schedule
is based on the information in the invoice header.
- Click the Create
Invoices link.
- Each installment will
now have its own unique Invoice number. The
total number of invoices will be reflected in the header.
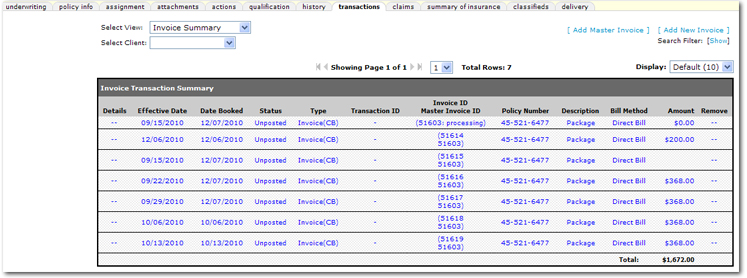
- The Invoice Summary
view displays each installment number with the master invoice number stacked
below. The master number is a link, clicking on the link will launch the
entire installment plan for review and modification.
- Unposted
invoices can be removed, security permitting, but posted invoices must
be reversed.
Splitting an Installment
Delivery Option for Installments
Endorsements and Installment Billing

 installment
schedule
is based on the information in the invoice header.