Adding People
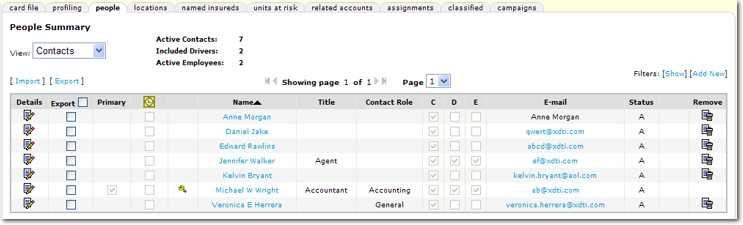
The people tab will display all people that have been entered
for the selected clients in a summary view. An
unlimited number of people may be added for each client. There are three designations for people added, Contact, Driver, or Employee. The first entry for the client must be a contact but can be designated a Driver and / or Employee as well. The first entry will be marked as the primary contact. After other entries are made, the primary contact designation can be moved to another Contact.
Note: Entities other than clients only have Contacts, no Driver or Employee designations apply to those entities.
Quickly navigate to procedures included in this topic by clicking one of the links below:
To Add People
To Edit a Person
To Inactivate a Person
To Remove or Delete a Person
To Synchronize Outlook
To Add People
- On the ,
click SEARCH. Search for the appropriate client.
- Click the Details
 icon of the client.
- Click the people tab.
- On the People Summary screen, in the View area, select Contacts. There must be a primary Contact before any other people are added. If a Driver or Employee is going to be entered, make the appropriate designation after the [Add New] link is selected. The [Add New] link will return the same screen no matter what View is selected on the People Summary screen.
- Click the [Add New]
link. The people details tab
is displayed. The [Add New] link will return the same screen no matter what View is selected on the People Summary screen.
Note: Before
a person is added, a search should always be performed. A person need only be added to the Nexsure once. After
the person is added, they can be related to an unlimited number of entities,
in any capacity.
- In the Apply Contact area, search for the contact to add.
If the contact is not found, select the New Person option. A new Contact Information form is displayed.
If the
contact is found, click the name and click Use
Selection. The
person's information will be brought over and associated to this entity.
There are
four fields in the people details unique to the person’s relationship
to the client, they are listed below. All
other fields apply to the person globally and if updated, it will update
all records of this person throughout Nexsure.
- Title
- Primary Contact
- Contact Role
- Location
- In the Contact Information area, there are three options for identifying the type of person to be entered. Select one or more of the following check boxes:
- Contact: When Contact is selected, the primary designation option becomes available. By default the Personal Information, Personal Numbers, Location and Notes sections are visible.
- Driver: When Driver is selected, the Driver Information section becomes visible.
- Employee: When Employee is selected, the Other Underwriting Information section becomes available.
- In the Personal Information area, complete the following:
- Select the Prefix
from the list. Items
may be added to the list in SETUP > Lookup Management.
- Enter the First
Name of the contact. Required information.
- Enter the Middle
Initial (MI) of the contact.
- Enter the Last
Name of the contact. Required information.
Tip: Only the person's first and last name along with the designation need to be entered to be able to save the record. All other information can be entered at another time if necessary. The default designation is Contact.
- Select the Suffix
from the list. Items
may be added to the list in SETUP > Lookup Management.
- Accept the Goes
By name that is automatically completed with the contact's first name or enter a new nickname for the contact.
- Select the Title
from the list. Items
may be added to the list in SETUP > Lookup Management.
- Select the Sex
from the list.
- Enter the Date
of Birth (DOB) using the Calendar
 icon or keying the date in using
the correct formatting.
icon or keying the date in using
the correct formatting.
- Enter the Social
Security No. using the correct formatting, if applicable.
- Select the Marital
Status from the list. Items
may be added to the list in SETUP > Lookup Management.
- In the Driver Information area, complete the following:
Note: The Driver Information area is only available for client level contacts. This area will not display on the organization level screens or any other entity contact screens.
- Select the State
Licensed from the list.
- Enter the License
Number.
- Enter the Date
Licensed using the Calendar icon or keying the date in using the
correct formatting.
- Enter the Driver # as designated by the client. Up to four digits can be entered.
- Enter the number of years of driving experience for the driver. This number is added to the ACORD 127 when Prefill / Lookup is used.
- Select the Policy Driver Status to identify whether the driver is currently Included or Excluded from the policy.
- Select the relationship the person has to the client. The selection will be added to the ACORD 90 Drivers section when Prefill / Lookup is used. The following options are available:
- Brother / Sister
- Child
- Employee
- Insured
- Parent
- Spouse
- Select the Distant Student check box to indicate the driver is a student at a distant school. The selection will be added to the ACORD 90 Drivers section when Prefill / Lookup is used.
- Select the Driver Good Student check box to indicate the person qualifies as a good student. The selection will be added to the ACORD 90 Drivers section when Prefill / Lookup is used.
- Select the Driver Training check box to indicate the person has taken a driver training course. The selection will be added to the ACORD 90 Drivers section when Prefill / Lookup is used.
- Enter the Acc. Prev. Course Date (Accident Prevention Course Date) using the Calendar icon or keying the date in using the
correct formatting. The selection will be added to the ACORD 90 Drivers section when Prefill / Lookup is used.
- In the Other Underwriting Information area, complete the following:
Note: The Other Underwriting Information area is only available for client level contacts. This area will not display on the organization level screens or any other entity contact screens.
- Enter the Date Hired using the Calendar icon or keying the date in using the
correct formatting. The selection will be added to the ACORD 127 Drivers section when Prefill / Lookup is used.
- Enter the Ownership %. Whole numbers from 1 to 100 can be entered. The selection will be added to the ACORD 130 Included / Excluded section when Prefill / Lookup is used.
- Select the Work Comp Employee Status, either Included or Excluded. The selection will be added to the ACORD 130 Included / Excluded section when Prefill / Lookup is used.
- Enter the Work Comp Class Code, up to four digits can be entered. The entry will be added to the ACORD 130 Included / Excluded section when Prefill / Lookup is used.
- Enter the Remuneration amount, up to 12 digits can be entered. The entry will be added to the ACORD 130 Included / Excluded section when Prefill / Lookup is used.
- Select Yes
or No to designate this contact
as the Primary Contact for this client. This person can only be marked primary if they are designated as a contact. A Primary Contact cannot be
deleted until another Primary Contact is designated. To change a Primary Contact see Changing a Primary
Contact.
- Select the Contact
Role from the list. Items
may be added to the list in SETUP > Lookup Management.
Note: The information displayed on the contacts tab may vary by entity.
- In the Personal Numbers area, complete the following:
- Type: Select the Type of phone
number from the list. Items
may be added to the list in SETUP > Lookup Management.
- Number: Enter the phone number,
without formatting, for this contact. Formatting
will be applied after the screen has been saved.
Note: During the Outlook synchronization process, the first number designated as a fax number will be exported to Outlook as the business fax.
- Ext: Up to a six digit extension
may be entered.
- Description: A description may be entered
for each number using alpha or numeric characters.
- E-Mail Address: Enter the email address
for the contact using the correct formatting. The
address must contain the @ and . symbols. There
are two email address entry boxes available to accommodate both work and personal email addresses.
Note: Email
addresses should be obtained for all contacts. Email addresses are placed
into a global address book, and made available on the email and fax tabs of the delivery screens. Only people designated as a Contact will be available in the global address book.
- In the Locations area, select the primary account location for the contact. Only physical locations will be displayed in this list. A location must be selected here or Nexsure will designate one automatically based on the primary location of the client.
- In the If address other... area, enter the person's address information if the address differs from the primary account location address. This is the address that the new person may use instead of the primary location address.
- In the Notes area, enter any notes regarding
this person.
Important: Keep
in mind when entering Contact Notes that any authorized person, including contacts, may be given access to Nexsure by the agency. Anyone granted access will be able to view the Contact Notes.
- Once all information has been entered, click [Save]. The person's information is saved to Nexsure.
Or
Click [Cancel] to return to the People Summary screen without saving any entries.
- Access the record again by clicking on the Details
 icon for the person from the People Summary screen. Click [Add Photo] to add a picture of the person.
Tip: When preparing the photo for upload, size the photo width to 150 pixels and height no larger than 225 pixels. The photo must be formatted as a .jpg image.
To Edit a Person
- On the Primary menu, click SEARCH. Search for the appropriate client. Be sure to change the Entity selection to Client.
- Click the Details icon next to the appropriate client. The card file tab is displayed by default.
- Click the people tab. The People Summary screen is displayed.
Note: If the person is not a contact, the appropriate View must be selected for which the person was designated.
- Click the Details icon next to the person to be edited. The Contact Information screen is displayed.
- Make any necessary changes to the record and click [Save]. If a designation such as Driver or Employee is removed by clearing the check box, a confirmation is displayed and the change is saved upon clicking Yes.
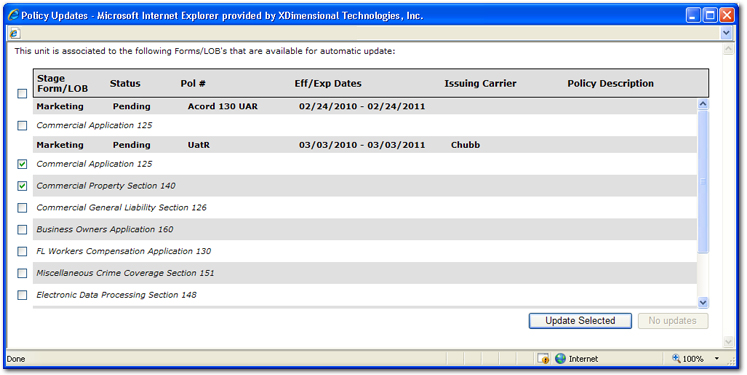
Important: When new units (people) that have been prefilled to a policy by Lookup and are added, modified, or deleted, a dialog box will be displayed once [Save] or [Inactivate] are selected. The dialog box will list all policies that the unit is associated with. Any policy in a pliable state will be available for selection in the dialog box. Selecting a policy or policies and then clicking Update Selected will make the change, addition or deletion of the unit to all policies selected.
To Inactivate a Person
- On the ,
click SEARCH. Search for the appropriate client.
- Click the Details
icon of the client.
- Click the people tab.
- On the People Summary screen, in the View area, select Contacts.
- Click the Details icon for the person to inactivate. The people details tab is displayed.
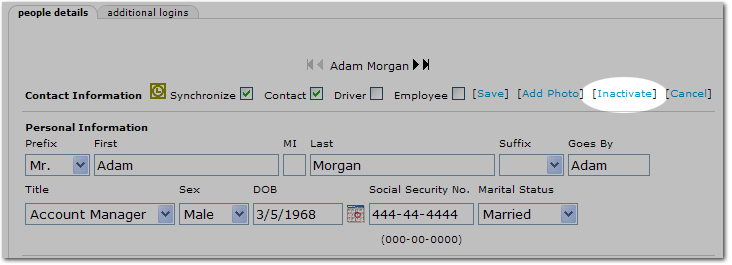
- Click [Inactivate] at the top of the screen. The People Summary screen is again displayed. The person's record will be removed from the default view of the summary screen but can be found using the Filter and searching for the Status of Inactive.
To Remove or Delete a Person
- On the ,
click SEARCH. Search for the appropriate client.
- Click the Details
icon of the client.
- Click the people tab.
- On the People Summary screen, in the View area, select Contacts.
Important: Driver and Employee people types must be removed before the Contact can be removed.
- On the People Summary screen, click the Remove
 icon next to the Contact to remove. The record will be removed from the client. If the Contact is used as a unit for another client or entity, they will remain in those records.
- If the person is designated a Driver or Employee, click the Details icon for the person to remove. The people details tab is displayed.
- In the Contact Information area, remove the selections in the Driver and / or Employee check boxes and click [Save]. The People Summary screen is again displayed. The Contact can now be removed.
Note: If the Contact has an Umbrella  icon on the summary screen, this means the person is associated with policies and cannot be removed. The Contact can be inactivated in this case if necessary. If the Contact must be completely deleted from the policy, the Contact, Driver, or Employee must be removed from the policy they are associated with first, which removes the Umbrella icon so that the Remove icon can be used to delete them from the client.
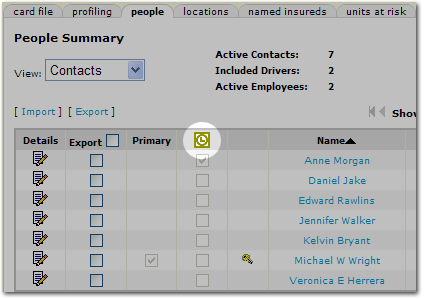
Synchronizing the Contact with Outlook
Client names, phone numbers and fax numbers can be synchronized with the Contacts list in Microsoft® Outlook®.
To Synchronize Outlook
- On the Primary menu, click SEARCH. Search for the client to synchronize.
- Click the Details icon next to the client name.
- Click the people tab. The People Summary is displayed.
- Click the Details icon next to the contact to synchronize. The people details tab is displayed. Only people designated as Contacts can be synchronized with Outlook.

- On the people details tab, select the
 Synchronize check box.
- Click [Save]. The People Summary screen is displayed.
- In the People Summary screen, click the Outlook icon.
- The first time Outlook is synchronized with Nexsure, the following message is displayed:

Select the Do not show this message next time option to hide this dialog box in the future.
- In the Tip dialog box, click OK. Outlook is displayed.
- On the Outlook toolbar, click Nexsure Contacts.
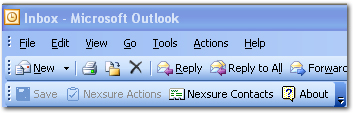
Note: If this is the first time Outlook has been synchronized, and the Nexsure Contacts option is not displayed, close Outlook and start again from step 7.
- Once the Nexsure Contacts button has been clicked, a Confirm dialog box is displayed.
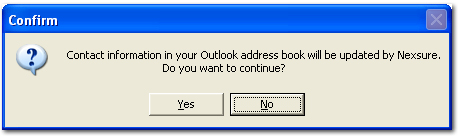
- In the Confirm dialog box, click Yes. The contact information is then available in Outlook.
Phone numbers added to the Personal Numbers section of thepeople details tab will be added to the Outlook address book upon synchronization. Fax numbers added to Outlook will be taken from the first number denoted as a fax number in the people details tab.
Note: Nexsure contact synchronization is specific to each person using Nexsure. Each person using Nexsure can decide which contacts will be added to their own Outlook.
Related Topics
Changing a Primary Contact
Editing Client Contacts
Contacts Security