Adding a New Opportunity
New opportunities can be added to help track potential business. Opportunities can be added to clients that are existing, suspects or prospects. Adding an opportunity is not required, a Marketing policy can be used as the initial step towards creating a policy.
To Add a New Opportunity
- On the ,
click SEARCH and conduct a search for the client to which the opportunity will be added.
- Click the Details
 icon next to the selected client. Or
add a new prospect / client.
- On the Client menu, click OPPORTUNITIES.
- Click [Add
New Opportunity]. The
New Opportunity dialog box is displayed.
- In the State / Province
list, select the state in which the policy will be held.
- In the Type list, select the type of coverage.
Important: The options available in the Type list are dependent on the staff member's security rights template. If Business Types are set up in the security rights template then only the selected Business Types will be displayed in the Type list for the opportunity. If Allow Override is selected in the security template Business Types tab, then all available business types will be displayed. For more information about Business Types in the security templates, see the User Rights Templates topic.
- In the Lines of Business list, select the line of business for the opportunity. Multiple lines of business can be selected by holding down the CTRL key and selecting
to create a package policy.
- In the New Opportunity dialog box, click Save.
The opportunity
will be displayed in the opportunities tab summary for that client.

- Click the Details
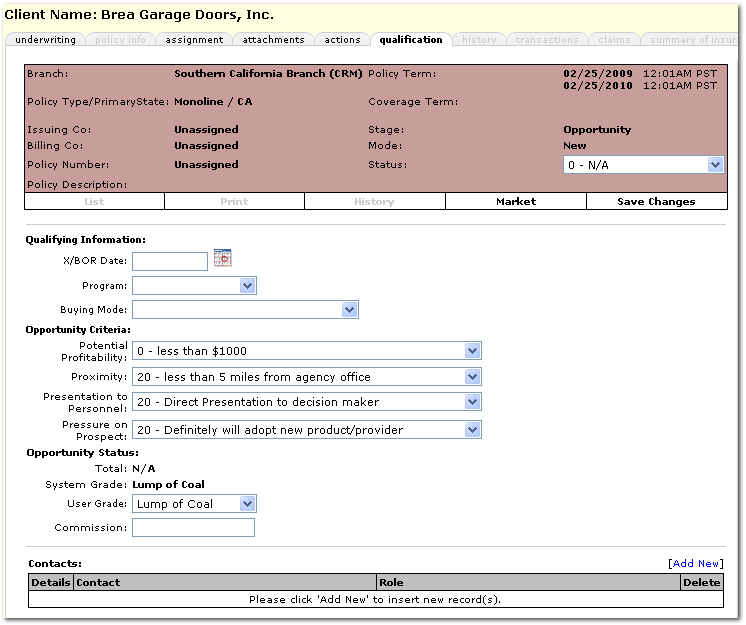
 icon for the new opportunity. The qualification tab is displayed. Complete the qualification tab as follows:

- In the X/BOR
Date box, click the Calendar
 icon and select a date. The date entered will indicate either the prospect's policy expiration or Broker of Record
date. This
field is required.
- In the Program list, select the program, if any, for which this opportunity is being qualified. Programs
are tied to branches. If
a program that should be available to the agency is not listed, contact the system administrator to have it added.
- In the Buying Mode list, select the appropriate Buying Mode.
The Buying
Mode is an indication of the prospect’s buying attitude.
- In the Opportunity Criteria area, select the appropriate answer for each of the questions listed. The questions in this area will vary based on the agency's set up selections. The number values assigned to each of the questions will be automatically totaled in the Total area below.
- In the Total area, the total will automatically calculate the answers selected in the Opportunity
Criteria section.
- In the System Grade area, the value is automatically calculated based on the total score of the answers to the questions in the Opportunity Criteria area.
- In the User Grade list, select the appropriate value for each
opportunity based upon knowledge of the account and factors that
may not be considered in the Opportunity Criteria questions.
- In the Commission box, enter the commission amount estimated for each opportunity added.
- In the Contacts area, enter the Contacts associated with this opportunity
and assign their role in the buying process. Click [Add New] to associate the client contacts with the opportunity.
Note: The
contact names must have already been added to the account at the client
level. Roles
on this screen differ from those on the client contact details screen.
- On the Navigation Toolbar, click Save Changes to save the information entered on the qualification tab.
Home Menu > Opportunities
Customizing Opportunities for
a Branch
User Rights Templates
 icon next to the selected client. Or
add a new prospect / client.
 icon next to the selected client. Or
add a new prospect / client.
 icon for the new opportunity. The qualification tab is displayed. Complete the qualification tab as follows: