Interface
The downloads summary tab displays all of the policy files that have either been imported or downloaded into Nexsure. Color coding is used to help identify where in the download process the file exists.
This
is also where quotes and IVANS information is imported into Nexsure. Downloads are retrieved from the IVANS mailbox every three hours between 6:00 PM PT and 6:00 AM PT every night.
- Blue Text: The file has not completed import and there are pending exceptions that need to be manually reviewed and processed.
- Black Text: The file has completed import. There are no exceptions that need to be manually reviewed or processed.
- Red Text: This is the number of exceptions that are located within the file. The red number listed is also a link to gain access to the file.
Note:
To receive IVANS downloads, you must first have a valid IVANS
account. Two-way
rating integration requires a rating application to be installed on the
staff member's machine.
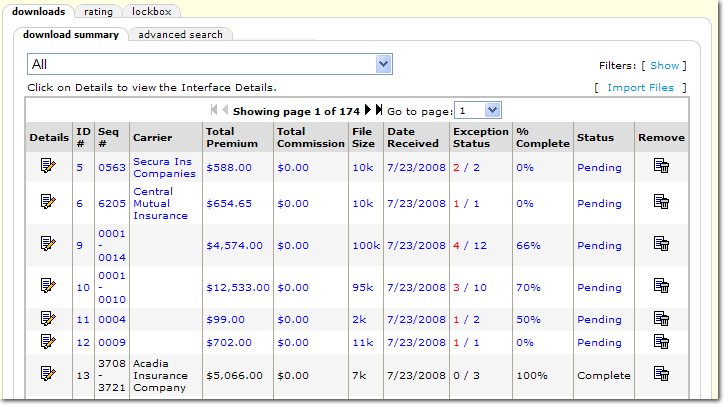
There are several options when working with interface records. Notice the list boxes and links across the top of the download summary tab.
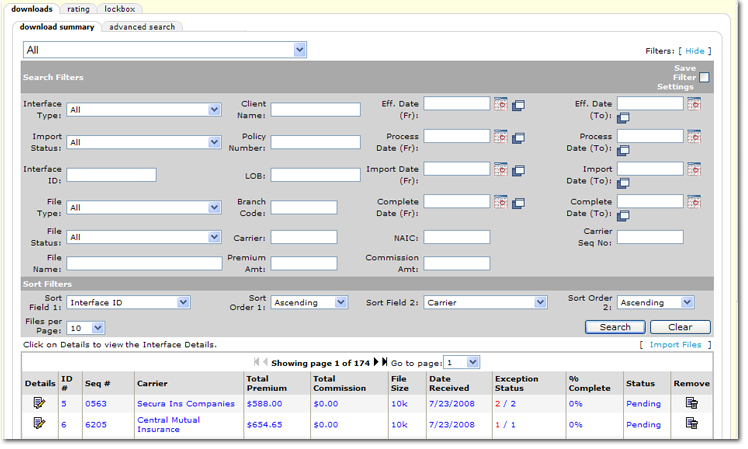
The following options are available when working with downloads files:
- Branch: The Branch
 list box in the upper left can be used to select a branch to narrow the search results. Once a branch is selected, downloads files tied to the selected branch are displayed.
- [Import Files]: Gives the ability to manually upload files from a PC. For more information about how to structure and upload files, see Importing Excel Files.
- Showing Page: The Arrow

 icons can be used to navigate through pages of search results.
- First Page
 icon.
icon.
- Previous Page
 icon.
icon.
- Next Page
 icon.
icon.
- Last Page
 icon.
icon.
- Page List: Click the Page List
 arrow to open a list of all search results pages. Select the desired page number to open that page of search results.
- Search Filters: Click [Show] or [Hide] to toggle the Search Filters screen.

The options available on the Search Filters screen are:
- Save Filter Settings: Selecting the Save Filter Settings check box on the Search Filters screen and clicking Search will change the default Search Filter setting. The next time the interface tab is opened, the files returned will be filtered by the saved setting. Exercise caution when using the Save Filter Settings check box with a date range as returned files will be restricted to that date range. As a general rule, check the filter settings each time this tab is accessed.
- Interface Type: Select the type of transaction the carrier is sending.
- Import Status: Select the status of the import that identifies the status of the transaction.
- Interface ID: The
interface ID is a number assigned by Nexsure to make it easier to track
specific downloads. Numbers
are generated in the order received.
- File Type: The
different file types are Daily Download,
FSC Quote and Initial
Load.
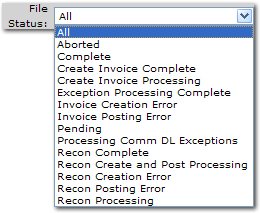
- File Status: Select a File Status from the list. The available options are:
- File Name: This
name is generated by Nexsure and is used by Support to query the database.
- Client Name: Enter the name of a client to return results that include all files for a particular client. Enter at least two characters to narrow the search results. Entering some of the Client Name returns a broader result; enter most of the name for more specific results.
- Policy Number: Enter at least two digits of the policy number associated with the file. The more digits of the policy number entered the narrower the search results.
- LOB: Enter the line of business for the interface files. Enter at least two characters to narrow the search results. Entering some of the line of business title returns broader results, enter most of the line of business for more specific results.
- Branch Code: Enter the Branch Code. This is typically identified as the code number assigned to the agency by the carrier. The code is also known as the Producer Code.
- Carrier: The carrier name for which the data was downloaded.
- Premium Amount: This it the total premium amount for the policies located within the file.
- Eff. Date (Fr): Click the Calendar
 icon to select the beginning date in a date range. A date range can be selected to return all policy downloads with coverage effective dates in the date range. Click the Variable
  icon and enter a variable number of days to set a continuous date range to be used with Save Filter Settings. Enter + or - and the number of days up to three digits. The date will then be + (after) or - (before) the current date.
- Process Date (Fr): Click the Calendar
 icon to select the beginning date in a date range. A date range can be selected to return all interface files with process dates in the date range. Click the Variable
  icon and enter a variable number of days to set a continuous date range to be used with Save Filter Settings. Enter + or - and the number of days up to three digits. The date will then be + (after) or - (before) the current date.
- Import Date (Fr): The date the download was received. Click the Calendar
 icon to select the beginning date in a date range. A date range can be selected to return all files with import dates in the date range. Click the Variable
  icon and enter a variable number of days to set a continuous date range to be used with Save Filter Settings. Enter + or - and the number of days up to three digits. The date will then be + (after) or - (before) the current date.
- Complete Date (Fr): The date the transaction was completed. Click the Calendar
 icon to select the beginning date in a date range. A date range can be selected to return all files with complete dates in the date range. Click the Variable
  icon and enter a variable number of days to set a continuous date range to be used with Save Filter Settings. Enter + or - and the number of days up to three digits. The date will then be + (after) or - (before) the current date.
- NAIC: Enter the carrier’s NAIC code as provided by the carrier.
- Commission Amount: This is the total commission amount of a commission download file. The commission amount will only display on commission download transactions.
- Eff. Date (To): Click the Calendar
 icon to select the ending date in a date range. A date range can be selected to return all policy downloads with coverage effective dates in the date range. Click the Variable
  icon and enter a variable number of days to set a continuous date range to be used with Save Filter Settings. Enter + or - and the number of days up to three digits. The date will then be + (after) or - (before) the current date.
- Process Date (To): Click the Calendar
 icon to select the ending date in a date range. A date range can be selected to return all interface files with process dates in the date range. Click the Variable
  icon and enter a variable number of days to set a continuous date range to be used with Save Filter Settings. Enter + or - and the number of days up to three digits. The date will then be + (after) or - (before) the current date.
- Import Date (To): The date the download was received. Click the Calendar
 icon to select the beginning date in a date range. A date range can be selected to return all files with import dates in the date range. Click the Variable
  icon and enter a variable number of days to set a continuous date range to be used with Save Filter Settings. Enter + or - and the number of days up to three digits. The date will then be + (after) or - (before) the current date.
- Complete Date (To): The date the transaction was completed. Click the Calendar
 icon to select the beginning date in a date range. A date range can be selected to return all files with complete dates in the date range. Click the Variable
  icon and enter a variable number of days to set a continuous date range to be used with Save Filter Settings. Enter + or - and the number of days up to three digits. The date will then be + (after) or - (before) the current date.
- CarrierSeqNo: Enter the transaction sequence number assigned by the carrier.
- Sort Filters: Use the Sort Filters to sort the results of the actions search.
The options available on the Sort Filters screen are:

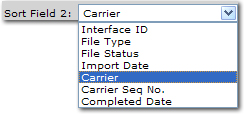
- Sort Field 1: By default Sort Field 1 is set to Interface ID. However, another column heading from the Sort Field 1 list may be selected. The search results will be sorted by the column selected in the Sort Field 1 list:
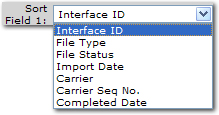
- Sort Order 1: By default Sort Order 1 is set to Ascending. However, either Ascending or Descending may be selected to set the order of the download files returned. Ascending will set the order from A-Z. Descending will set the order from Z-A. The Sort Field 1 will be the first sort and Sort Field 2 will be the sub sort.
- Sort Field 2: By default Sort Field 2 is set to Carrier. However, another column heading from the Sort Field 2 list may be selected. The search results will be sorted by the column selected in the Sort Field 2 list:
- Sort Order 2: By default Sort Order 2 is set to Ascending. However, either Ascending or Descending may be selected to set the order of the download files returned. Ascending will set the order from A-Z. Descending will set the order from Z-A. The Sort Field 1 will be the first sort and Sort Field 2 will be the sub sort.
- Files Per Page: By default the Files Per Page is set to 10. However, 5, 10, 25, 50, or 100 action records may be selected to display per screen.
- Search: Click Search. The results of the Search Filter criteria and Sort Filter settings are displayed.
- Clear: Click Clear to remove all entries in the Search Filter and Sort Filters fields.
Important: Clicking Clear does not remove the Save Filter Settings selection.
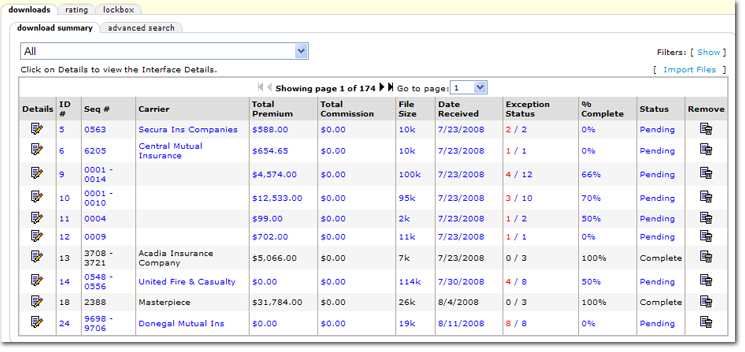
- Details -
The Details
 icon will open the download summary details screen. It
displays each download for that particular carrier.
- ID #: A system generated number that will increment in sequential order. It is a unique number assigned to each file.
- Seq # - This
ID is assigned by the carrier and is pulled from the AL3 file.
- Carrier - Carrier
name.
- Total Premium: The total premium amount for the policies located within the file.
- Total Commission: The total commission amount of a commission download file.
- File Size: The size of the file.
- Date Received: The date the file was received by Nexsure.
- Exception Status - The Exception Status shows the ratio of exceptions to total files processed. If the Exception number is red, it is a link to the exception details screen where the exceptions can be resolved.
- % Complete: This is the percentage of the file that has completed downloading.
- Status - While
a download has exceptions that haven't been addressed it remains in a
Pending status. When
all exceptions are resolved, the status changes to Complete. Pending
downloads are displayed in a blue font, completed downloads are black.
Note:
Policies
with a status of New can no longer download and add to a client that already
has a policy.
- Remove - Clicking
the Remove
 icon will delete the download.
Tip: For information about using the advanced search tab, see the Interface > Advanced Search topic.
Processing Downloads
Once downloads have been completed they
must be processed.
To Process Downloads
- Click the Details
 icon for the download you want to process.
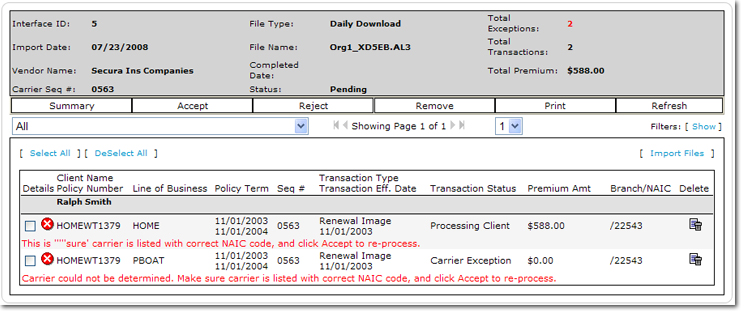
- Before you can accept
or reject a download you must select the check box for each download you
wish to process. Use the [Select All] or [Deselect All] links to select or deselect all downloads at once. [Select
All] / [Deselect All] will only select the boxes of the downloads on the page
being displayed.
Note:
If you
have multiple pages of downloads, check boxes you have selected will stay
selected as you click through the pages. However,
if you leave the downloads screen, they will not remain saved unless you
click the Save link. Selected
downloads will all be processed together, for example, if 10 downloads
are selected and you click Accept,
all selected downloads will be accepted. If
you save your selections and leave the interface screen, upon return make
sure you review your current selections before you process them all together.
- Click Accept
or Reject to process the downloads
you selected.
- If a download does not process once Accept has been clicked on the Navigation Toolbar, a red Error
 icon will be displayed. To process the download again, right-click on the Error
  icon to view the context menu and select Accept. The download will again be processed.
- In the event a client cannot be found after processing a download, the Client could not be found message will be displayed. Click the message to open the Client Search dialog box.
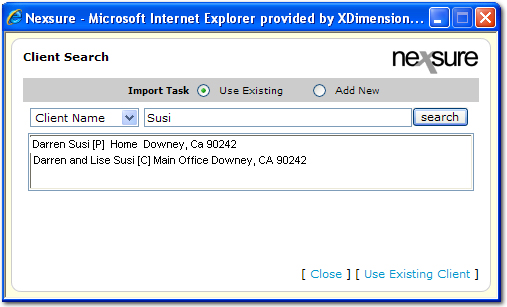
- Use the Client Search dialog box to search for the existing client. If this is a new client, select Add New and the file will be queued for re-processing to add the new client.
Note: Notice the [P] and [C] next to the client names which indicate the client type; Personal and Commercial. Also notice the Location Name has been added to the search results for each line.
Understanding Specialized Mapping for AL3 Files
In some cases, AL3 files do not match Nexsure files exactly. The following instances describe the specialized mapping processes for certain AL3 files.
Note: When importing AL3 files, the Bill Type is used from the imported file for the policy. Either Agency Bill or Direct Bill are assigned.
To Understand Home/Condo/Renters Cancellation Transactions
In some cases when a cancellation daily download is sent by the carrier, the policy in it's entirety is not depicted in the AL3 file. In such files only the main LOB and cancellation information for the policy are sent and the carrier does not provide the Homeowner Policy Type Code because it may be a Renter or a Condo policy. In these cases, Nexsure will match up the Policy Type Code sent from the carrier to the correct LOB in Nexsure.
To Understand Umbrella Transactions
In some cases a carrier will send the Umbrella coverage as coverage under another LOB and not as a standalone LOB for the policy. When this occurs, an additional LOB will be added to the policy creating a package policy.
To Understand ACORD 80 ADDRR (Additional Residence Rented to Others) Mapping
The coverage code of ADDRR (Additional Residence Rented to Others) is mapped to the Endorsement section of the Homeowner Form – ACORD 80. The information sent by the carrier contains Coverage Code, Limit, Premium and the Description.
To Understand LOB Policy Downloads
When a policy comes from the carrier for download, the existing policy in Nexsure will be copied first to create the new form; schedules will not be copied. Once the carrier policy information is downloaded, the fields that the carrier sent will update the new form for the policy in Nexsure. All other information entered into the policy previously through Nexsure will remain available.
Note: In certain circumstances, the carrier may leave some fields blank on the AL3 file. When this occurs, the blanks from the carrier will overwrite the information in the corresponding fields on the policy with those blanks.
To Understand Homeowner LOB Policy Downloads
When a policy comes from the carrier for download, the existing policy in Nexsure will be copied first to create the new form; including the schedules. Once the carrier policy information is downloaded, the fields that the carrier sent will update the new form for the policy in Nexsure. All other information entered into the policy previously through Nexsure will remain available.
Note: In certain circumstances, the carrier may leave some fields blank on the AL3 file. When this occurs, the blanks from the carrier will overwrite the information in the corresponding fields on the policy with those blanks.
To Download an AL1 Memo
- On the HOME menu, click INTERFACE. The download summary tab is displayed.
- Search for the file with the memo to be downloaded using the search Filters.
- Once the file has been located, click the Details
 icon. The download summary details are displayed.
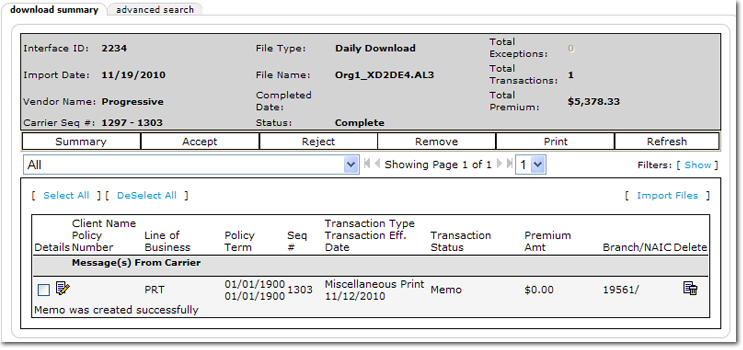
- Locate the Memo Transaction and click the Details
 icon to open the Memo.

- Use the Print option on the browser window to print a copy of the memo.
IVANS
Downloads
Importing
FSC Quotes


 arrow to open a list of all search results pages. Select the desired page number to open that page of search results.


 icon will open the download summary details screen. It
displays each download for that particular carrier.
 icon will delete the download.
 icon will be displayed. To process the download again, right-click on the Error
  icon to view the context menu and select Accept. The download will again be processed.
 icon. The download summary details are displayed.
 icon to open the Memo.