Creating a List Bill Plan
Setting up a list bill plan is done at the client level. The
list bill is only available on the master client; it is created as a template
to be used for billing the master policy and related account locations.
- On the Primary
menu, click Search.
- Click the Details
 icon for the appropriate master client.
- On the Client
menu, click Transactions.
- Click the List
bill plans tab.
- Click [Add
New]. The
Add New Bill Plan dialog box is displayed.
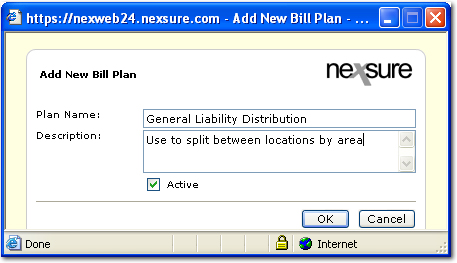
- In the Plan
Name box, enter
the new plan name.
- In the Plan
Description box, enter
a short description of the plan.
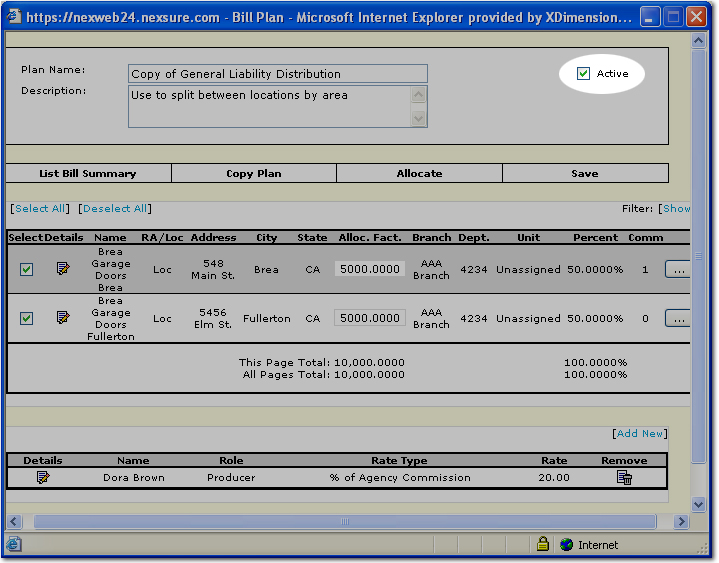
- Select the Active check box to make the list bill plan available for use. If the Active check box is cleared,
the plan is not available for use at invoicing and is marked Inactive.
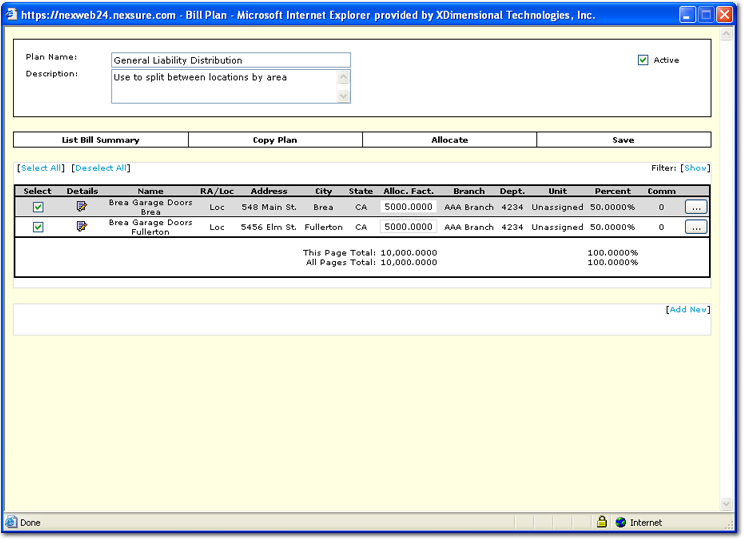
- In the Add New Bill Plan dialog box, click OK. A summary of all list bill plans is displayed.
- Click the Details icon next to the new list bill plan. All current locations of the master account and
the related accounts are displayed. As
locations and related accounts are added or deleted, they will be displayed.

Note: For
a related account with multiple locations, the related account will be
displayed once with each location.
- Select the locations to be included in the list
bill plan by clicking in the appropriate Select check boxes. As
locations are selected, the Alloc. Fact. and the Ellipsis
 button are
activated.
button are
activated.
- In the Alloc.
Fact. column, enter
a value based on square footage, premium dollars, total insurance to value,
etc. for each related account or location.
Note: Select
one type of factor and be consistent for each location.
- On the navigation toolbar, click Allocate.
Each value
will be divided by the total amount of related accounts (or locations)
and calculate its percentage of the total in the Percent
column. The
total of the Percent column will
equal 100%.
Seven related accounts or locations can be
displayed at a time. Nexsure
runs a per page total (This Page Total)
as well as a collective total (All Pages Total). The
Allocation Factor box will display in red once that unit's total has been
added to the page total field.
- On the navigation toolbar, click Save.
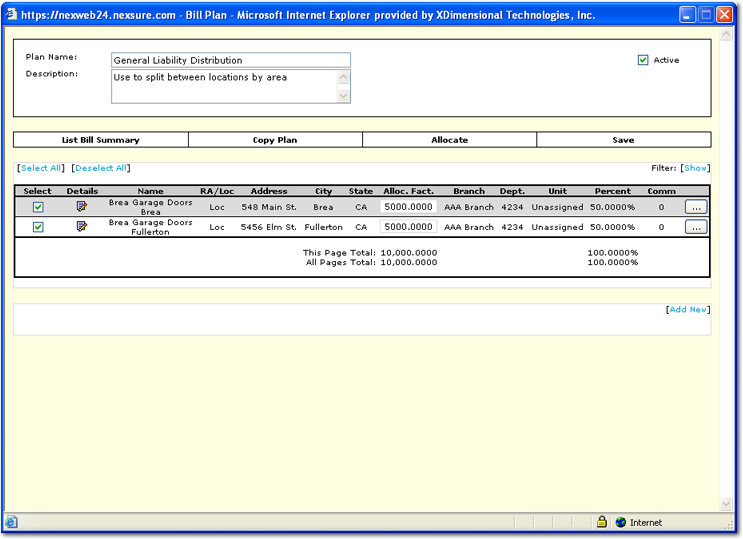
- If the allocation factors are changed, in the navigation toolbar, click Allocate again to update the page
total and percentages based on the new allocation factors.
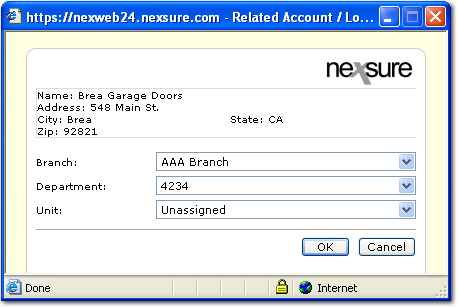
- Clicking the Detailsicon of a location will display the specific location
information for the selected line item. If
changes are made click OK to save
or Cancel to close without saving.
- Clicking the Ellipsis button to the right of a
location displays the producer(s) (Account Managers are not displayed)
commission record(s) at the bottom of the screen in a summary view for
that line item. The
number displayed to the right of the Ellipsis button is the total number
of producer(s) for that line item. The
commission will be set to the defaults if it has been set up for the producer. The
location record is highlighted in gray to designate the record being worked.
See Employee Commissions section of help for assistance.
Note: For
the master account, producers will not pre-fill. The
producer(s) displayed are at the client level not the policy level.
- If the producer is displayed with the incorrect
commission rate, click the Details icon of the commission record, adjust
the commission and click OK to
save the change.
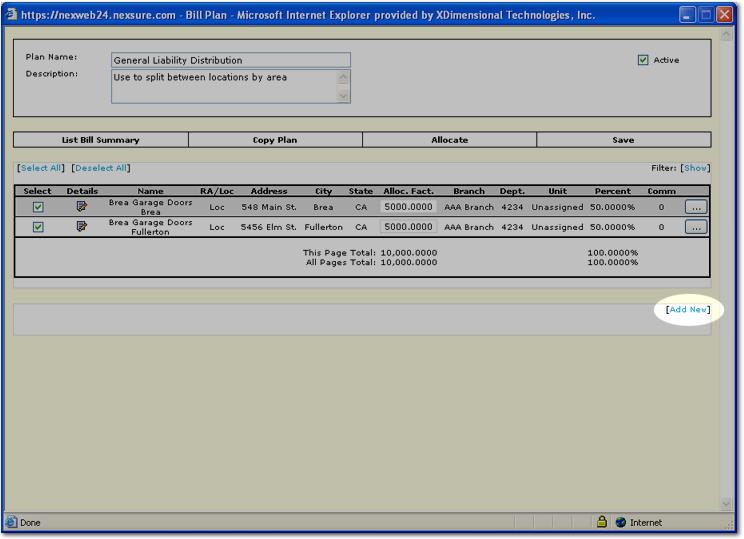
- If no producer(s) is displayed, click [Add
New] to pull the producer in to create a commission record for that
line item.
- The Add People Commission dialog box is displayed.
The Employees
box defaults to the employees that are assigned at the client level as producers.
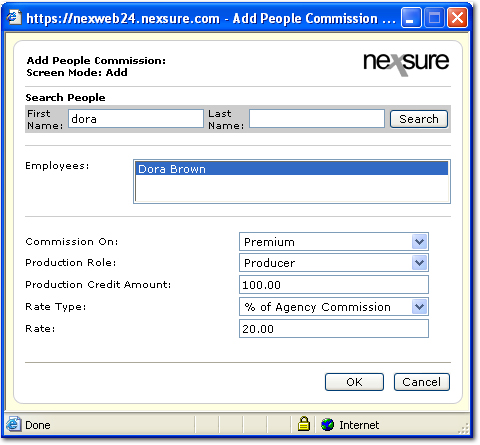
- In the Employees box, select the employee or use the Search People option to find an employee.
- In the Commission On list, select what the commission will be calculated
on.
- In the Select
Fee list, make a fee selection. The fee
selection permits the application of fee-specific commission rates. Fees
subject to commission do not need to have the same rate applied and can
have a differentiating commission rate / rate type applied.
Note:
Only fees
which are subject to commission will be available.
- In the Production Role and Production Credit Amount lists, select the production role and production credit amount. The Production Role
and Production Credit Amount fields are used to designate the role and
percent of business this employee brought into the agency on this policy.
- In the Rate Type list, select the Rate Type.
- In the Rate box, enter the appropriate
rate. Nexsure will calculate the commission based on the rate type chosen.
- Click OK.
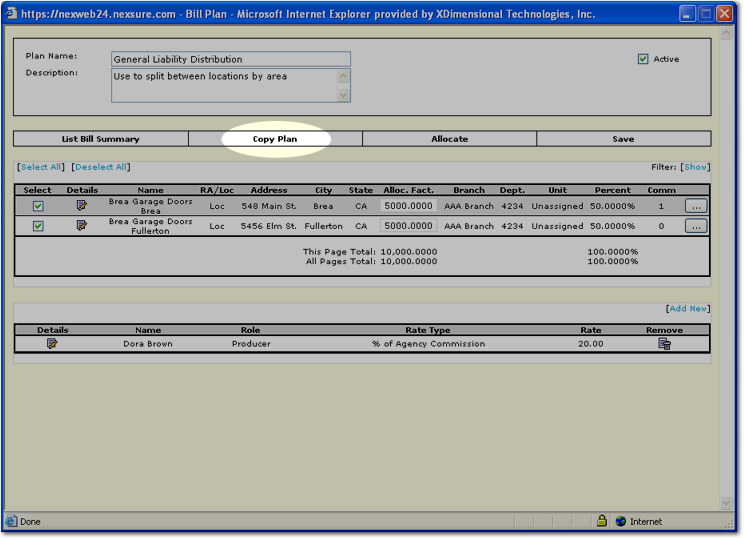
Note: An
unlimited number of people commission records may be added for each location,
as people commission records are added, the commission column tallies
the number of commission records for each location.
- In the navigation toolbar, click Copy
Plan to copy the existing plan, if desired. This
removes the need to re-enter an existing plan and reduces the chances of
duplicate entries.
- A confirmation window is displayed. Click
OK to confirm and return to the
original list bill plan.
- On the navigation toolbar, click List Bill Summary
to exit once the list bill plan template is created, or
copied. All list bill plans created will appear in a summary
view on the list bill plans tab. Notice
the copy displays with the text, "Copy of” before the original plan name and the
Active check box is not checked.

Note: You
must edit the copy and check the Activate box to activate the copy.
- Click the Details icon for the copied plan. The
entire plan along with the Plan Name and Description can be edited as
needed.
- Select
the Active check box to activate
the new bill plan.
- On the navigation toolbar, click Save to save the plan.
- On the navigation toolbar, click List Bill Summary to
exit the plan.
List
Bill Plan Invoicing
List
Bill Overview and Setup