Adding Named Insureds
A named insured is added when the client is first entered in Nexsure and is automatically designated as primary. Named insureds and their information added to the named insureds tab will be available to prefill to applications. When adding a named insured the information required depends on whether the client is personal or commercial. Instructions follow for adding a personal named insured and a commercial named insured.
Quickly navigate to procedures included in this topic by clicking one of the links below:
To Add a Personal Named Insured
To Add a Commercial Named Insured
To Edit a Named Insured
To Add NAICS / SIC Codes
To Add a Personal Named Insured
- On the Primary menu, click SEARCH. Search for the appropriate client. Be sure to change the Entity selection to Client.
- Click the Details
 icon next to the appropriate client. The card file tab is displayed by default.
- Click the named insureds tab. The Named Insured Summary screen is displayed.
- On the Named Insureds Summary screen, click [Add New]. The Named Insured screen is displayed.
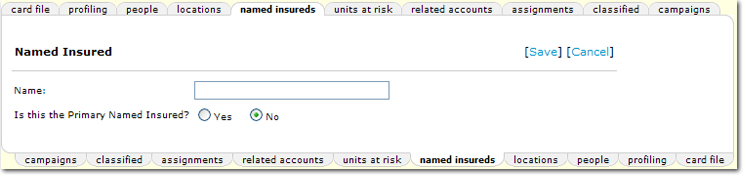
- On the Named Insured screen, complete the following:
- Name: Enter the name.
- Is This The Primary Named Insured?: Select either Yes or No to indicate whether or not this named insured will be the primary named insured on the policy.
- Click [Save] to add the new named insured to the policy and return to the Named Insured Summary screen.
Or
- Click [Cancel] to return to the Named Insured Summary screen without saving.
Important: The named insured must be added and saved before they can be made inactive. Primary named insureds cannot be made inactive until another named insured is set as the primary.
To Add a Commercial Named Insured
- On the Primary menu, click SEARCH. Search for the appropriate client. Be sure to change the Entity selection to Client.
- Click the Details icon next to the appropriate client. The card file tab is displayed by default.
- Click the named insureds tab. The Named Insured Summary screen is displayed.
- On the Named Insureds Summary screen, click [Add New]. The Business Information screen is displayed.
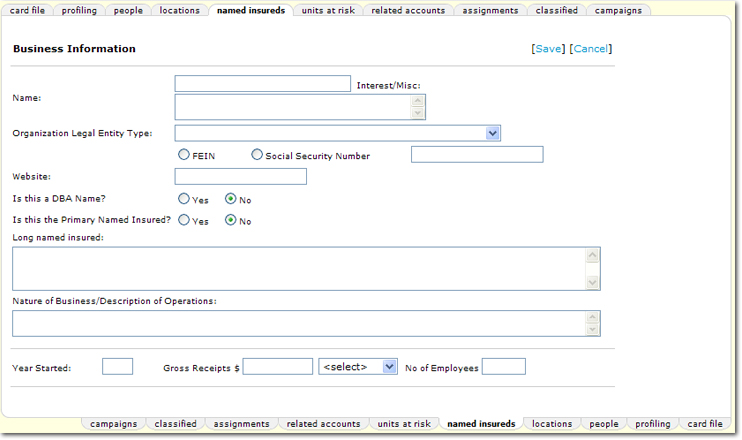
- On the Business Information screen, complete the following:
- Name: Enter the name.
- Interest / Misc: Record information such as interest, percentage of ownership or locations
that pertain to particular named insured. If Lookup is used to complete the ACORD 125 > Other Named Insured section, the information entered in the Interest / Misc box is used to populate the form.
- Organization Legal Entity Type: Select the legal entity type from the list. Items may be added to the list in SETUP > Lookup Management. The default selections are:
- Corporation
- Individual
- Partnership
- FEIN / Social Security Number: Select either the FEIN or Social Security Number option and enter the FEIN code (Federal Employee ID Number) or the Social Security Number using the proper formatting. An example of the correct formatting is given when either option is selected.


- Website: Enter the client’s Web site address. If Lookup is used to complete the ACORD 125 > Applicant > Applicant Web Address section, the information entered in the Website box is used to populate the form.
Note: Do not enter the http:// prefix for the website address, Nexsure will automatically remove the prefix from any links where the address is displayed.
- Is This a DBA Name?: If the name entered in the Name box above is the DBA name, select Yes. Otherwise, select No.
- Is This The Primary Named Insured?: Select either Yes or No. If Yes is selected, the new named insured will be made the Primary. The previous Primary Named Insured will no longer be primary.
- Long named insured: Enter up to 300 characters for the long name of the named insured. If Lookup is used to complete the ACORD 125 > Other Named Insured section, the information entered in the Long named insured box is used to populate the form.
- Nature of Business / Description of Operations: Enter up to a 300 character description for the named insured. If Lookup is used to complete the ACORD 125 > Other Named Insured section, the information entered in the Description box is used to populate the form.
- Year Started: Enter the year the business was started.
- Gross Receipts $: Enter
the business gross receipts amount. In the adjacent list, select
Annually or Monthly.
- Number of Employees: Enter the number of employees.
- After all information is added to theBusiness Information screen, click [Save]. The named insured is added.
Important: The named insured must be added and saved before they can be made inactive. Primary named insureds cannot be inactivated. The Primary designation must first be changed to another named insured; then the [Inactivate] option will be displayed.
- Click [Cancel] to return to the Named Insured Summary screen without saving.
To Edit a Named Insured
- On the Primary menu, click SEARCH. Search for the appropriate client. Be sure to change the Entity selection to Client.
- Click the Details icon next to the appropriate client. The card file tab is displayed by default.
- Click the named insureds tab. The Named Insured Summary screen is displayed.
- Click the Details icon next to the named insured to be edited. The Named Insured or Business Information screen is displayed depending on whether the account is personal or commercial.
- Make any necessary changes to the record and click [Save].
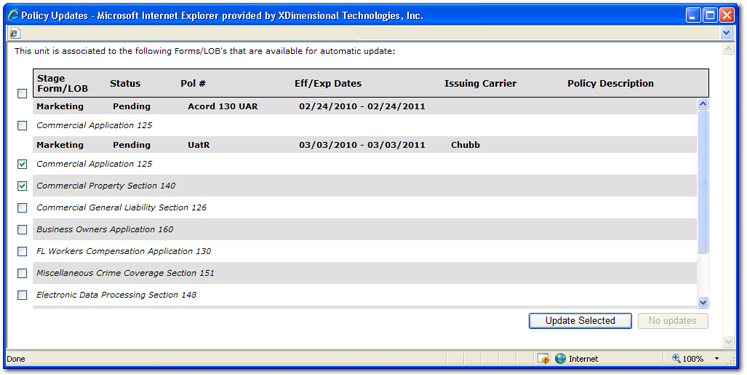
Important: When new units that have been prefilled to a policy either by Lookup or the units at risk tab and are added, modified, or deleted, a dialog box will be displayed once [Save], [Copy], or [Inactivate] are selected. The dialog box will list all policies that the unit is associated with. Any policy in a pliable state will be available for selection in the dialog box. Selecting a policy or policies and then clicking Update Selected will make the change, addition or deletion of the unit to all policies selected.
- Click [Copy] to make a copy of the named insured. The new copy will be available on the summary screen with the text "Copy of" preceding the name of the named insured.
- Click [Inactivate] to inactivate the named insured. The [Inactivate] option will not be displayed on the primary named insured record, see Important note below. Inactive named insureds will not be available in the policy level Lookup options.
Important: Primary named insureds cannot be inactivated. The Primary designation must first be changed to another named insured; then the [Inactivate] option will be displayed.
To Add NAICS / SIC Codes
- In the NAICS / SIC area, click [Add New]. NAICS / SIC information can only be added to the Primary named insured once they have been initially added and saved. Once the [Add New] option is clicked, the NAICS / SIC Information dialog box is displayed.
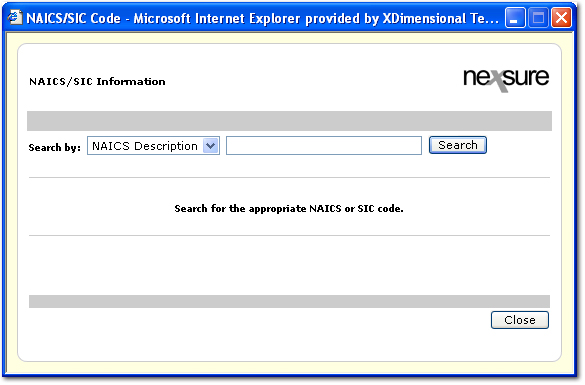
- In the Search by list, select one of the following options:
- NAICS Code
- NAICS Description
- SIC Code
- SIC Description
- Enter the search criteria. Enter at least one character. However to return results faster, enter at least two characters of the description or code.
- Click Search. The search results are displayed in a list. Click on a result item to view the associated description below.
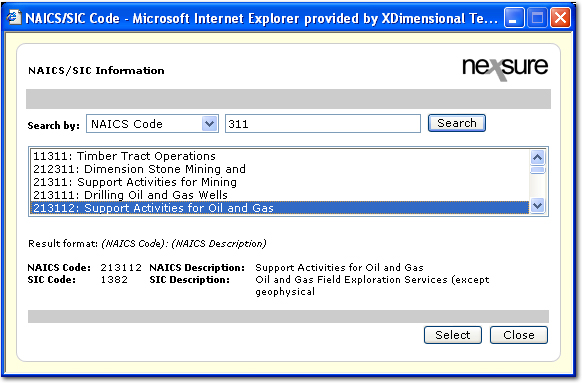
- Once a code has been highlighted in the list, click Select.
Or
Click Close to return to the named insureds tab without making a code selection.
- After clicking Select, a confirmation dialog box is displayed. Select either Yes or No to indicate whether or not the NAICS / SIC code is the primary code for the named insured.
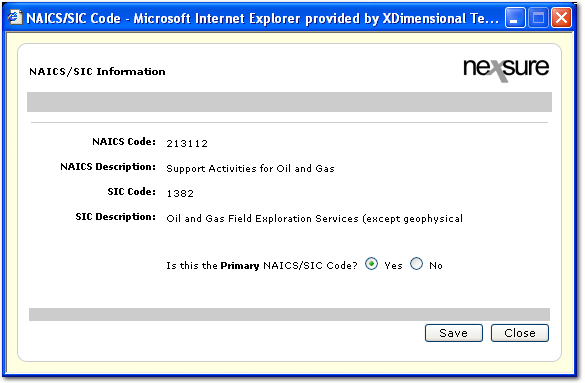
- Click Save. The new code is added to the named insureds tab. Notice that the Primary code cannot be removed. To remove a primary code, select a new primary first then remove the unnecessary code.

Related Topics
Named Insureds Summary