Adding Client Locations
Client locations can be added to the client records. The office locations such as main offices and satellite offices can be entered and can be indicated as the billing address for the client.
Quickly navigate to procedures included in this topic by clicking one of the links below:
To Add a Client Location
To Copy a Location
To Edit a Location
To Activate / Inactivate a Location
To Update the Location Name at the Client Level
To See Where Location Name Appears on Other Screens in Nexsure
To Add a Client Location
- On the Primary menu, click SEARCH. Conduct a search to find the client to update.
- In the search results, click the Details
 icon next to the client to update.
- Click the client locations tab.
- On the client locations
tab, click [Add New]. The Location Information screen is displayed.
- Complete the Location
Information as follows:
- Location
Type: Use
the list to select from the location types entered in Setup.
- Locations Name:
Enter an
identifying location name if desired.
- Primary
Location for this account: The
main address for this entity.
- Billing
Location for this account: The default billing address for this entity.
- Complete the Location Underwriting Information as follows:
- GL Classification: The entry in this box will be available in the Prefill / Lookup to ACORD 126 Schedule of Hazards section. The entry will populate the Classification box.
- GL Class Code: The entry in this box will be available in the Prefill / Lookup to ACORD 126 Schedule of Hazards section. The entry will populate the Class Code box.
- GL Premium Basis Code: The selection in this list will be available in the Prefill / Lookup to ACORD 126 Schedule of Hazards section. The entry will populate the Premium Basis Code selection.
- WC Class Code: The entry in this box will be available in the Prefill / Lookup to ACORD 130 WC Rating Info section. The entry will populate the Class Code box.
- WC Description Code: The entry in this box will be available in the Prefill / Lookup to ACORD 130 WC Rating Info section. The entry will populate the Description Code box.
- Categories, Duties, Classifications: The entry in this box will be available in the Prefill / Lookup to ACORD 130 WC Rating Info section. The entry will populate the Categories, Duties, and Classifications box.
- # Full Time Employees: The entry in this box will be available in the Prefill / Lookup to ACORD 130 WC Rating Info section. The entry will populate the # Full Time Employees box.
- # Part Time Employees: The entry in this box will be available in the Prefill / Lookup to ACORD 130 WC Rating Info section. The entry will populate the # Part Time Employees box.
- Total # Location Employees: The entry in this box will be available in the Prefill / Lookup to ACORD 125 Premises Info Part 2 sub section section. The entry will populate the Total # Location Employees box.
- Est. Annual Remuneration: The entry in this box will be available in the Prefill / Lookup to ACORD 130 WC Rating Info section. The entry will populate the Estimate Annual Remuneration box.
- Rating State / Province: The entry in this box will be available in the Prefill / Lookup to ACORD 130 WC Rating Info section. The entry will populate the Rating State / Province Associated with Location box.
- Interest: The entry in this box will be available in the Prefill / Lookup to ACORD 125 Premises Info Part 2 sub section section. The entry will populate the Interest list.
- City Limits: The entry in this box will be available in the Prefill / Lookup to ACORD 125 Premises Info Part 1 sub section section. The entry will populate the City Limits box.
- Complete the Location Numbers section as follows:
- Location
Numbers: Enter the phone numbers without formatting. Formatting
will be applied after the locations tab has been saved. Select the type of phone number. Extension
numbers may be entered up to 6 characters.
 Adding additional phone numbers...
- Once the new location information has been saved, the Location Summary screen displays. Click the Details icon next to the location to update. Notice [Add New] is now available in the Location Numbers area.
- In the Location Numbers area, click [Add
New].
- Select the Type of the phone number being added.
- Enter the phone
numbers without formatting. Formatting will be applied after the screen
has been saved.
- The extension numbers
may be entered up to 6 numeric characters.
- A Description can be entered to help identify the phone number.
- In the Primary Phone Number area, select Yes or No to indicate if this is the primary phone number for the location.
- Click Save to save the phone number just added.
Or
- Click Close to abort the addition of the new number.
Note: The number of phone
numbers that can be added to each location is only limited by the identity
choices.
- Click the Details icon beside the number to edit.
- Click the Delete
 icon beside the number to delete the entire location record.
- Physical
Address: The physical address for this location.
- Mailing
Address: The
mailing address for this location if different from the physical address.
- Click Save to save the new location information.
Or
Click Cancel to abort any additions or updates.
To Copy a Location
- Locate the appropriate client through SEARCH and click on the locations tab.
- Click the Details icon to view Location Information.
- Click [Copy]. The Copy dialog box is displayed.
- Select the number of copies necessary and click Copy. The location copies are added to the Location Summary screen. Each copy will have the words "Copy of" in front of the Location Name. Select the Details
 icon for each copy and make changes to the Location Information as necessary.
To Edit a Location
- On the Primary menu, click SEARCH. Search for the appropriate client. Be sure to change the Entity selection to Client.
- Click the Details icon next to the appropriate client. The card file tab is displayed by default.
- Click the locations tab. The Location Summary screen is displayed.
- Click the Details icon next to the location to be edited. The Location Information screen is displayed.
- Make any necessary changes to the record and click [Save].
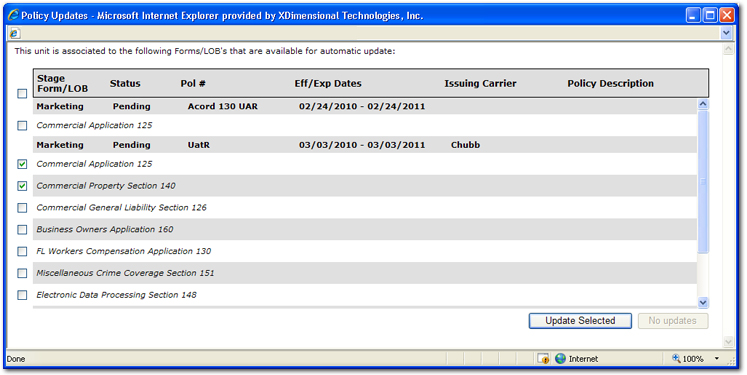
Important: When new units that have been prefilled to a policy either by Lookup or the units at risk tab and are added, modified, or deleted, a dialog box will be displayed once [Save], [Copy], [Inactivate], or [Delete] are selected. The dialog box will list all policies that the unit is associated with. Any policy in a pliable state will be available for selection in the dialog box. Selecting a policy or policies and then clicking Update Selected will make the change, addition or deletion of the unit to all policies selected.
To Activate / Inactivate a Location
- Locate the appropriate client through SEARCH and click on the locations tab.
- Click the Details icon to view Location Information.
- Click [Inactivate] or [Activate] depending on the current Status of the location. The Location Summary screen is again displayed. Any inactive locations are not shown on the default view of the Location Summary screen. Use the Filters to search for inactive locations.
Important: The Primary Location cannot be inactivated until another location is set as primary. The old Primary Location can then be made inactive.
To Update the Location Name at the Client Level
- Locate the appropriate client through SEARCH and click on the locations tab.
- Click the Details icon to view Location Information.
- Enter the new Location Name.
- Click [Save] to update the Location Information.
To See Where Location Name Appears on Other Screens in Nexsure
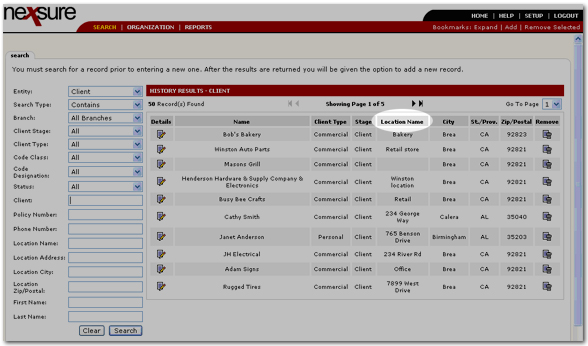
The Location Name appears on the SEARCH screen to help identify the location.
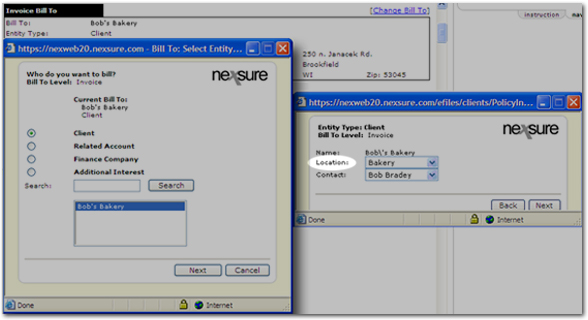
The Bill To address is changed on either the policy info tab or the invoice. To change, click [Change Bill To], choose the Bill To option (such as Client), select the Bill To from the list and click Next. The Location list contains any location names entered at the Client > locations tab. If no location name was entered, the Location list will be empty.
When adding disbursements to a client, the Location Name can be used to help identify the client.

To access the Disbursement dialog box, click [Add New Disbursement] on the disbursements tab.
When adding receive payments for a client, the Location Name can be used to help locate the client.
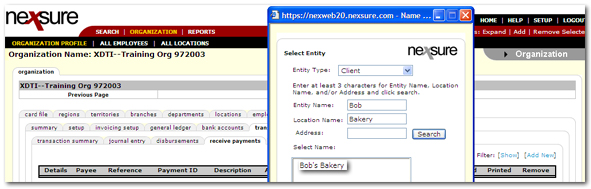
To access the Select Entity dialog box, click [Add New] on the receive payments tab screen.
Related Topics
Locations Summary