eLink Setup
The eLinks option can be set up to pass information from Nexsure into another web-based application or tool. The purpose is to be able to transmit data from Nexsure so that copying and pasting information from Nexsure into another tool is not necessary. In the setup screens for eLinks, the URL to transmit the information and the parameters for the information can be added. Once set up, Nexsure will transmit the information each time the eLinks menu item is accessed.
Important: When using the eLinks option, keep in mind that if specific client information needs to be transmitted, the staff member transmitting the information must be within the specific client's screens in Nexsure. If the data to be transmitted is at the organization-wide level, the staff member can be in any of the Nexsure screens.
To Set Up a New eLink
- On the Utility menu, click SETUP. The Setup Console is displayed.
- On the Setup Console, click Integration > eLinks. The eLink Setup screen is displayed. The eLink Setup screen will give a summary of all the eLinks that have been setup.
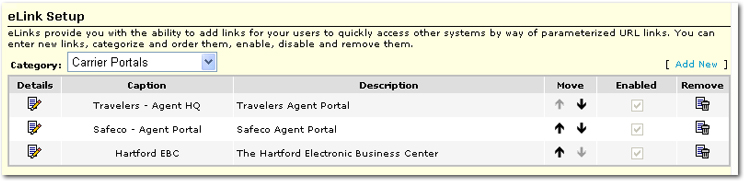
- In the Category list, select the category of the eLink to modify or delete. The elinks that are set up can be organized by categories. Under each Category, the items such as those shown on this summary will be displayed.
- On the eLinks Setup screen, click [Add New]. The entry boxes for the new eLinks are displayed.
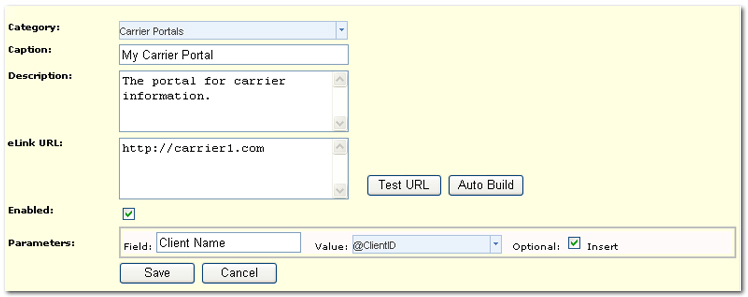
- In the Category box, either select an existing Category or a new Category can by typed into the box. The categories will become the top level menu items under the ELINKS menu. Each eLink that is added will be displayed on a submenu for the selected Category. Choose Default if you do not want the eLink to have a category. The eLink will then be displayed directly on the ELINKS menu.
- In the Caption box, enter the name for the eLink that will be displayed on the ELINKS menu. There is a limit of 25 characters possible in this entry box. This is a required field.
- In the Description box, enter on optional description for the eLink. The Description will only be displayed on the eLinks Setup screen summary.
- In the eLink URL box, enter the URL to which the new eLink will be directed.
- Click Test URL to verify that the eLink URL is valid and will direct the staff member to the appropriate web site. The URL should be properly formatted with http:// or https://.
- If the URL entered already contains the parameters to transmit, click Auto Build to enable the automatic identification of parameters within the URL entered above. The parameters and value from the URL will then be added to the Parameters box below. Once Auto Build has been clicked, the parameters from the eLink URL box are removed. Be sure to check the resulting parameters and values in case some modifications need to be made.
- Select the Enabled check box to indicate whether the eLink will be displayed on the ELINKS menu. An eLink can be created and disabled by clearing the Enabled check box. The elink can later be Enabled when it is necessary again.
- In the Parameters the following options control the data that is transmitted to the web site to which the URL is linked. Make an entry in each of the following:
- Field: Enter the name of the field to which the data will be transmitted. This is a required field with a limit of 25 characters.
- Value: In the Value list, select either from a list of Nexsure database variables or manually enter a static value in plain text to be transmitted to the web site to which the URL is linked. When a static value is entered, the exact value as entered will be passed to where the eLink is pointed. The system encodes the URL so the value can be entered in plain text.
- Optional: Select the Optional check box to indicate the associated Value is not required if the variable is not available in Nexsure.
- Add: Click Add to add a new row to the Parameters summary. Once the Field, Value and Optional entries have been made, click the Add link to add more parameters.

Once a parameter has been set up and Add has been clicked, the Edit link and Remove  icon become available:
- Edit: Click Edit to open the parameter for editing. Once all edits are complete, click Update to save the changes to the parameter.
- Cancel: Click Cancel to exit the parameter without saving changes.
- Remove : Click the Remove icon to delete the parameter completely.
- Click Save to save the eLink and its parameters.
Or
Click Cancel to return to the eLinks Setup screen containing the summary of eLinks that have been setup.
On the eLink Setup summary screen, there are several options for organizing and working with the eLinks:
- Category: Use the Category list to select the Category under which the eLink was set up. Use Default to view eLinks that do not belong to a category.
- Details
 icon: Click the Details icon to edit the setup of the associated eLink.
- Move

 arrow: Click a Move arrow to change the order of the eLinks as they are displayed on the ELINKS menu.
- Remove icon: Click the Remove icon to delete the eLink completely.
Using eLinks