Creating Document Templates
Document templates in Nexsure allow data from the Nexsure database to
be integrated into a Microsoft® Word or Excel® file. Before a template can be appended as an attachment, it must be created in SETUP. Nexsure will add components to Word or Excel to aid in the template creation. Use of this feature requires Microsoft Office 2000, XP or 2003.
To Create a Document Template
- On the ,
click SETUP. (If the setup link
is not available on the Utility menu, contact the Nexsure point person
within the agency for assistance.)
- In the Setup
Console, click Document Templates. The Template tab is displayed.
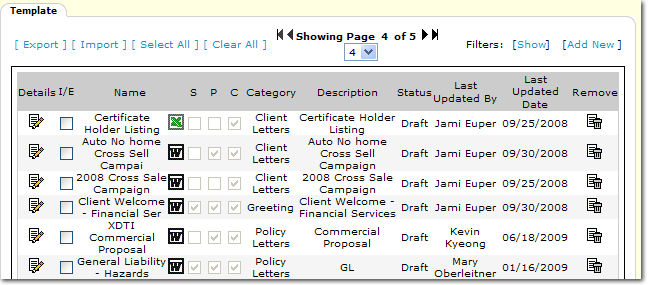
- In the Template tab, click [Add New]. The Document Template dialog box is displayed.
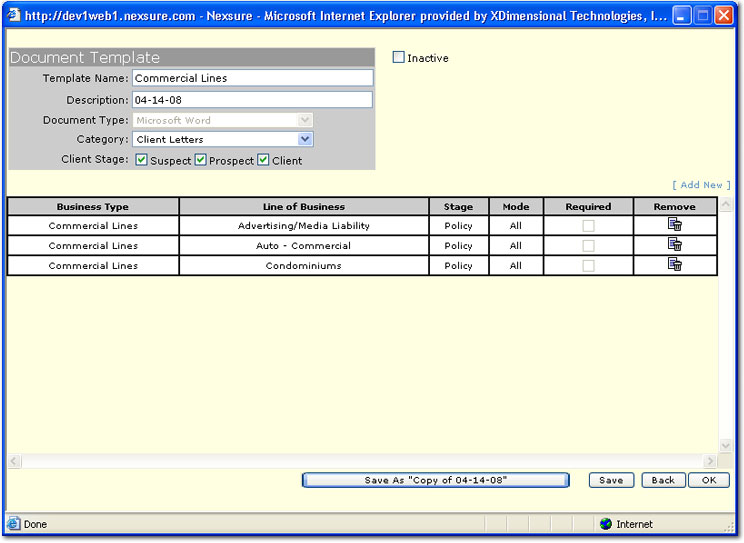
- In the Document Template dialog box, make entries and selections
for the new template.
Complete the following:
- Template
Name: Enter a brief name for the type of document that is
being added so it can be easily recognized from the client > policy level.
- Description: Describe what the document is to be used for.
Note: After the template has been created, the name and description
may be modified.
- Document
Type: Select Microsoft Word or Excel from the list.
- Category: This list can be modified in Lookup
Management to fit the organizations needs.
- Client
Stage: Select a client stage:
- Suspect:
Card file only.
- Prospect:
Marketing policy only, not an in force policy.
- Client:
In force policy.
- Inactive: Select the Inactive check box if the template needs to be made inactive. The inactive setting allows the template to remain in Nexsure but will not be available for selection with adding an attachment. If the Inactive setting is removed, the template is automatically displayed with a Draft status.
- To make the template
specific to a line of business, click [Add
New]. The Nexsure Office Integration > Document Template dialog box is displayed.
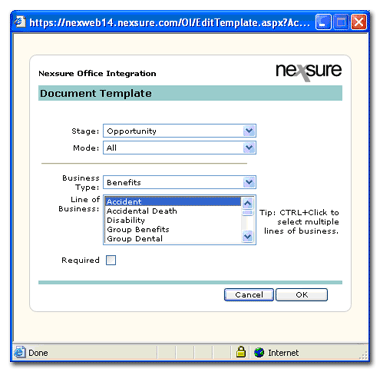
- In the Nexsure Office Integration > Document Template dialog box, make the following selections
pertaining to the line(s) of business:
- Stage: There are three policy stages:
- Opportunity: No
form data included.
- Marketing: Only form
data from marketing included.
- Policies: Only form
data from policies included.
- Mode: There are four policy mode options:
- All: Select if the template can be used for policies that may be in New, Renew or Re-New-Co modes.
- New: Select if the template is exclusively used for newly written policies
and have a policy mode of New.
- Renew: Select if the template is exclusively used for renewal policies and
has a policy mode of Renew.
- Re-New-Co: Select if the template is exclusively used for policies that are a renewal
to the agency but new to the carrier and have a policy mode of Re-New-Co.
- Business Type: There are five group types to use to help filter through the line
of business list:
- Benefits
- Bonds
- Commercial Lines
- Financial Services
- Personal Lines
- Line of Business: Select the line of businesses that the
document will be used on by holding down the control key and clicking
with the right mouse button. The line of business must be added in order
to use the document on that line of business at client > policy level.
Tip: CTRL +
Click will allow multiple lines of business to be selected.
- Required
Check Box - Use this check box only if it is required to have the
selected line of businesses in order to access the letter at client > policy
level.
Note: Adding
lines of business will allow fields that are pertinent to the line of business available
for selection when creating the template.
- Click OK,
Word or Excel will open, it may take several seconds to open.
- Nexsure will add the
Office Integration Toolbar to
the Word or Excel menus.

- Click Nexsure
Fields to display the XML Tree. The
XML Tree contains the data fields as they appear in the policy form:
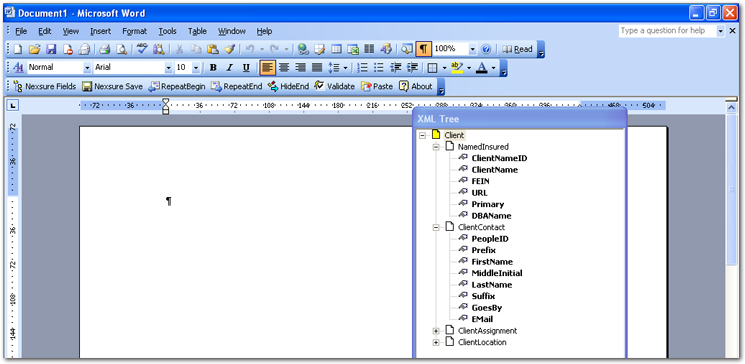
Tip: For easier
manipulation between the Word document and XML Tree, resize
them so they are side by side.
Note: The Validate Document button can be used
to validate the structure of custom fields such as HideBegin and HideEnd.
Use to help locate problems related to custom fields.
- Position the cursor where
the field will need to be in the template.
- In the XML
Tree click the
 in front of each section to expand the available Nexsure fields.
- In the Word document
window:
- On the Insert
menu, click Date and Time.
- Select the format.
- Check the Update automatically
checkbox. This
will automatically update the date on documents created using this template.
- Click OK.
- Click at the end of the
date field and enter down 1 or 2 spaces.
- In the XML Tree:
- From the Client Contact
section, click and drag the First Name and drop it into the Word document.
The Nexsure
Field Properties dialog box will display:
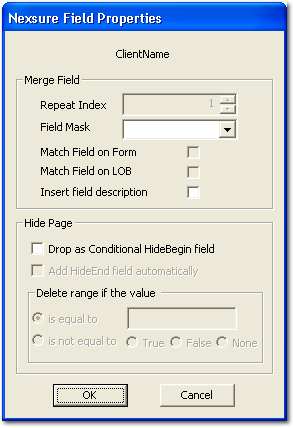
- Merge
Field / Repeat Index: When generating a schedule the repeat index
will allow a specific number of items to generate. For
example, if the number 10 is entered only the first 10 vehicles on a policy
will be generated. Setting
the Repeat Index value to zero will allow ALL vehicles on the policy to
generate to the document.
Note: To ensure all data is returned when using only the Repeat Index of -0-, do not add another row touching the bottom row of the table with the scheduled items.
- Field
Mask: Select a decimal format (if applicable) to display numeric
values. Leaving
‘Select Mask’ in the drop-down applies no formatting.
- Match
Field on Form: Select this option if the field populates a specific
form type. For
example, to merge a field from a state-specific form, this option must
be selected. If Match Field on Form
is not selected,
any state-specific fields will not be merged.
- Match
Field on LOB: Select this option if the field will only populate
a specific line of business.
- Hide Page: The Hide Page options are used to hide entire pages
if the line of business is not present, such as in a proposal. They can
also be used around tables to hide data that does not exist.
 More...
When using the Hide Page feature it is easiest
to view the document in Normal
mode (On Word's View menu, select Normal).
This view will display all the page breaks so they may be included above
or below the HideBegin / HideEnd fields.
HideBegin
is the starting position where the page is to be hidden if the condition
is met. Place the cursor where the HideBegin is to be placed.
It is important to select a field that will
identify the section to be omitted from the document.
Tip: If the line of business does not exist, consider choosing the Policy
ID field. This field is unique and therefore, if it does not exist
the page will be suppressed as desired. Find the Policy ID field after
selecting the line of business in the XML tree.
Drag the field toward the document to display
the Nexsure Field Properties.
Select Drop as Conditional Hide Page
field. Notice that the “Find the Policy ID field after selecting
the line of business in the XML tree check box is checked. Leaving this
box checked automatically places the HideEnd field immediately after the
HideBegin. This HideEnd field will need to be moved to the end of the
page that will be omitted if the Policy ID in this case is not found.
In this scenario, if the field has no data
the desired effect is to omit the page, so leave the Delete page if the
value is field blank.
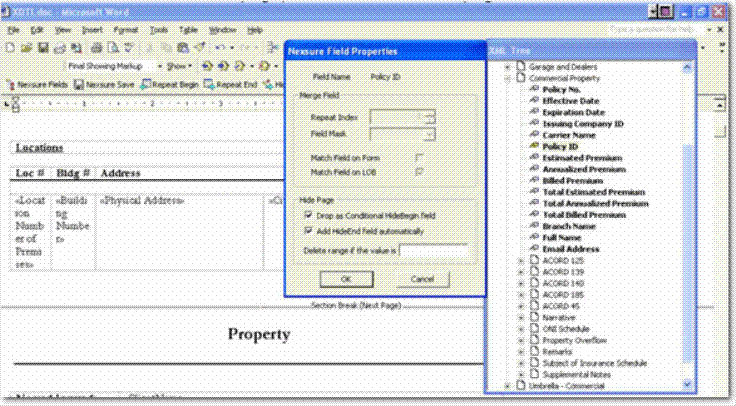
The HideBegin and HideEnd is dropped into
the document. Notice that the HideBegin was placed above the Section Break
(Next Page). Doing this will suppress any empty pages.
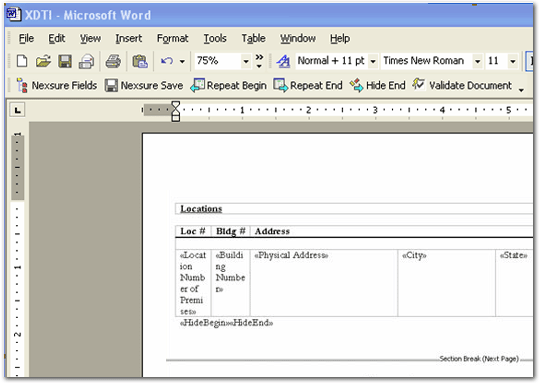
Note:
If the HideEnd box was not checked in the Nexsure Field Properties window,
place the cursor where the HideEnd should be placed and click the HideEnd
button on the toolbar to add.
Select the HideEnd field and cut (use the
scissors on the toolbar) and paste (click the clipboard on the toolbar)
the HideEnd field at the end of where the page should be hidden.
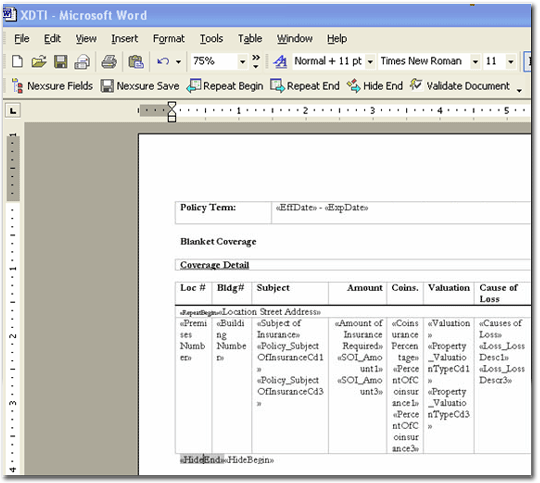
Note:
For every HideBegin there must be a corresponding HideEnd. If not, when
the document is merged these HideEnd fields will print on the merged document.
Use the printed merge fields to help troubleshoot where missing fields
may be.
If it is necessary to have more than one
HideBegin before the HideEnd is added, they can be 'nested'. However,
the HideBegin may not be embedded in (IF) conditional statements. If more
than one condition should be met to determine if the page or section should
populate, add as many HideBegin fields as needed. It works like a compare
string, making sure the condition is met before populating the section.
Make sure to add a HideEnd for each HideBegin after all conditions are
added:
<<HideBegin>>
Section information entered here
<<HideBegin>>
Section information entered here
<<HideBegin>>
Section information entered here
<<HideEnd>>
<<HideEnd>>
<<HideEnd>>
Tip: If the
items in the Nexsure Field Properties box are irrelevant to the field
being inserted in the template click OK without entering any data to bypass
the dialog box.
Use HideBegin and HideEnd, not only to hide pages but to hide sections or coverages between the page hides. In most cases a <<HideBegin>> and <<HideEnd>> will be used instead of an IF statement.  More...
- To return the words Any Auto, use the Hide Page check boxes from the Nexsure Field Properties dialog box. Click the Drop as Conditional HideBegin field and notice the Add HideEnd field automatically is checked as well. Leave the Add HideEnd field automatically box checked to have the <<HideEnd>> field placed in the document with the <<HideBegin>> field.
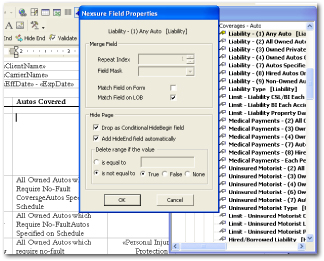
- To translate a true/false answer to a more meaningful response, select the True, False or None options with the <<HideBegin>> equal to or not equal to. Nexsure automatically selects is equal to or (in this case) is not equal to by the selection of the data field type. True means the field is not blank or a Yes answer on the form. False means the field is blank or is a No answer on the form. None means the field is blank.
- Click OK to insert the <<HideBegin>> and <<HideEnd>> fields.
- Place the cursor between the <<HideBegin>> and <<HideEnd>> fields.
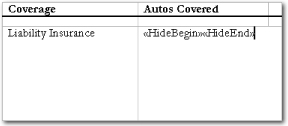
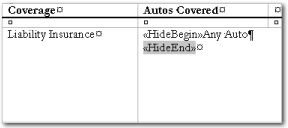
- Enter the text (Any Auto) and any formatting necessary such as a carriage return ¶ as shown. If the field result is True, then the text and formatting will return. If the field is not equal to True, the text will be omitted when the document is merged.
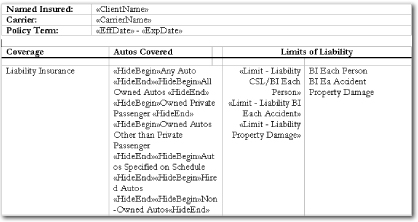
- Repeat steps through 5 to add more <<HideBegin>> and <<HideEnd>> fields as necessary.
- Click OK.
- In the Word document window, click at the end of the First Name, press the space bar.
- In the XML Tree, click and drag Last
Name and click OK.
- In the Word document window, click at the end
of the Last Name, hit the Enter key to tab down.
- In the XML Tree, click and drag Mail Address 1 and click OK.
- In the Word document window, click at the end
of the Mailing Address, hit Enter
key to tab down.
- In the XML Tree, click and drag Mail City and click
OK.
- In the Word document window, click at the end
of City, put in a comma, press the space bar.
- In the XML Tree, click and drag Mail State and
click OK.
- In the Word document window, click at the end
of the State and press the space bar.
- In the XML Tree, click and drag Mail
Zip Code field and click OK.
- In the Word document window:
- Click at the end of the Zip Code, press the enter key to tab down two or three spaces.
- Type “Dear”, press the space
bar.
- In the XML Tree, click and drag the First Name field.
- Click OK.
- In the Word document
window:
- Click at the end of the
First Name, put in a comma, press the enter
key to tab down two or three spaces.
- Type out the message, i.e., “Here is
the vehicle schedule you requested. Let
me know if you have any questions.”
- Press the Enter
key to tab down two or three spaces.
- While still in the Word
document window, to create a table:
- On the Table
menu, point to Insert and click
Table.
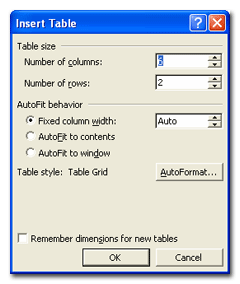
- Number of columns: 6
- Number of rows: 2
(the number
of rows will automatically increase to accommodate all items)
- Click OK.
- Click in the top row
of the first column and type Year, tab to next row and type Make, and continue
across the top row until each column has a heading.

|
|
Year
|
Make
|
Model
|
Vin
|
Compl
|
Collision
|
|
|
|
|
|
|
|
|
Tip: The Word
document may be customized by changing the font size, using formatting such as bold or italics,
centering rows, etc., as seen in the screen shot above.
Note: If an
item is dragged over from the Nexsure Fields window and dropped into an
inappropriate spot, highlight it and drag it to the correct spot or it
can be deleted by hitting the Delete key.
- Place the cursor in the
2nd row under Year.
- In theXML Tree:
- Click on
 in front of
ACORD 1271 CA (or applicable form).
- Click on
 in front of Vehicles.
- Click on
 in front of Record.
- Click and drag the Year field.
- Using the Nexsure Field Properties dialog box, select:
- Repeat Index: Set to
zero to pull all records.
- Field Mask: Select Mask.
- Table Name: 1 for 1st
table.
- Click OK.
- In the Word document
window:
- Click at the end of Year
and tab to move the cursor over to the second row under the Make column.
- Repeat steps 29 and 30
for Make, Model and Year.
- Move the cursor to the
second row under the Compl column.
- In the XML Tree:
- Click and drag the Comprehensive
Deductible field.
- Using the Nexsure Field
Properties dialog box, select:
- Repeat Index: Set to
zero to pull all records.
- Field Mask: $#,##0
- Table Name: 1 for 1st
table.
- Click OK.
- In the Word document
window:
- Click at the end of Comp
Deductible and tab to move the cursor over to the second row under the Collision column.
- Repeat steps 31 and
32 for Collision Deductible.
- In the Word document
window:
- Click under the table.
- Enter down 1 or 2 lines.
- Type “Thank you,”.
- Enter down 1 or 2 lines.
- In the XML Tree, under the Client Assignment, click and drag the First Name field
and click OK.
- In the Word document
window, click at the end of the First Name, press the space bar.
- In the XML Tree:
- Under the Client Assignment,
click and drag Last Name field.
- Click OK.
- In the Word document window, the Repeat Begin
 and Repeat End
  buttons are used in conjunction with schedules to repeat data in a format other than a one row data layout.
  More...
- To insert the <<RepeatBegin>> field, place the cursor in front of the text or field inside the table and click the Repeat Begin button.

- To insert the <<RepeatEnd>>, place the cursor in the last column after the last text field or layout and then click the Repeat End button on the toolbar. Notice that the <<RepeatEnd>> field is inserted into the document.
- In the Word document, on the Nexsure toolbar, the Paste option is available for moving blocks of information in the template.
 More...

Use the following guidelines to move sections of the template using the Paste button:
- Place the cursor at the beginning of the section to move.
- On the Insert menu, click Bookmark.
- Give the beginning bookmark a name and click Add.
- Place the cursor at the end of the section to move.
- On the Insert menu, click Bookmark.
- Give the ending bookmark a name and click Add. Now a block of text has been defined by the beginning and ending bookmarks.
- Decide where the block of text should be moved to and place the cursor in the new position.
- Click Paste. The Bookmarks dialog box is displayed.
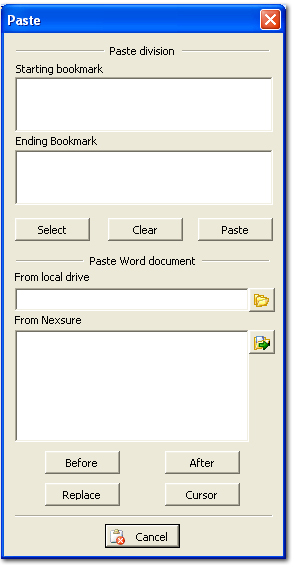
- In the Bookmarks dialog box, in the Starting bookmark area, select the name of the beginning bookmark. The beginning of the block of text to move.
- In the Ending Bookmark area, select the name of the ending bookmark. The end of the block of text to move.
- Click Paste. The selected text is moved to the new location in the template. All other text is moved to accommodate the repositioning.
- Another option in the Bookmarks dialog box is to click Select instead of Paste. Clicking Select will simply leave the block of text highlighted.
- The Paste button can also be used to insert other Word documents into the template.
 More...
To insert a Word document into the template, use the following guidelines:
- Click Paste. The Paste dialog box is displayed.

- The document to insert can be from a local drive or from Nexsure. Click the Folder
 icon to navigate to a document on the local drive or click the Nexsure Folder
  icon to select a document from Nexsure to insert.
- The following options are available for positioning the document to be inserted:
- Before: Insert document before starting or ending bookmark selected.
- After: Insert document after the starting or ending bookmark selected.
- Replace: Insert the document between starting and ending bookmarks selected.
- Cursor: Insert document where cursor is currently placed in the open document.
- Cancel will close the Paste dialog box without further modification to the template.
Note: The same feature is also available at the policy detail level however, the From Nexsure selections are limited to documents attached to the specific policy.
- When the document has
been completed, click the File menu in Word and click Nexsure Save As.
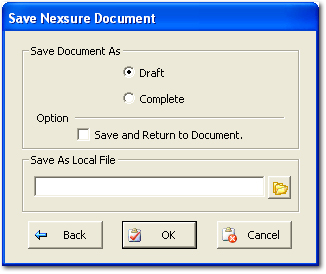
- In the Save Document As area, the following selections are available:
- Draft: Selecting
Draft allows edits to be made to the template by anyone having access
to SETUP > Document Templates.
- Complete: By selecting
Complete only the author of the template, or an administrator, can make
changes to the template.
- In the Option area, select the Save and Return to Document check box to keep the template open after a save. Otherwise, the template will be saved to Nexsure and closed.
Important: Templates being created or updated must be saved every four hours or the changes may be lost.
- To save the template to a local drive, in the Save As Local File area, click the Folder
 icon to browse to a local folder to save the template outside of Nexsure.
Or
To save the template to Nexsure, click OK. The document template will be saved to Nexsure.
Once the
template is in Nexsure, it can be added as a client or a policy attachment.
Tip: Save the template as
a draft so that it may be modified later. An
agency logo may be added to the top of the page.
Note: When
deleting a Nexsure field in Excel, the label must be deleted as well as
the comment associated with it. Simply
deleting the label of the cell will not delete the comment. The comment
may be deleted by deleting the entire row, or right clicking the cell
and selecting Delete Comment. The same care must be taken when moving
the field to another cell in a spreadsheet. To move a Nexsure field, right-click
the field and select Cut, then paste it to another cell.
Attachments
Using Document Templates


 More...
 More...

 and Repeat End
  buttons are used in conjunction with schedules to repeat data in a format other than a one row data layout.
  More...
 More...
 More...