You are here: Organization Menu > Accounting Summary > Transactions > Deposits
Deposits

To Make a Deposit

  1. On the Primary Menu, click ORGANIZATION.
  2. Click the accounting tab.
  3. Click the transactions tab.
  4. Select the deposits tab.
  5. Select the bank account you wish to deposit to from the drop-down list.

  1. Click [Add New Deposit].

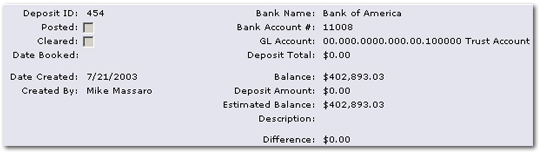
Note: A deposit ID number will be assigned by Nexsure and will be displayed in the deposit header. The deposit header also displays other general information such as the date created, who created the deposit and bank account information including balances.

  1. Enter the Date Booked (current date is default).
  2. Select the Deposit Method, such as EFT (electronic file transfer).
  3. Enter the Anticipated Total dollar amount.  
  4. Enter a description and internal note (optional) to help identify the deposit.
  5. In the Quick Navigation panel, click Receipt.  This will show a list of existing received payments.
  6. Select the payments you wish to deposit, or click Select All.
  7. Click Post to post the deposit to the general ledger, or click Abort to cancel the deposit.

Note: When posting to locked periods, keep the following in mind. If the staff member has rights to post to a locked period a dialog box is displayed letting the staff member know they are posting to a locked period. If the staff member does not have rights to post to a locked period, the only option is to change the date booked to an unlocked period. More information on rights for staff members to post to locked periods can be found at Transactions > Reconciliation Security.