Invoicing Setup
Invoicing setup establishes settings for Fees, Taxes and Receive Payments defaults used during invoicing and receipt of payments.
To Access the Invoice Setup Tabs
- On the Primary menu, click ORGANIZATION.
- Click the accounting > invoicing setup tab. The four invoicing setup tabs appear with the fees tab open by default.

The fees tab lists non-premium charges that can be added to a client invoice.
To Add a New Fee
- On the fees tab, click the [Add New] link. The Fee Details screen appears.
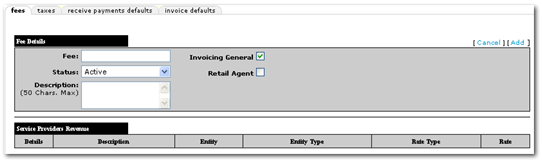
- In the Fee box, enter a title for the new fee.
- From the Status drop-down list box, select whether or not the new fee is an Active fee.
- In the Description box, enter a brief description of the new fee.
- Next to Invoicing General, select the check box to indicate that the fee is available for all standard invoicing processes.
Note: If the Invoicing General check box is selected and not the Retail Agent check box, the Fee will be available for client billing and only to Retail Agent billing through the client file.
- Next to Retail Agent, select the check box to indicate that the fee is available for retail agent billing.
- Click the [Add] link to complete the addition of the new fee. The [Add New] links then become available for the Service Providers Revenue and Branches screens.
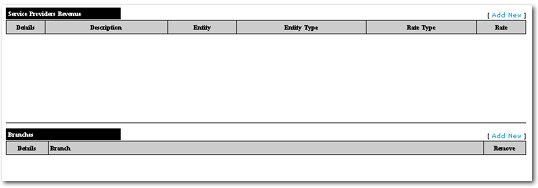
To Add a New Service Providers Revenue Entry
- On the Service Providers Revenue screen, click the [Add New] link. The Service Provider dialog box is displayed.
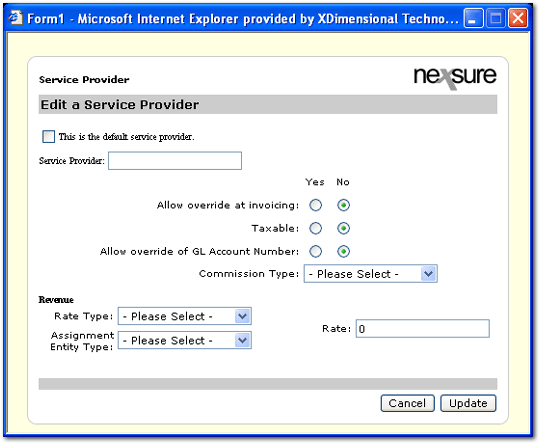
- If this service provider will be the default, click the check box next to This is the default service provider. The default service provider fee is used by Nexsure’s automatic NSF charge for returned checks.
- In the Service Provider box, enter the name of the service provider.
- Select the Yes or No option next to Allow override at invoicing to indicate whether or not the following fields can be edited during invoicing:
- Description
- Commission Type
- Taxable
- Rate Type
- Rate
- Entity Type
- Entity
- Select the Yes or No option next to Taxable to indicate whether or not taxes can be applied to the fee during invoicing.
- Select the Yes or No option next to Allow override of GL Account Number to indicate what account will be offset by the fee amount during the invoicing process.
- Yes: The fee amount will be offset to any branch level income or expense account.
- No: The fee amount will be offset to the agency fee income account.
- In the Commission Type field, select a commission type to be applied to a fee from the drop-down list box. The following selections are available:
- People: Applies people commission to the fee for employees.
- Branch: Applies agency commission to the fee.
- Branch & People: Applies branch and people commission to the fee.
- No Commission: No commissions are applied to the fee.
- From the Rate Type drop-down list box, select one of the following options to indicate whether or not the fee is a flat dollar amount or a percentage of the premium.
- In the Rate box, enter either the flat dollar amount or the percentage for the fee.
- From the Assignment Entity Type drop-down list box, make a selection to determines if the fee amount is offset to the Branch (income or expense) or Carrier (payable).
- Click the Update button to add the Service Provider selections to the fees tab. Or, click the Cancel button to return to the fees tab without saving selections.
To Add a New Branches Entry
- On the Branches screen, click the [Add New] link. The Add Branches dialog box is displayed.
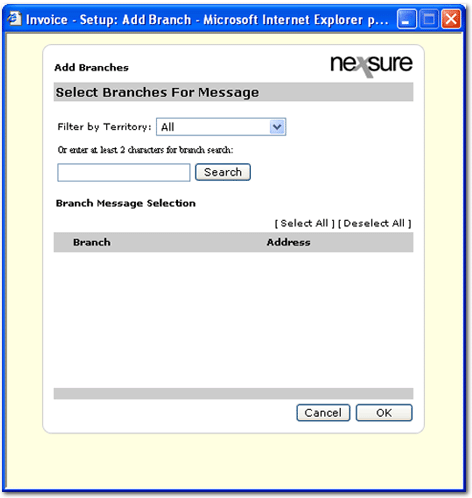
- From the Filter by Territory drop-down list box, select a territory.
- In the Search box, enter at least two characters of the name of a branch.
- Click the Search button. The branch search results appear.

- In the Branch column, select the check boxes next to the branches to include.
- When all branch selections have been made, click the OK button to add the selections to the Branches screen. Or, click the Cancel button to return to the Branches screen without saving changes.
Adding a Tax