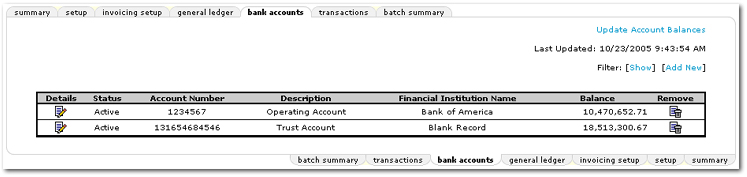
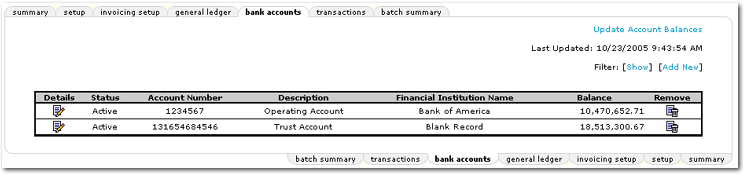
Bank Accounts
The bank accounts tab lists all bank accounts that have been added at the respective levels (organization or territory). Bank accounts added at the organization level are for bank activity having to do with the operations for the organization and region. Adding a trust account at the organization level does not allow access to any premium-related activity.
Bank accounts for premium-related activities are added at the territory level. Bank account activity at the territory level includes both operations accounting and any premium accounting activity for the associated branches.
To Navigate to the Bank Accounts Tab
- On the ,
click ORGANIZATION.
- If necessary, select the tab for the level that the bank account is located at, i.e. territories tab and then select the Details
 icon for entity.
- Click the accounting tab.
- Click the bank accounts tab. The bank account summary screen displays
all bank accounts associated with the selected organization level.
To Search for an Existing Bank Account
If there are more bank accounts added than will fit on the first screen, navigation arrows are available. The search filter may also be used to search for a specific account.
- Navigate to the bank accounts tab using the guidelines above in To Navigate to the Bank Accounts Tab.
- On the bank accounts tab, click [Show]. The Search Criteria and Sort Order screens are displayed.
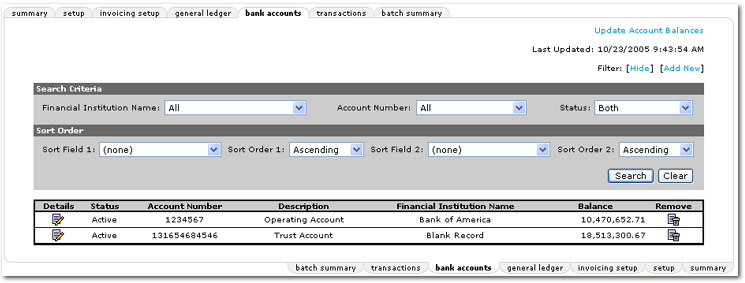
- In the Search Criteria area, the following options are available:
- Financial Institution Name: Select the name of the financial institution from the list.
- Account Number: Select the account number from the list.
- Status: Select whether the financial institution is Active, Inactive, or Both.
- In the Sort Order area, the following options are available:
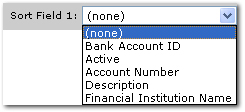
- Sort Field 1: Select a column heading from the Sort Field 1 list. The search results will be sorted by the column selected in the Sort Field 1 list. The available selections are:
- Sort Order 1: Select either Ascending or Descending to set the order of the policies returned. Ascending will set the order from A-Z. Descending will set the order from Z-A. The Sort Field 1 will be the first sort and Sort Field 2 will be the sub sort.
- Sort Field 2: Select a column heading from the Sort Field 2 list. The search results will be sorted by the column selected in the Sort Field 2 list. The available selections are:

- Once all search and sort options have been selected, click Search. The search results are displayed.
Or
Click Clear to remove all search and sort selections.
Note: Clicking [Hide] will close the search screen.
To Add a New Bank Account
Bank accounts can be associated with any level of the organization
that has books. Financial entities must be added prior to adding a bank account, for detailed instructions refer to Financial Entity Setup.
- Navigate to the bank accounts tab using the guidelines above in To Navigate to the Bank Accounts Tab.
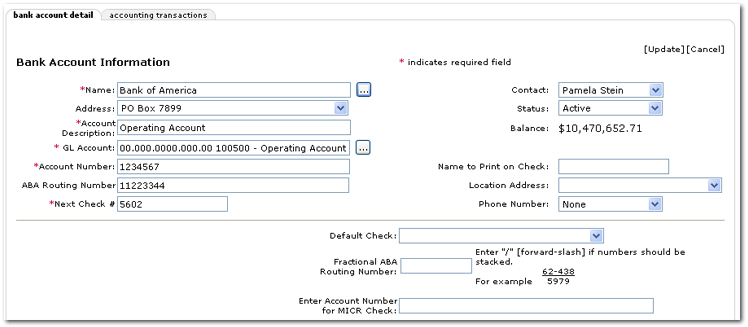
- Click [Add New]. The bank account detail tab is displayed.

- In the Name box, click the
ellipsis
 button to search for and select a bank account
that has been previously entered into the system. Bank
accounts are entered as a Financial
Entity on the search screen.
button to search for and select a bank account
that has been previously entered into the system. Bank
accounts are entered as a Financial
Entity on the search screen.
- In the Address list, select the address of the Financial Entity that will hold the new bank account.
- In the Account Description box, enter a description
for the account, such as, Operating Account.
- In the GL Account box, click the ellipsis
button to search
for and select a general ledger account number that has been previously entered into the system. General ledger numbers are assigned on the general ledger tab.
- In the Account Number box, enter the account number for the bank selected.
- In the ABA Routing Number box, enter the ABA
Routing Number found on the bottom of the check (Optional).
- In the Next Check # box, enter the number
for the next check to be issued.
- In the Contact list, the contact will
be automatically filled with the information supplied when the financial entity
was entered into the system. If multiple contacts have been added to the financial entity, use the list to select the appropriate contact.
- In the Status list, the status will be set automatically according to the status of the contact for the financial entity.
- In the Balance area, the balance is automatically calculated based on entries for the account.
- In the Name to Print on Check box, enter the name that prints on checks exactly as it will appear on the check.
- In the Location Address list, select the address of the location that is issuing the check. The address is one that was added to the organization or territory level. If no location name has been added to the address, only the address is displayed in the list.
- In the Phone Number list, select the phone number for the location issuing the check. Only the phone numbers added to the selected location are available for selection.
- In the Default Check list, select the default check style. The default style can be changed when ready to print the check.
- Select the Add 2nd Signature Line check box to indicate that a second signature line is necessary when a check is printed. If this checkbox is selected, the second signature line message described below will also be printed on the checks.
- In the 2nd Signature Line Message box, enter a memo for the check that relates to the second signature line.
- In the Fractional ABA Routing Number box, enter the fractional ABA routing number to appear on the check. Enter a (/) forward-slash if numbers should be stacked.
- In the Enter Account Number for MICR Check box, enter the account number necessary for MICR check coding.
- Click [Update].
To View Bank Account Details
- Navigate to the bank accounts tab using the guidelines above in To Navigate to the Bank Accounts Tab.
- Click the Details icon next to the bank account to view.
- The bank
account detail tab gives account information as well as
the account numbers and contact information. If any information on this tab is changed, [Update]
must be clicked for the changes to take effect.
Note: Multiple
financial entities with the same name can be distinguished by selecting
a different address from the Location Address list.
Accounting Transactions