Preparing a Vista Workstation for Nexsure
Use this topic to ensure that settings for Windows Vista using Internet Explorer 7 are set for Nexsure to function correctly and for the Nexsure control to download and install. Also listed towards the bottom is basic maintenance which should be performed often to ensure Nexsure is performing properly. The basic maintenance steps should also be the first line of troubleshooting when any issues occur within Nexsure.
Quickly navigate to procedures included in this topic by clicking one of the links below:
To Set Up the Workstation
To Install Nexsure Agent
To Perform Basic Maintenance
To Clear Temporary Files
To Set Up the Workstation
- In Internet Explorer, click Tools > Options > Internet Options.
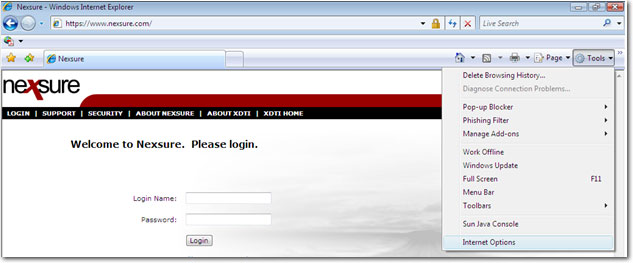
The Internet Options dialog box is displayed.
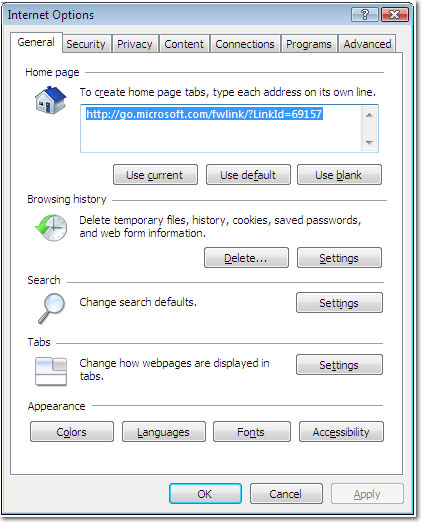
- On the General tab, in the Browsing History area, click Settings. The Temporary Internet Files and History Settings dialog box is displayed.
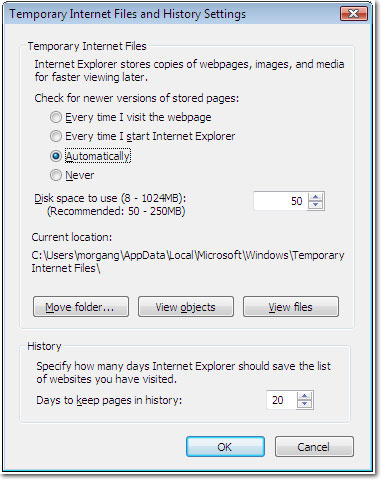
- In the Temporary Internet Files and History Settings dialog box, in the Check for newer versions of stored pages area, select Automatically.
- In the Temporary Internet Files and History Settings dialog box, click OK. The Internet Options dialog box is again displayed.
- In the Internet Options dialog box, click the Security tab.
- On the Security tab, in the Select a zone to view or change security settings area, click Internet.
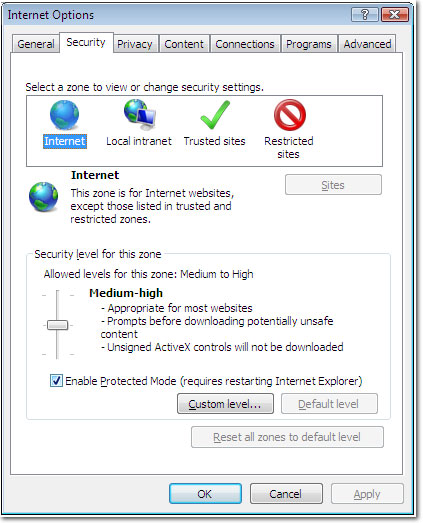
- On the Security tab, in the Security level for this zone area, click Custom level. The Security Settings - Internet Zone dialog box is displayed.
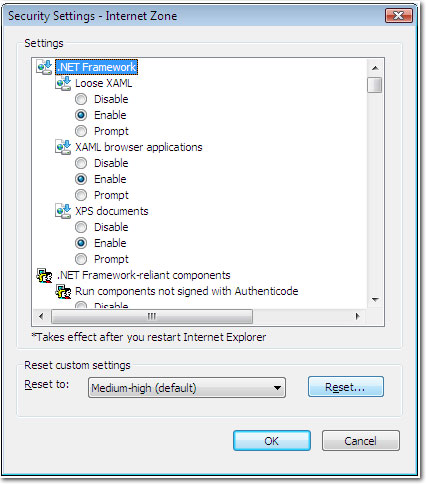
- In the Security Settings - Internet Zone dialog box, in the Reset custom settings area, select Medium-high and click Reset.
- In the Settings area, enable the following settings:
- Automatic prompting for ActiveX controls
- Automatic prompting for file downloads
- In the Security Settings - Internet Zone dialog box, click OK. The Internet Options dialog box is again displayed.
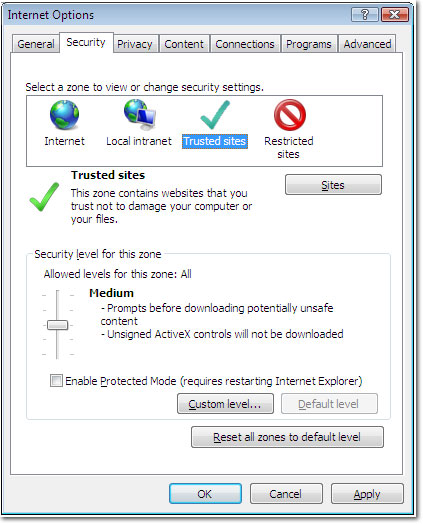
- On the Security tab, in the Select a zone to view or change security settings area, click Trusted sites.
- In the Security level for this zone area, click Custom level. The Security Settings - Trusted Sites Zone dialog box is displayed.
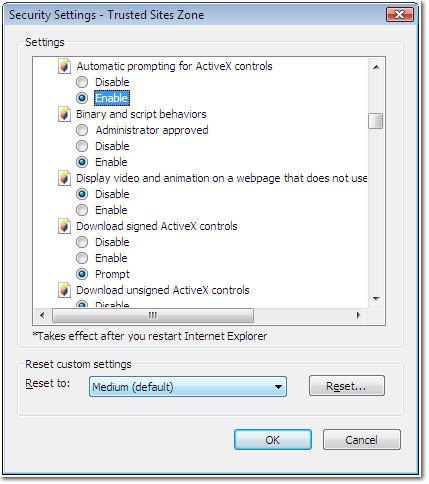
- On the Security Settings - Trusted Sites Zone dialog box, in the Reset custom settings area, select Medium and click Reset.
- In the Settings area, enable the following settings:
- Automatic prompting for ActiveX controls
- Automatic prompting for file downloads
- In the Security Settings - Trusted Sites Zone dialog box, click OK. TheInternet Options dialog box is again displayed.
- In the Internet Options dialog box, the Security tab will still be displayed. On the Security tab, Trusted sites should still be highlighted in the Select a zone to view or change security settings area.
- On the Security tab, click Sites. The Trusted Sites dialog box is displayed.
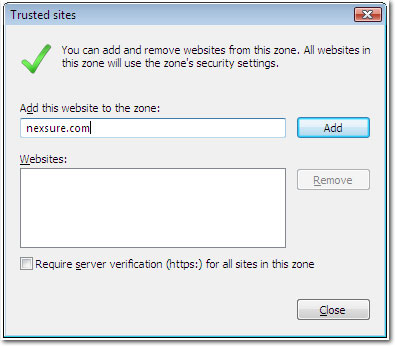
- In the Trusted sites dialog box, in the Add this website to the zone area, enter nexsure.com and click Add. Nexsure.com is added to the Websites area.
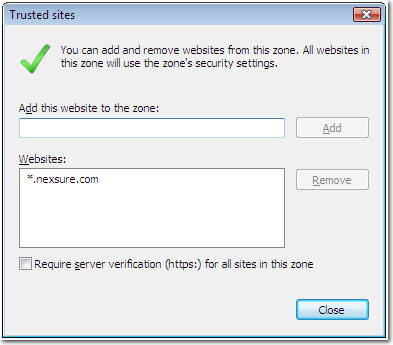
- In the Trusted sites dialog box, clear the Require server verification (https:) for all sites in this zone check box.
- In the Trusted sites dialog box, click Close. The Internet Options dialog box is again displayed.
- In the Internet Options dialog box, click the Privacy tab.
- On the Privacy tab, click Sites. The Per Site Privacy Actions dialog box is displayed.
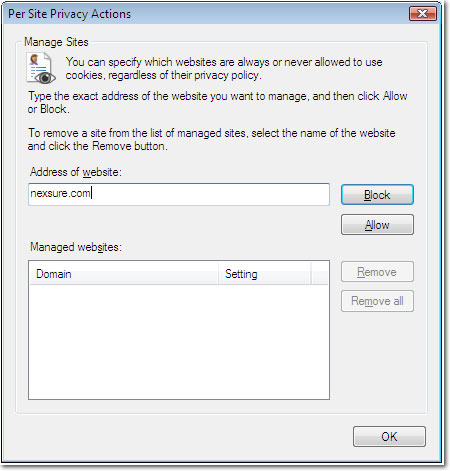
- In the Address of website area, enter nexsure.com and click Allow. Nexsure is added to the Managed websites area with a Setting of Always Allow.
- In the Per Site Privacy Actions dialog box, click OK. The Internet Options dialog box is again displayed.
- On the Privacy tab, in the Pop-up Blocker area, verify whether the Turn on Pop-up Blocker option is selected. If the option is selected, in the Pop-up Blocker area, click Settings. The Pop-up Blocker Settings dialog box is displayed.
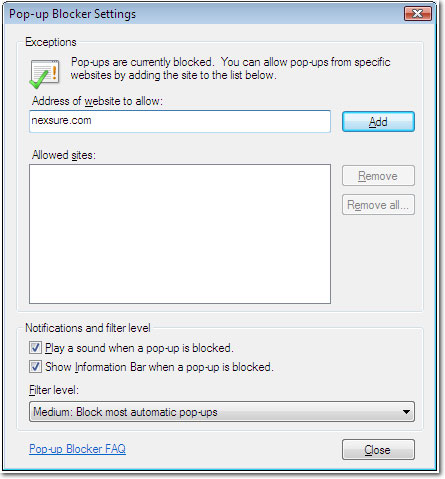
- In the Address of website to allow box, enter nexsure.com and click Add. Nexsure.com is added to the Allowed sites area.
- In the Notifications and filter level area, select both check boxes and set the Filter level to Medium.
- In the Pop-up Blocker Settings dialog box, click Close.
- In the Internet Options dialog box, click OK.
To Install Nexsure Agent
To download the Nexsure Agent (which controls batch printing and eServices), use the following guidelines to turn off the User Account Control (UAC). Once the control is turned off, the Nexsure Agent can be updated.
- Click the Windows
 button > Control Panel. The Control Panel Home screen is displayed.
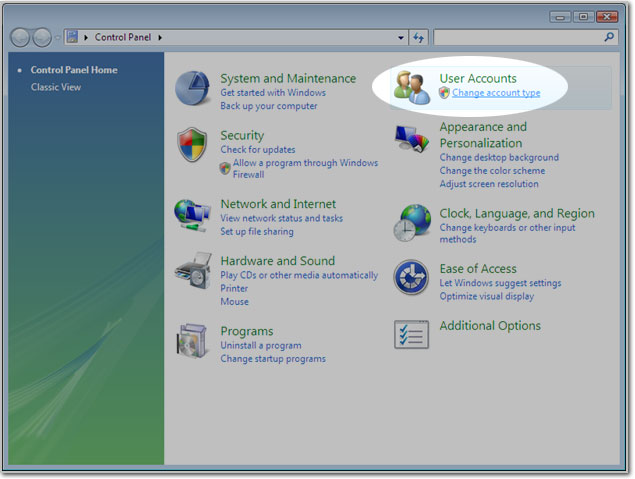
- In the Control Panel Home screen, click User Accounts. The User Accounts screen is displayed.
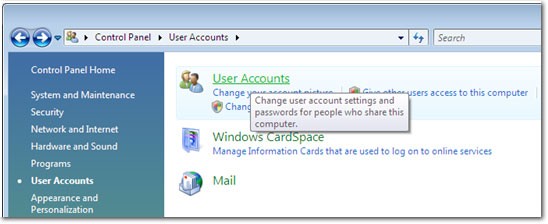
- In the User Accounts screen, click User Accounts. The Make changes to your user account screen is displayed.
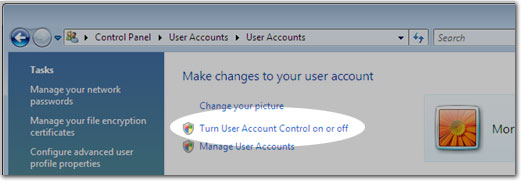
- In the Make changes to your user account area, click Turn User Account Control on or off. The Turn on User Account Control (UAC) to make your computer more secure screen is displayed.
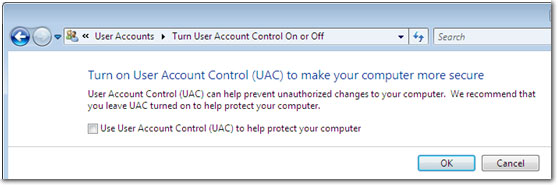
- Clear the Use User Account Control (UAC) to help protect your computer check box.
- Click OK. A prompt may be displayed asking to restart the computer.
- Log back into Nexsure and start a batch print or eService function. A prompt will be displayed asking to install the Nexsure Agent. Once it has been downloaded and installed the UAC can be turned on again.
Important: If the UAC is turned on again, the staff member must remember to turn the UAC off again when downloading an updated Nexsure agent that may be released during a hot fix or version release.
To Perform Basic Maintenance
- Clear the temporary Internet files by clicking Tools > Internet Options in Internet Explorer.
- In the Internet Options dialog box, click the General tab.
- On the General tab, in the Browsing History area, click Delete. The Delete Browsing History dialog box is displayed.
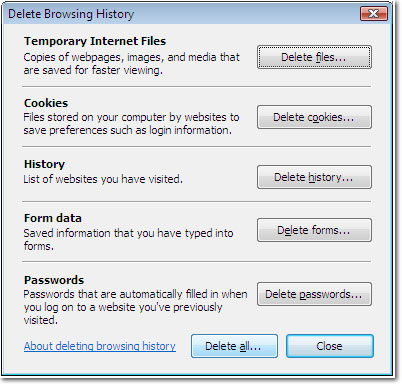
- In the Delete Browsing History dialog box, click Delete files or Delete all. The items are deleted.
- Click Close. The Internet Options dialog is again displayed.
- Verify any installed Add-ons and Version numbers by clicking the Programs tab in the Internet Options dialog box. The Programs tab is displayed.
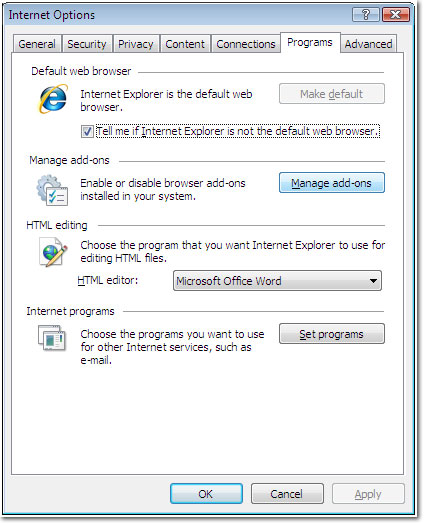
- In the Manage add-ons area, click Manage add-ons. The Manage Add-ons dialog box is displayed. WebUpdate Control should be displayed in the list of add-ons if the staff member has logged in to Nexsure previously. This control is downloaded and installed upon logging in to Nexsure. The control is a onetime install until a newer version is released in a hot fix or version post at which time the new version will again download and install upon login
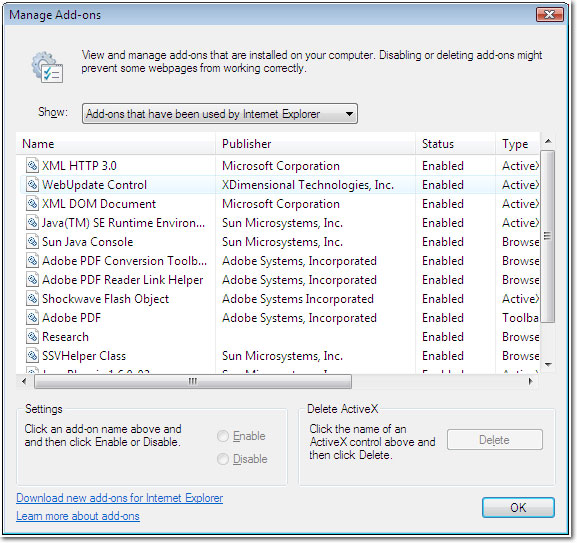
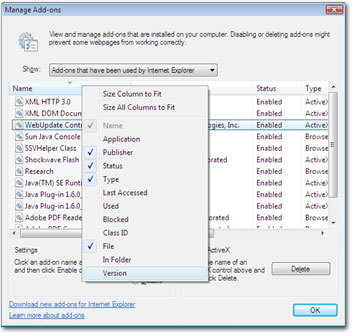
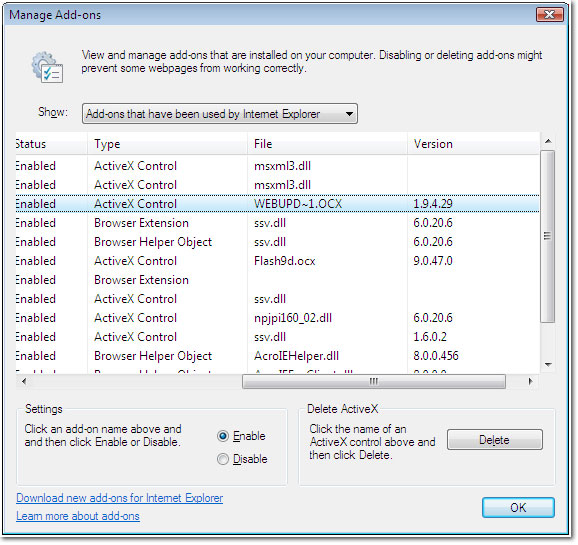
- In the Manage Add-ons dialog box, right-click on the Name column header and select Version. Selecting Version will add another column to the view by which the version number of the WebUpdate Control add-on can be verified.
- Once the Version column has been added, scroll to the right to view the version number. Click OK when the verification is complete.
To Clear Temporary Files
- On the desktop, click the Windows button > All Programs > Computer. The Computer window is displayed.
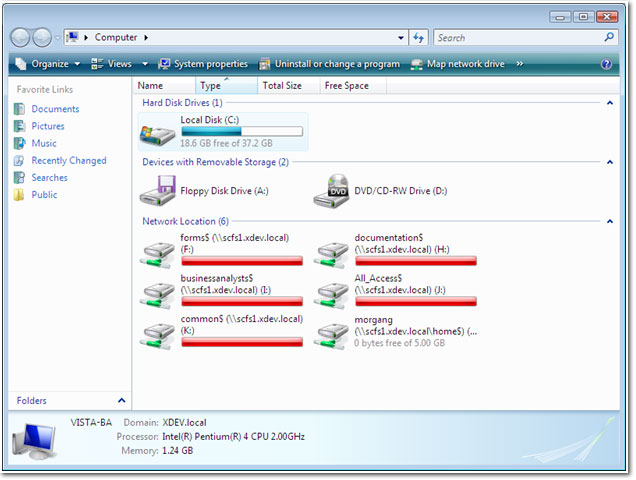
- In the Computer window, double-click on the Local Disk (C:). The Local Disk (C:) window is displayed.
- Double-click to navigate through the following folder path: Users > (user name) > AppData > Local > Temp.
- Once in the Local > Temp folder, click a folder or file to highlight it and press CRTL + A. All folders and files in the Temp folder should now be highlighted.
- Before deleting, make sure that all programs are closed as well as programs that stay in the computer memory (RAM) for quick launch later (Terminate and Stay Resident - TSR programs). Press DELETE. The Temp folder is now emptied.
Important: Delete the temp files often. Clearing the local temp files and the Internet temp files should always be the first troubleshooting action to take if Nexsure is showing errors or odd behaviors are occurring. The odd behaviors may be due to the way Windows® and Internet Explorer® handle files.
Preparing a Workstation for Nexsure
Nexsure Control