Retail Agent Access Security
When setting up the retail agent access system, there are a few steps that must be taken beyond the basic configuration and setup. The security rights must be in place for the agent to view the necessary information through the portal.
Quickly navigate to procedures included in this topic by clicking one of the links below:
To View the Retail Agent Access User Rights Template
To Create a New Template
To Copy and Modify an Existing Template
To View the Retail Agent Access User Rights Template
- On the Utility menu, click SETUP.
- In the Setup Console, click Security Administration. The security policy tab is displayed.
Important: Rules on the security policy tab that are marked with an asterisk do not apply to the client access portal.
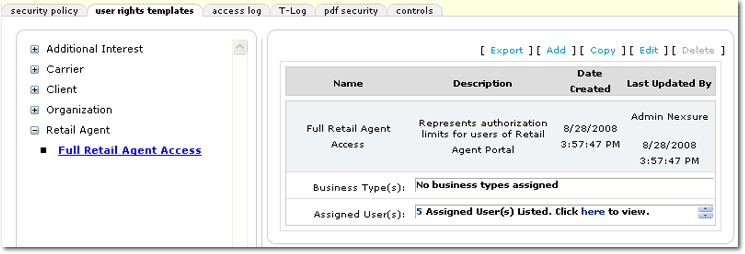
- Click the user rights templates tab. The template selections are displayed.
- In the navigation tree, click Retail Agent > Full Retail Agent Access. The template titled Full Retail Agent Access is the base template that contains full access for the agents to all features in the Retail Agent Access portal.
Creating User Rights Templates for Retail Agent Access
The Full Retail Agent Access template gives rights to all functions in the Retail Agent Access portal. The Full Retail Agent Access template cannot be altered as it is the default template. If a more limited view of the portal is necessary for the agent, templates can be created containing only the necessary rights. There are two ways to approach creating a new template:
- Add a new template and then select each of the rights that are desired. This approach is best if only a few rights will be necessary in the new template.
- Copy the Full Retail Agent Access template and then remove the rights that are undesirable. This approach is best if most of the base rights are necessary in the resulting template.
To Create a New Template
- On the Utility menu, click SETUP.
- In the Setup Console, click Security Administration. The security policy tab is displayed.
- Click the user rights templates tab. The template selections are displayed.

- On the user rights templates tab, click [Add]. The new template form is displayed.
- In the Template Name box, enter a name for the new template.
- In the Description box, enter a description for the template.
- In the Entity Type list, select Retail Agent. The associated Resource Groups are displayed.
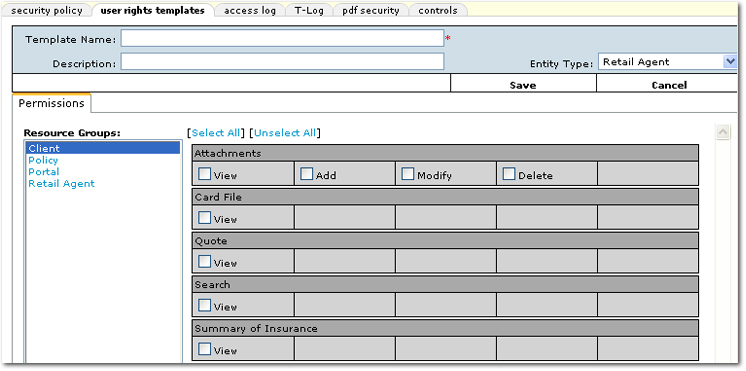
- In the Resource Groups box, select each of the resource groups as necessary and then select the associated rights check boxes.
- Once all selections have been made, click Save on the Navigation Toolbar.
Or
Click Cancel on the Navigation Toolbar to exit the template without saving changes.
Tip: See the following security topics for details about the retail agent access portal specific rights:
- Retail Agent Access Announcements Security
- Retail Agent Access Attachment Security
- Retail Agent Access Card File Security
- Retail Agent Access Certificate Security
- Retail Agent Access Commission Security
- Retail Agent Access Contacts Security
- Retail Agent Access Contracts Security
- Retail Agent Access Locations Security
- Retail Agent Access Policies Security
- Retail Agent Access Proof of Coverage Security
- Retail Agent Access Quote Security
- Retail Agent Access Resource Center Security
- Retail Agent Access Search Security
- Retail Agent Access Summary of Insurance Security
- Retail Agent Access Verification Security
To Copy and Modify an Existing Template
- On the Utility menu, click SETUP.
- In the Setup Console, click Security Administration. The security policy tab is displayed.
- Click the user rights templates tab. The template selections are displayed.
- In the navigation tree, click Retail Agent > Full Retail Agent Access. The template titled Full Retail Agent Access is the base template that contains full access for the user to all features in the Retail Agent Access portal.
- Click [Copy]. The new template form is displayed along with the Resource Groups for the copied template.
- In the Template Name box, enter a name for the new template.
- In the Description box, enter a description for the template.
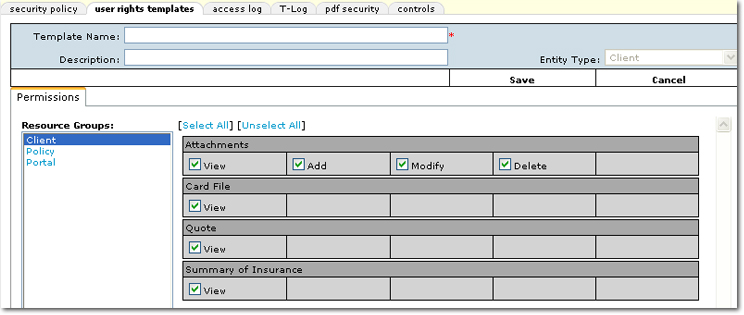
- In the Resource Groups box, select each of the Resource Groups and then clear the associated rights check boxes as necessary. See the Tip in the To Create a New Template section for information on specific security rights.
- Once all selections are complete, click Save on the Navigation Toolbar.
Or
Click Cancel on the Navigation Toolbar to exit the template without saving changes.
Retail Agent Access General Configuration
Retail Agent Access Main Menu